Metrici QR Code Recognizer v2.4
User Manual for End Users and System Administrators

Welcome! This user manual will guide you through using and configuring the Metrici QR Code Recognition application. This software automatically recognizes QR codes from video streams and can send this information to servers for further processing, such as access control, inventory tracking, or document processing.
Table of Contents
- 1. Overview
- 2. Main Window
- 3. Getting Started
- 4. Video Sources
- 5. Detection Window
- 6. QR Recognition Engine Settings- Working mode and trigger
- 7. External Trigger
- 8. QR Code Detection Settings
- 9. Reporting and Check Actions
- 10. Door Opening and Door Light
- 11. GPS Integration
- 12. Weight Scale Integration
- 13. Radar Integration
- 14. Live View
- 15. Settings Management
- 16. INI Configuration File
1. Overview
The Metrici QR Code Recognizer system is designed to:
- Connect to video cameras - Supports IP cameras, RTSP streams, HTTP video streams, and many other video sources
- Detect QR codes - Automatically identifies QR codes from the video feed
- Process and record codes - Saves recognized QR codes with timestamps, images, and location data
- Integrate with external systems - Can send code data to servers for access control, inventory tracking, or verification
- Work with additional sensors - Can connect to GPS devices, weight scales, and radar sensors for enhanced tracking
2. Main Window
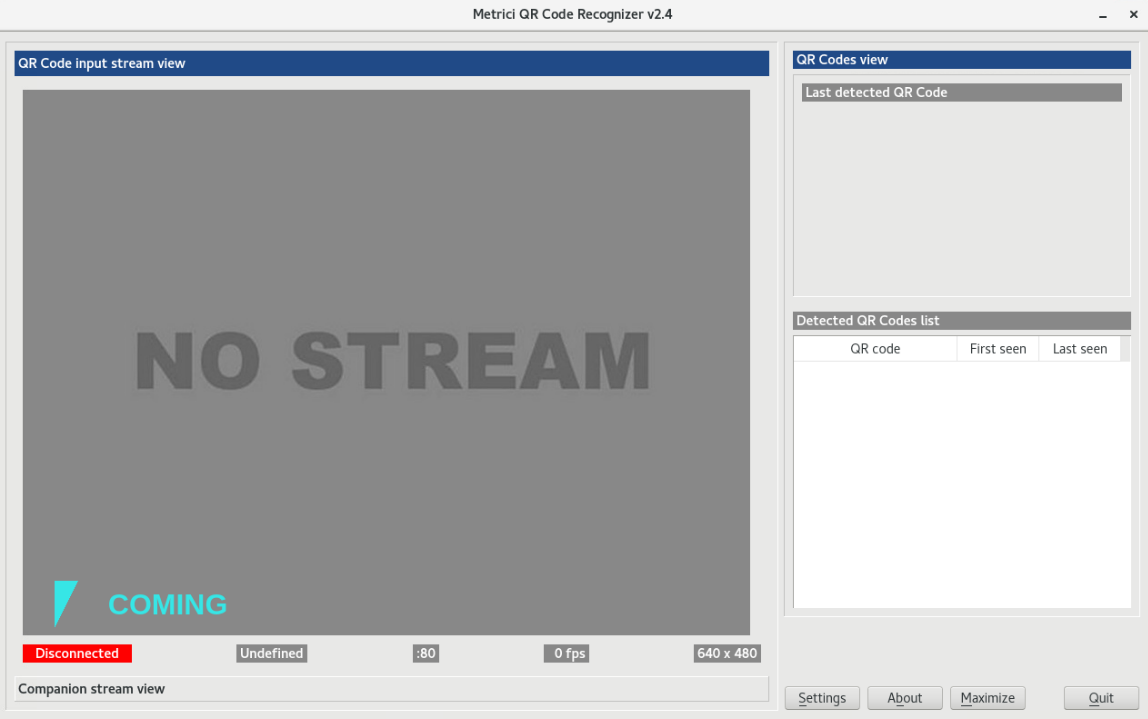
The main window is divided into several sections:
2.1 Video Display Area
The left side of the window displays:
- Main Input Stream - Shows the video feed from your primary camera
- Companion Stream - (Optional) Shows video from a second camera for additional coverage
Each video display shows:
- Connection status (Connected, Disconnected, Connecting)
- Stream type and address
- Frame rate (FPS)
- Video resolution
2.2 QR Code Information Panel
The right side displays:
- Last Detected Code - Shows the most recently recognized QR code
- Code Table - A list of all detected QR codes with timestamps and confidence scores
- Statistics - Frame counts and processing rates
2.3 Control Buttons
- Settings - Opens the configuration window to customize all application settings
- About - Shows version information and license details
- Min/Max - Toggles between fullscreen and windowed mode
- Quit - Closes the application
3. Getting Started
3.1 Initial Setup
- Connect your camera - Ensure your IP camera is connected to the network and functioning
- Launch the application - Set it in Foregreound with watchdog to iniate settings
- Open settings - Click the Settings button
- Configure video source - Go to the "Input Stream" section and select your camera type
- IP Address: Enter the camera's IP address or hostname (without http://)
- Port: Enter the HTTP port (default HTTP is usually 80)-other protocols have different ports
- Write username and password for the camera
- Limit FPS: Set to 0 for unlimited, or specify a maximum frame rate
- Save settings - Click Save to apply your configuration
- Test the connection - The video feed should appear in the main window
3.2 First Time Configuration
For optimal performance, follow these steps:
- Adjust the Detection Window to cover only the area where QR codes will appear
- Set the QR Recognition Engine Working Mode based on your needs
- Configure Reporting URLs if you want to send code data to a server
- Set up Barrier Control if you need automatic gate opening based on QR codes
4. Video Sources
The application supports many types of video sources. You need to configure both the Input Stream (main camera) and optionally a Companion Stream (secondary camera).
4.1 Input Stream Configuration
Stream Type
Select the type of video stream from your camera. If you don't have a specific supported brand, just choose Generic. The application supports:
| Type | Description |
|---|---|
| HTTP ACTi MJPEG | ACTi cameras using MJPEG over HTTP |
| RTSP ACTi H264 | ACTi cameras using H264 over RTSP |
| HTTP Android MJPEG | Android-based cameras |
| HTTP Arecont MJPEG | Arecont Vision cameras |
| HTTP Axis MJPEG | Axis cameras using MJPEG |
| RTSP Axis MJPEG | Axis cameras using RTSP with MJPEG |
| RTSP Axis H264 | Axis cameras using RTSP with H264 |
| RTSP Bosch MJPEG | Bosch cameras using MJPEG |
| RTSP Bosch H264 | Bosch cameras using H264 |
| HTTP Dahua MJPEG | Dahua cameras using MJPEG |
| HTTP Diviotec MJPEG | Diviotec cameras |
| RTSP Diviotec H264 | Diviotec cameras using H264 |
| HTTP Generic MJPEG | Generic MJPEG cameras |
| RTSP Generic MJPEG | Generic RTSP MJPEG streams |
| RTSP Generic H264 | Generic RTSP H264 streams |
| HTTP Hikvision MJPEG | Hikvision cameras using MJPEG |
| RTSP Hikvision H264 | Hikvision cameras using H264 |
| HTTP Mobotix MJPEG | Mobotix cameras using MJPEG |
| HTTP Mobotix MxPEG | Mobotix cameras using their MxPEG format |
| RTSP Mobotix H264 | Mobotix cameras using H264 |
| RTSP Mobotix MOVE H264 | Mobotix MOVE cameras |
| HTTP Novus MJPEG | Novus cameras |
| RTSP Novus H264 | Novus cameras using H264 |
| RTSP Pelco MJPEG | Pelco cameras |
| ROSEEEK RAW | ROSEek camera raw stream |
| HTTP Samsung MJPEG | Samsung cameras |
| RTSP Samsung H264 | Samsung cameras using H264 |
| HTTP Sony MJPEG | Sony cameras |
| RTSP Sony H264 | Sony cameras using H264 |
| RTSP Uniview H264 | Uniview cameras |
| HTTP Vivotek MJPEG | Vivotek cameras |
| HTTP VLC MJPEG | VLC media server streams |
Stream Address
Enter the network address of your camera. This could be:
TCP Port
The network port number your camera uses. Common defaults:
- HTTP streams - usually port 80
- RTSP streams - usually port 554
- Custom cameras - check your camera documentation
Username and Password
If your camera requires authentication, enter the credentials here. Leave blank if your camera is open access.
FPS Limit
Limits the number of frames processed per second. Lower values reduce CPU usage but may miss fast-moving QR codes. Recommended values:
4.2 Companion Stream
The companion stream provides a second video camera view. This is useful when:
- You need multiple angles of the same QR code
- You want to cover a larger area than one camera can see
Configuration options are identical to the Input Stream.
5. Detection Window
The detection window defines the specific area within the video frame where the application will look for QR codes. This optimization :
- Improves accuracy - Reduces false detections from non-code areas
- Increases speed - Smaller area = faster processing
- Reduces CPU usage - Less area to scan
5.1 Detection Window Active
Enable or disable the detection window. When disabled, the entire video frame is scanned for QR codes.
- Enabled (checked) - Only scan within the defined window
- Disabled (unchecked) - Scan the entire video frame
5.2 Window Position and Size
| Setting | Description |
|---|---|
| Origin X (origx) | Horizontal starting position of the detection window (left edge) |
| Origin Y (origy) | Vertical starting position of the detection window (top edge) |
| Resolution X (resx) | Width of the detection window in pixels |
| Resolution Y (resy) | Height of the detection window in pixels |
5.3 Items Direction
Set the direction of item movement (0-360 degrees). This is used for:
- Statistical analysis of item flow
- Event triggering (e.g., trigger when items are entering vs. leaving)
- Filtering codes based on direction
- Coming - Items going in the set direction are coming
- Leaving Items going in the set direction are leaving
- Useful to use to filter events on the Interface when needed or to keep track of items inside
- You have item detection sensors (photoelectric sensors, infrared beams)
- You want precise control over when codes are captured
- You want to save CPU resources by only processing when needed
- Duplicate entries for the same code
- Multiple triggering for one item
- Overloaded reporting systems
- Enabled - Faster processing, best for single-item scanning
- Disabled - Captures all codes, best for multi-code or high-density areas
- Grant access (open barrier)
- Deny access (keep barrier closed)
- Log only (no action)
- Trigger alert
- Entry and exit points
- Multiple security checkpoints
- Staging area control
- Mobile scanning installations
- Recording the exact location where each code was scanned
- Verifying the location of recorded scans
- Unconnected - GPS device not connected or not detected
- Error - GPS device connected but not functioning
- Low Signal - GPS signal weak, position may be inaccurate
- Good Signal - GPS working properly with accurate position
- Latitude - North/South position (-90 to +90 degrees)
- Longitude - East/West position (-180 to +180 degrees)
- Enabled - Frames are sent to the live view server
- Disabled - Live view is not active
- Click the Settings button in the main window
- Configure all desired settings in the various sections
- Click Save to apply changes
- The settings are saved to a configuration file
- Click Cancel in the settings window
- Changes are discarded
- Previous settings remain active
The direction is set using a dial control. Arrange the arrow accordingly:
6. QR Recognition Engine Settings- Working mode and trigger
The QR Recognition Engine settings control how the application processes video to find and read QR codes.
6.1 Working Mode
| Mode | Description | Use Case |
|---|---|---|
| Continuous | Constantly analyzes every frame for QR codes | High-volume scanning, no external trigger available |
| Started by Trigger | Only analyzes when triggered by external signal | Lower CPU usage, controlled capture timing, lower false positives |
7. External Trigger
An external trigger allows sensors or devices to tell the application when to capture QR codes. This is useful when:
Trigger Type
| Type | Description |
|---|---|
| None | No external trigger (uses continuous mode) |
| Barionet 50 I1-I4 | Barionet 50 device with input 1, 2, 3, or 4 |
| Metrici Virtual | Virtual trigger via network connection |
Trigger Seconds
The duration (in seconds) the detection engine remains active after being activated. Set this based on how long items take to pass through the detection area.
8. QR Code Detection Settings
8.1 Same Code Delay
After a QR code is detected, the application waits this many seconds before detecting the same code again. This prevents:
Recommended value: depending on item flow speed
8.2 Minimum Code Length
The minimum number of pixels a recognized QR code must contain to be considered valid. This filters out false detections.
8.3 Maximum Code Length
The maximum number of pixels a recognized code can have.
8.4 Single Code Mode
When enabled, the application will only process and report the first QR code found in each frame. When disabled, all detected QR codes in a frame are processed.
9. Reporting and Check Action
The application can send recognized QR code information to external servers for processing, validation, or storage.
9.1 Reporting URL
The web address where recognized code data is sent. The server typically stores this information in a database.
Format: http://your-server.com/io/qr/reporting_event.php
9.2 Check Action URL
The web address used to check recognized codes against a database. The server can respond with instructions such as:
Format: http://your-server.com/io/qr/check_action_event.php
9.3 Check Action Authentication Key
A security key facilitates communication between egines and database. It is to be obtained from Metrici Interface when setting the location and cameras, being generated by Metrici.
9.4 Send Trigger
The application can send a network trigger when a QR code is recognized:
| Setting | Description |
|---|---|
| Trigger Address | IP address or hostname of the device to trigger |
| Trigger UDP Port | Network port on the target device |
Common uses include triggering external systems like barrier controllers, displays, sorting systems, or alarm systems.Or another Metrici detection engine.
10. Door Opening and Door Light
The application can automatically control two separate doors/barriers/gates etc based on QR code validation results.
10.1 First Device
| Setting | Description |
|---|---|
| Open Door URL | HTTP address to send a command that opens the first device |
| Close Door URL | HTTP address to send a command that closes the first device |
| Open-Close Delay | Time (seconds) between opening and automatically closing the barrier |
10.2 Door Light ON URL
Same settings as the first one, for a second gate or barrier at the same location.
Use cases for dual barriers:
11. GPS Integration
The application can receive GPS coordinates from a connected GPS device. This is useful for:
11.1 GPS Status
Shows the current status of the GPS connection:
11.2 Latitude and Longitude
Shows the current GPS coordinates in decimal degrees format:
12. Weight Scale Integration
The application can integrate with industrial weight scales. When connected, the weight of the item is recorded along with the QR code.
12.1 Weight Scale Type
| Type | Description |
|---|---|
| None | No weight scale connected |
| Barix Cantar-I30 | Barix Cantar-I30 weight scale device |
12.2 Weight Scale Address
The network address (IP or hostname) of the weight scale device.
12.3 Weight Scale TCP Port
The network port the weight scale uses for communication (default varies by device).
13. Radar Integration
The application can integrate with radar speed sensors to capture item speed along with QR codes.
13.1 Radar Type
| Type | Description |
|---|---|
| None | No radar connected |
| Metrici Observer Radar | Metrici radar device naturally integrated with the detection engines |
13.2 Radar Address
The network address (IP or hostname) of the radar device.
13.3 Radar TCP Port
The network port the radar uses for communication.
14. Live View
The live view feature sends processed video frames to a web server, allowing real-time viewing through a web browser.
14.1 Live View Active
Enable or disable the live view feature:
14.2 Live View URL
The web address where frames should be sent:
Format: http://localhost/io/qr/live_view.php
15. Settings Management
15.1 Saving Settings
To save your configuration:
15.2 Canceling Changes
If you make changes you don't want to keep:
15.3 Auto-Reload on File Change
The application monitors the settings file for external changes. If you modify the settings file directly (using a text editor), the application will automatically reload the new settings.
16. INI Configuration File
16.1 Overview
The application stores all its configuration settings in an INI-format configuration file. This file contains all the parameters that control how the application operates, from video source connections to reporting URLs. The INI file serves as both a persistent storage for settings and a convenient way to back up, transfer, or modify configurations across different installations.
16.2 File Location
The configuration file is typically named app_id.ini and is located in the same directory as the application executable.
16.3 File Structure
The INI file uses a simple text-based format with sections, keys, and values. The file is divided into sections enclosed in square brackets, with each section containing multiple key-value pairs. The general format is:
[SectionName]
key1=value1
key2=value2
key3=value316.4 General Settings
These settings control the core operation mode and basic application behavior.
| Setting | Description | Example |
|---|---|---|
| input_stream_type | Type of video stream for the main camera (see Stream Types table) | 17 |
| input_stream_address | Network address or hostname of the main camera | 192.168.1.60 |
| input_stream_tcp_port | TCP port for the video stream connection | 554 |
| input_stream_username | Username for camera authentication (leave blank if not required) | admin |
| input_stream_password | Password for camera authentication (leave blank if not required) | secret123 |
| input_stream_fps_limit | Maximum frames per second to process (0 = unlimited) | 7 |
16.5 Companion Stream Settings
The companion stream provides a secondary video source for additional coverage or redundancy.
| Setting | Description | Example |
|---|---|---|
| companion_stream_type | Type of video stream for the companion camera (see Stream Types table) | 10 |
| companion_stream_address | Network address or hostname of the companion camera | 192.168.1.61 |
| companion_stream_tcp_port | TCP port for the companion video stream | 80 |
| companion_stream_username | Username for companion camera authentication | admin |
| companion_stream_password | Password for companion camera authentication | admin123 |
| companion_stream_resx | Horizontal resolution of companion stream in pixels | 640 |
| companion_stream_resy | Vertical resolution of companion stream in pixels | 480 |
16.6 Reporting and Check Action Settings
These settings configure how the application reports recognized QR codes to external servers and receives validation responses.
| Setting | Description | Example |
|---|---|---|
| reporting_url | URL endpoint for sending recognized QR code data | http://server.com/io/qr/reporting_event.php |
| reporting_check_action_authkey | Authentication key for reporting requests | TX8343V2 |
| reporting_check_action_id | Station identifier sent with reporting data | 7 |
| check_action_url | URL endpoint for checking QR codes against a database | http://server.com/io/qr/check_action_event.php |
| check_action_min_probability | Minimum confidence threshold (0.0-1.0) for actions | 0.6 |
| check_action_send_trigger_address | IP address for sending UDP trigger on detection | 192.168.1.100 |
| check_action_send_trigger_udp_port | UDP port for trigger messages | 5000 |
16.7 Barrier Control Settings
These settings control automatic barrier or gate opening based on QR code validation.
| Setting | Description | Example |
|---|---|---|
| open_barrier_url | HTTP URL to call when opening the first barrier | http://192.168.1.100/outs.cgi?out0=0 |
| open_close_barrier_delay | Seconds to wait before automatically closing barrier | 10 |
| close_barrier_url | HTTP URL to call when closing the first barrier | http://192.168.1.100/outs.cgi?out0=1 |
| open_barrier2_url | HTTP URL to call when opening the second barrier | http://192.168.1.101/open.cgi |
| open_close_barrier2_delay | Seconds to wait before automatically closing barrier 2 | 15 |
| close_barrier2_url | HTTP URL to call when closing the second barrier | http://192.168.1.101/close.cgi |
16.8 QR Code Detection Settings
These settings control how the application detects and processes QR codes.
| Setting | Description | Example |
|---|---|---|
| same_plate_delay | Seconds to wait before detecting the same code again | 10 |
| plate_min_length | Minimum number of pixels for valid QR code | 100 |
| plate_max_length | Maximum number of pixels for valid QR code | 1000 |
| single_plate_mode | Process only first QR code per frame (0=disabled, 1=enabled) | 0 |
| countries | Comma-separated list of expected formats (if applicable) | "RO,BG,DE" |
16.9 Detection Window Settings
These settings define the region of interest within the video frame where QR codes will be detected.
| Setting | Description | Example |
|---|---|---|
| input_stream_window_active | Enable detection window (0=disabled, 1=enabled) | 0 |
| input_stream_window_origx | X coordinate of detection window's left edge | 300 |
| input_stream_window_origy | Y coordinate of detection window's top edge | 224 |
| input_stream_window_resx | Width of detection window in pixels | 300 |
| input_stream_window_resy | Height of detection window in pixels | 224 |
| input_stream_resx | Horizontal resolution of input video in pixels | 1920 |
| input_stream_resy | Vertical resolution of input video in pixels | 1080 |
16.10 Direction and Event Settings
These settings control how the application interprets item movement direction.
| Setting | Description | Example |
|---|---|---|
| cars_direction | Direction of item movement in degrees (0-360) | 36 |
| cars_event_type | Event type filter (1=coming, 2=leaving) | 1 |
16.11 Engine Settings
Settings that control the QR recognition engine operation mode.
| Setting | Description | Example |
|---|---|---|
| lpr_engine_working_mode | Engine mode (0=continuous, 1=triggered) | 0 |
16.12 External Trigger Settings
Settings for connecting external sensors that trigger QR code capture.
| Setting | Description | Example |
|---|---|---|
| external_trigger_type | Trigger type (0=none, 1=Barionet, 2=Virtual) | 0 |
| external_trigger_seconds | Duration trigger remains active after activation | 1 |
16.13 Weight Scale Settings
Settings for integrating industrial weight scales to record item weight with QR codes.
| Setting | Description | Example |
|---|---|---|
| weight_scale_type | Device type (0=none, 1=BarixI30) | 0 |
| weight_scale_address | Network address of weight scale device | 192.168.1.50 |
| weight_scale_tcp_port | TCP port for weight scale communication | 10001 |
16.14 Radar Settings
Settings for integrating radar speed sensors to capture item speed data.
| Setting | Description | Example |
|---|---|---|
| radar_type | Device type (0=none, 1=Barix ) | 0 |
| radar_address | Network address of radar device | 192.168.1.51 |
| radar_tcp_port | TCP port for radar communication | 10002 |
16.15 Live View Settings
Settings for streaming processed video frames to a web server for remote viewing.
| Setting | Description | Example |
|---|---|---|
| live_view_active | Enable live view feature (0=disabled, 1=enabled) | 1 |
| live_view_url | URL endpoint for sending live view frames | http://server.com/io/qr/live_view.php |
16.16 Video Stream Types
The following values are used for the input_stream_type and companion_stream_type settings:
| Value | Stream Type |
|---|---|
| 1 | HTTP ACTi MJPEG |
| 2 | RTSP ACTi H264 |
| 3 | HTTP Android MJPEG |
| 4 | HTTP Arecont MJPEG |
| 5 | HTTP Axis MJPEG |
| 6 | RTSP Axis MJPEG |
| 7 | RTSP Axis H264 |
| 8 | RTSP Bosch MJPEG |
| 9 | RTSP Bosch H264 |
| 10 | HTTP Dahua MJPEG |
| 11 | HTTP Diviotec MJPEG |
| 12 | RTSP Diviotec H264 |
| 13 | HTTP Generic MJPEG |
| 14 | RTSP Generic MJPEG |
| 15 | RTSP Generic H264 |
| 16 | HTTP Hikvision MJPEG |
| 17 | RTSP Hikvision H264 |
| 18 | HTTP Mobotix MJPEG |
| 19 | HTTP Mobotix MxPEG |
| 20 | RTSP Mobotix H264 |
| 21 | RTSP Mobotix MOVE H264 |
| 22 | HTTP Novus MJPEG |
| 23 | RTSP Novus H264 |
| 24 | RTSP Pelco MJPEG |
| 25 | ROSEek RAW |
| 26 | HTTP Samsung MJPEG |
| 27 | RTSP Samsung H264 |
| 28 | HTTP Sony MJPEG |
| 29 | RTSP Sony H264 |
| 30 | RTSP Uniview H264 |
| 31 | HTTP Vivotek MJPEG |
| 32 | HTTP VLC MJPEG |
16.17 Example Configuration Files
Basic Setup (o.ini)
[General]
input_stream_type=4
input_stream_address=192.168.11.40
input_stream_tcp_port=80
input_stream_username=admin
input_stream_password=123456
reporting_check_action_authkey=TX8343V2
reporting_check_action_id=7
reporting_url=http://lpr.metrici.ro/io/qr/new_plate_event.php
check_action_url=http://lpr.metrici.ro/io/qr/check_action_event.php
check_action_min_probability=0.6
same_plate_delay=10
plate_min_length=160
plate_max_length=350
input_stream_resx=1280
input_stream_resy=720
input_stream_window_active=0
input_stream_window_origx=60
input_stream_window_origy=40
input_stream_window_resx=1096
input_stream_window_resy=604
Advanced Setup with Barriers (0.ini)
[General]
input_stream_type=5
input_stream_address=192.168.100.70
input_stream_tcp_port=80
input_stream_username=root
input_stream_password=metrici
input_stream_fps_limit=0
companion_stream_type=0
companion_stream_address=192.168.1.6
companion_stream_tcp_port=80
companion_stream_username=admin
companion_stream_password=admin123
reporting_check_action_authkey=W0603E0W
reporting_check_action_id=22
reporting_url=http://dev2.metrici.ro/io/qr/reporting_event.php
check_action_url=http://dev2.metrici.ro/io/qr/check_action_event.php
check_action_send_trigger_address=
check_action_send_trigger_udp_port=0
open_barrier_url="http://admin:admin@192.168.1.100/outs.cgi?out0=0"
open_close_barrier_delay=10
close_barrier_url=
open_barrier2_url=
open_close_barrier2_delay=10
close_barrier2_url=
check_action_min_probability=0.6
same_plate_delay=1
plate_min_length=100
plate_max_length=700
single_plate_mode=0
cars_direction=36
cars_event_type=1
input_stream_resx=1920
input_stream_resy=1920
companion_stream_resx=1920
companion_stream_resy=1080
input_stream_window_active=0
input_stream_window_origx=292
input_stream_window_origy=88
input_stream_window_resx=592
input_stream_window_resy=788
live_view_active=1
live_view_url=http://dev2.metrici.ro/io/qr/live_view.php
external_trigger_type=0
external_trigger_seconds=1
lpr_engine_working_mode=0
weight_scale_type=0
weight_scale_address=
weight_scale_tcp_port=10001
radar_type=0
radar_address=
radar_tcp_port=10002
16.18 Editing the INI File
You can edit the INI file manually using any text editor. However, it's recommended to use the application's Settings window when possible, as it provides validation and prevents syntax errors.
Best Practices for Manual Editing
- Backup first - Always make a copy of the current configuration before editing
- Use plain text editor - Use editors like nano, vim, or gedit; avoid word processors
- Preserve formatting - Keep the [General] section header and key=value format
- Test changes - Restart the application after editing to apply changes
16.19 Troubleshooting Configuration Issues
Solutions:
- Ensure the file is named correctly (usually app_id.ini)
- Verify the file is in the correct location
- Check for syntax errors in key names and values
- Restart the application to ensure all settings are loaded
Solutions:
- Verify the IP address is reachable from the application host
- Check that the stream type matches your camera model
- Confirm the TCP port is correct for your camera's protocol
- Test credentials directly in a web browser or video player first
- Check firewall rules on both the camera and application host
16.20 Configuration File Migration
When migrating between systems or upgrading the application, you can transfer your configuration by copying the INI file. However, you may need to update the following settings:
- Network addresses - Update IP addresses for cameras and servers on the new network
- Hostnames - If using hostnames, ensure DNS resolution works on the new system
- Authentication keys - Update any server-side keys if they have changed
- Device paths - For serial devices, update the device path
Troubleshooting
Camera Connection Issues
Solutions:
- Verify camera IP address is correct and camera is on the network
- Check username and password credentials
- Ensure the correct stream type is selected
- Check firewall settings allow traffic on the camera's port
- Verify camera is functioning by accessing it directly in a web browser
- Ping it
Poor Recognition Accuracy
Solutions:
- Adjust the detection window to focus on the area where codes are clearly visible
- Improve lighting conditions at the camera location
- Adjust camera angle to capture codes head-on rather than at an angle
- Lower the minimum probability threshold
- Increase FPS limit if items are moving fast
- Adjust minimum/maximum code length to match expected data format
High CPU Usage
Solutions:
- Enable and optimize the detection window to reduce processed area
- Lower the FPS limit
- Use trigger-based mode instead of continuous mode
- Enable single code mode
- Use H264 stream instead of MJPEG if available (more efficient compression)
Duplicate Code Entries
Solutions:
- Increase the "Same Code Delay" setting
- Enable single code mode
- Use external trigger to ensure codes are only captured once per item
Barrier Not Opening
Solutions:
- Verify barrier URLs are correct and accessible
- Check that the server at the URL is running
- Ensure the application has network access to the barrier controller
- Verify barrier controller is configured to accept commands
- Check authentication keys and IDs if required
Settings Not Saving
Solutions:
- Always click "Save" before closing the settings window
- Check file permissions on the settings file
- Verify sufficient disk space is available
Glossary
| Term | Definition |
|---|---|
| FPS | Frames Per Second - how many images are captured per second |
| H264 | Video compression format - efficient video encoding standard |
| HTTP | HyperText Transfer Protocol - web communication protocol |
| IP Camera | Network Camera - camera that sends video over a computer network |
| MJPEG | Motion JPEG - video format where each frame is a JPEG image |
| QR Code | Quick Response Code - two-dimensional barcode that can be scanned |
| RTSP | Real Time Streaming Protocol - protocol for streaming media |
| TCP | Transmission Control Protocol - reliable network communication method |
| UDP | User Datagram Protocol - fast network communication method |
Technical Support
If you need additional help:
- Check the application logs for error messages (accessible via the Settings window)
- Check app_id.log to see more logs from each application
- Verify network connectivity between all devices
- Ensure all devices are using the latest firmware
- Contact your system administrator for network or server issues
Document Version: 1.0
Application Version: Metrici QR Code Recognizer v2.4
Last Updated: February 2026