Metrici Snapshot v1.0
User Manual for End Users and System Administrators

Welcome to the Metrici Snapshot user manual. This document will guide you through installing, configuring, and using the Metrici Snapshot application for capturing images from video streams.
Metrici Snapshot is an event-driven image capture application that connects to IP cameras and automatically captures snapshots when triggered. When a trigger signal is received, the application takes a picture from the video stream and sends it to your reporting server for logging and storage. This is useful for documenting specific events detected by external systems.
Table of Contents
- Introduction
- Getting Started
- Main Window Overview
- Settings Configuration
- Connecting Your Camera
- Command Line Options
- Configuration File (INI)
- Troubleshooting
- Frequently Asked Questions
1. Introduction
Metrici Snapshot is designed to capture and send images from video streams when triggered by external events. The application works by:
- Connecting to one or two IP cameras (primary and optional companion)
- Continuously monitoring for trigger signals
- When a trigger is received, capturing a snapshot from the video stream
- Sending the captured image to your reporting server
This type of application is commonly used for:
- Event documentation - Capturing images when external sensors detect activity
- Security triggering - Taking pictures when alarms or motion detectors are triggered
- Process monitoring - Recording images when manufacturing or processing events occur
- Access logging - Capturing images when doors, gates, or barriers are activated
- External system integration - Responding to triggers from other software or hardware systems
The application supports a wide variety of IP camera brands and can process video from two cameras simultaneously (primary and companion streams).
2. Getting Started
Starting the Application
You can start Metrici Snapshot in two modes:
- Graphical Mode (Default): Run without any arguments to see the main window
./snapshot - Background Mode (No GUI): Run with the
-noguiflag for headless operation on servers./snapshot -nogui
First Run
On first run, the application will create a settings file (named based on the app_id, default is "0.ini"). The application will attempt to connect to your configured camera(s) and wait for trigger signals. When triggers are received, it will capture and send snapshots.
3. Main Window Overview
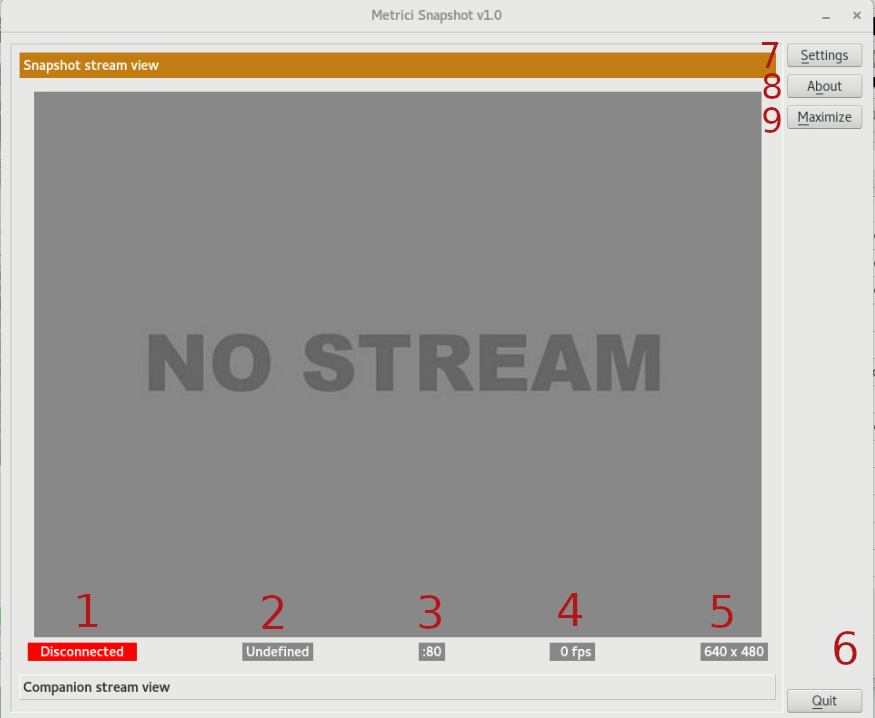
The main window displays the video feeds from your connected cameras with captured snapshots shown when triggers occur.
Primary Video Display
The large central area shows your primary camera feed. This is the video stream from which snapshots are captured when triggers occur. You can watch the live video to verify your camera is positioned correctly and working properly.
Companion Video Display
If configured, a smaller secondary video display shows your companion camera stream. When a trigger is received, the application can capture images from both cameras simultaneously, giving you two angles of the same event.
Connection Status Indicators
Below each video display, you'll see status information:
- 1. Connection Status: Shows whether you're connected, disconnected, or connecting to the camera
- 2. Stream Type: Displays the protocol being used (RTSP, HTTP, etc.)
- 3. Stream Address: Shows the camera's IP address or URL
- 4. FPS: Frames per second - indicates video quality
- 5. Resolution: The video resolution (width x height)
Trigger Status
When a trigger is received, the application indicates this visually:
- Trigger Active: A trigger signal is currently being processed
- Trigger Key: Displays the identifier of the trigger that was received
- Snapshots Captured: Images are captured from both (or all) configured streams
Control Buttons
The bottom of the window contains the following buttons:
- 6. Quit: Closes the application
- 7. Settings: Opens the configuration window where you set up cameras, triggers, and reporting
- 8. About: Shows version information and license details
- 9. Minimize/Maximize: Toggles between windowed and full-screen modes
4. Settings Configuration
Click the Settings button to open the configuration window. This is where you set up your cameras, triggers, and reporting options. The settings are organized into several sections.
Engine Working Mode
This setting controls when the application processes video and responds to triggers:
| Mode | Description |
|---|---|
| Started by Trigger | The application only records events from the camera when a trigger signal is received. After capturing the snapshot and sending it to the server, the application stops monitoring and waits for the next trigger. |
Primary Input Stream
The primary input stream is your main camera that provides the video from which snapshots are captured. Configure these settings:
Stream Type
Select the protocol and brand of your camera. The application supports many camera manufacturers:
| Category | Camera Brands/Types |
|---|---|
| Major Brands | AXIS, HIKVISION, Samsung, Sony, Bosch, Dahua |
| Industrial | ACTi, Arecont Vision, DIVIOTEC, Novus, Pelco, Vivotek |
| Specialized | Mobotix (MxPEG), Roseek RAW |
| Generic | Generic MJPEG over HTTP, Generic H264 over RTSP, Generic JPEG pictures |
| Software | VLC streams, Android camera streams |
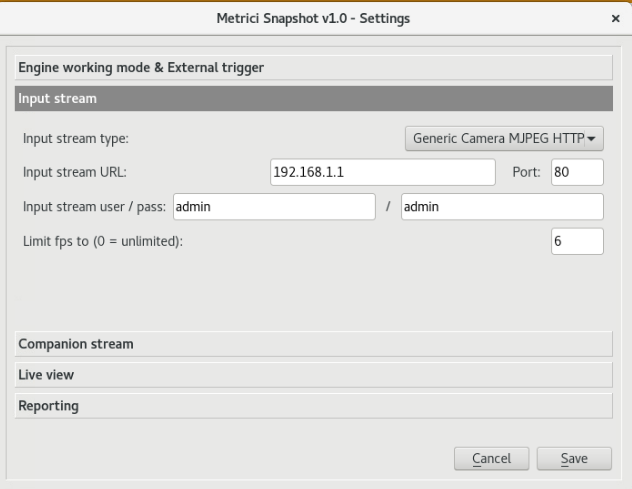
Stream Address
Enter the network address of your camera. This depends on your camera type:
- For HTTP cameras: Enter the IP address or hostname, e.g.,
192.168.1.100orcamera.mydomain.com - For RTSP cameras: Enter the full RTSP URL, e.g.,
rtsp://192.168.1.100:554/stream1
TCP Port
The network port your camera uses for video streaming:
- HTTP cameras: Usually port
80 - RTSP cameras: Usually port
554or8554 - Check your camera documentation for the correct port
Username and Password
Enter the credentials required to access your camera. Most IP cameras require authentication to view video streams. If your camera doesn't require authentication, leave these fields blank.
FPS Limit
This setting limits how many frames per second the application requests from the camera. Enter 0 to use the camera's default frame rate, or enter a specific number like 3 or 9 to limit it.
Lower FPS limits reduce bandwidth usage but higher FPS gives you more up-to-date images when triggers occur.
Companion Stream
The companion stream is an optional secondary camera. When a trigger is received, the application captures snapshots from BOTH the primary and companion cameras simultaneously, giving you two views of the same event.
Common uses for companion streams include:
- Using a wide-angle camera as primary and a zoomed-in camera as companion
- Viewing the same scene from a different angle (e.g., front and side views)
- Having a different type of camera (e.g., regular and thermal) for comprehensive coverage
All the same settings apply as the primary stream (type, address, port, username, password).
Live View
Live view allows the application to automatically send video frames to a web server, enabling live video streaming through a web browser.
Enable Live View
Check this box to activate live view functionality. When enabled, the application will periodically send images to your live view server.
Live View URL
Enter the web address where live view images should be sent. This is typically a PHP script or similar endpoint on your web server.
Example: http://yourserver.com/io/eer/live_view.php
The live view feature allows you or others to monitor the camera feed through a web browser in real-time.
Reporting Settings
When the application captures a snapshot after receiving a trigger, it sends the image and event data to your reporting server.
Reporting URL
The web address where captured snapshots and event data are sent. This should be a server-side script (PHP, Python, etc.) that accepts and processes the image data.
Example: http://yourserver.com/path/new_event.php, usually http://localhost/io/eer/new_event.php
The receiving server saves the image and logs the event with a timestamp and other information.
Duplicate Reporting URL (Optional and only available in .ini file- see below)
You can specify a second URL where the same snapshot and event data will be sent. This provides redundancy if you need events logged or stored in two different systems simultaneously.
Authentication Key
A security key that validates the event data being sent. It is the communication between engine and database.It is generated by Metrici in the Interface when creating the location and adding the cameras.
External Trigger
An external trigger tells the application when to capture a snapshot. This is the core functionality - the application waits for these signals and then immediately captures and sends images.
Trigger Type
| Trigger Type | Description |
|---|---|
| Barix Barionet 50 (Inputs 1-4) | Uses a Barix Barionet 50 hardware device. This device has 4 inputs that can trigger the application. When the specified input is activated (e.g., by a door sensor, motion detector, or button press), the application captures a snapshot. |
| Metrici Virtual Trigger | A software-based trigger. The application listens for trigger signals sent over the network using UDP protocol. This allows other software or systems to control when snapshots are captured. Useful for integration with other applications or automation systems. |
How Triggers Work
When a trigger is configured:
- The application monitors for trigger signals
- When a trigger signal is received, the application captures a snapshot from the primary camera (and companion camera if configured)
- The captured image(s) are sent to your configured reporting URL(s)
- The trigger is logged and the application returns to monitoring for the next trigger
5. Connecting Your Camera
Follow these steps to connect your camera to Metrici Snapshot:
Step 1: Find Your Camera's Information
Before configuring the application, gather this information from your camera:
- Camera IP address
- Video stream protocol (RTSP or HTTP)
- Stream URL or path
- Port number (usually 80 for HTTP, 554 for RTSP)
- Username and password for camera access
Step 2: Open Settings
Click the Settings button in the main window.
Step 3: Configure Primary Input Stream
- Find the "Input Stream" section
- Select the appropriate "Stream Type" from the dropdown list
- Enter the camera's address in "Stream Address"
- Set the correct port number
- Enter the username and password if required
Step 4: Configure External Trigger
- Find the "External Trigger" section
- Select the trigger type that matches your setup
- For Barix devices, the application will automatically use the appropriate port
- For virtual triggers, no additional configuration is needed- the settings are done in the sending engine
Step 5: Configure Reporting
- Find the "Reporting" section
- Enter your reporting server URL
- Set an action ID if needed
- Enter an authentication key if your server requires one
Step 6: Test the Connection
Click Save to apply the settings. The application will attempt to connect to your camera. Watch the status indicators below the video display:
- Connecting: Attempting to establish connection
- Connected: Successfully receiving video
- Disconnected: Connection failed (check your settings)
Camera-Specific Examples
AXIS Camera (RTSP)
Stream Type: AXIS H264 RTSP
Stream Address: 192.168.1.100
TCP Port: 554
Username: admin
Password: password123
HIKVISION Camera (HTTP)
Stream Type: HIKVISION MJPEG HTTP
Stream Address: 192.168.1.101
TCP Port: 80
Username: admin
Password: admin123
Generic RTSP Camera
Stream Type: Generic Camera H264 RTSP
Stream Address: rtsp://192.168.1.102:554/Streaming/Channels/101
TCP Port: 554
Username: (if required)
Password: (if required)
6. Command Line Options
When starting Metrici Snapshot from the command line, you can use various options to customize behavior:
| Option | Description |
|---|---|
-nogui |
Run without graphical interface. Useful for servers or headless systems. |
-debug |
Enable debug mode with additional diagnostic information. |
-disable_gpu |
Disable GPU acceleration even if available. |
-gpu <id> |
Specify which GPU to use (0 = first GPU, 1 = second GPU, etc.). |
-app_id <id> |
Set the application ID (0-254). Used when multiple instances run simultaneously. |
-app_name <name> |
Set a custom application name for identification. |
-log_level <level> |
Set logging verbosity: 0=None, 1=Low, 2=Medium, 3=High. |
-v |
Display version information and exit. |
Example Commands
# Run with GUI, showing version
./snapshot -v

# Run in background mode (no GUI)
./snapshot -nogui

# Run with debug logging enabled
./snapshot -debug

# Run with high log level
./snapshot -log_level 3

        # Run with custom app ID for multiple instances
./snapshot -app_id 1 -nogui
7. Configuration File (INI)
All application settings are stored in a configuration file called <app_id>.ini. For example, if you use the default app_id of 0, the file will be named 0.ini. If you run multiple instances with different app_ids, each will have its own separate configuration file.
INI File Location
The configuration file is created in the same directory where the Metrici Snapshot application is installed. You can manually edit this file with a text editor if needed, or use the Settings window within the application.
INI File Structure
The INI file uses a simple text format with sections and key-value pairs. Here's an example of what the configuration file looks like:
[General]
input_stream_type=5
input_stream_address=192.168.1.100
input_stream_tcp_port=80
input_stream_username=admin
input_stream_password=password123
input_stream_fps_limit=0
companion_stream_type=0
companion_stream_address=
companion_stream_tcp_port=80
companion_stream_username=
companion_stream_password=
reporting_check_action_authkey=
reporting_check_action_id=0
reporting_url=http://localhost/io/eer/new_event.php
reporting_duplicate_url=
input_stream_resx=1920
input_stream_resy=1080
companion_stream_resx=640
companion_stream_resy=480
live_view_active=1
live_view_url=http://localhost/io/eer/live_view.php
external_trigger_type=0
external_trigger_seconds=1
engine_working_mode=0
Configuration Values Reference
The following table describes all the configuration values stored in the INI file:
Primary Input Stream Settings
| Setting | Values | Description |
|---|---|---|
input_stream_type |
0-33 | The type of camera protocol. 0=Undefined, 1=ACTi MJPEG HTTP, 5=AXIS MJPEG HTTP, 17=HIKVISION MJPEG HTTP, etc. See the Stream Type dropdown in Settings for all options. |
input_stream_address |
IP address or hostname | The network address of your primary camera. For HTTP cameras, use the IP or hostname. For RTSP, use the full RTSP URL if needed. |
input_stream_tcp_port |
Port number (default: 80 for HTTP, 554 for RTSP) | The TCP port the camera uses for streaming video. |
input_stream_username |
String or empty | Username for camera authentication. Leave empty if no authentication is required. |
input_stream_password |
String or empty | Password for camera authentication. Leave empty if no authentication is required. |
input_stream_fps_limit |
0=unlimited, or specific FPS value | Limits the frames per second processed from the camera. Use 0 for no limit. |
input_stream_resx |
Width in pixels (e.g., 1920, 1280, 640) | The horizontal resolution of the primary camera stream. |
input_stream_resy |
Height in pixels (e.g., 1080, 720, 480) | The vertical resolution of the primary camera stream. |
Companion Stream Settings
| Setting | Values | Description |
|---|---|---|
companion_stream_type |
0-33 | The camera type for the companion stream. Set to 0 to disable the companion stream. |
companion_stream_address |
IP address, hostname, RTSP URL, or empty | The network address of your companion camera. |
companion_stream_tcp_port |
Port number (default: 80) | The TCP port for the companion camera stream. |
companion_stream_username |
String or empty | Username for companion camera authentication. |
companion_stream_password |
String or empty | Password for companion camera authentication. |
companion_stream_resx |
Width in pixels | The horizontal resolution of the companion camera stream. |
companion_stream_resy |
Height in pixels | The vertical resolution of the companion camera stream. |
Reporting Settings
| Setting | Values | Description |
|---|---|---|
reporting_url |
URL string | The web address where captured snapshots and event data are sent when a trigger occurs. Example: http://yourserver.com/io/new_event.php |
reporting_duplicate_url |
URL string or empty | An optional second URL where the same data is sent. Useful for redundancy. |
reporting_check_action_id |
Integer (default: 0) | An identifier used to categorize or route events on the receiving server. |
reporting_check_action_authkey |
String or empty | A security key sent with events for validation. The receiving server can verify this key. |
Live View Settings
| Setting | Values | Description |
|---|---|---|
live_view_active |
0=disabled, 1=enabled | Enables or disables the live view feature that sends video frames to a web server. |
live_view_url |
URL string | The web address where live view images are periodically sent. Example: http://yourserver.com/io/live_view.php |
Trigger and Engine Settings
| Setting | Values | Description |
|---|---|---|
external_trigger_type |
0-5 | Type of external trigger: 0=None, 1=Barix Input 1, 2=Barix Input 2, 3=Barix Input 3, 4=Barix Input 4, 5=Metrici Virtual Trigger |
external_trigger_seconds |
Number of seconds | Timeout value for external trigger. Determines how long the application waits before resetting if no trigger is received. |
engine_working_mode |
0=Continuous, 1=Started by Trigger | Controls when the application processes video. Continuous mode keeps the connection active. Started by Trigger mode connects only when triggered. |
Stream Type Values Reference
The following table shows all available stream type codes and their meanings:
| Value | Stream Type |
|---|---|
| 0 | Undefined |
| 1 | ACTi MJPEG HTTP |
| 2 | ACTi H264 RTSP |
| 3 | Android MJPEG HTTP |
| 4 | Arecont MJPEG HTTP |
| 5 | AXIS MJPEG HTTP |
| 6 | HIKVISION MJPEG HTTP |
| 7 | Bosch MJPEG RTSP |
| 8 | Novus MJPEG HTTP |
| 9 | DAHUA MJPEG HTTP |
| 10 | Vivotek MJPEG HTTP |
| 11 | Generic MJPEG HTTP |
| 12 | Sony H264 RTSP |
| 13 | Bosch H264 RTSP |
| 14 | Pelco MJPEG RTSP |
| 15 | Samsung H264 RTSP |
| 16 | Generic JPEG Picture HTTP |
| 17 | HIKVISION H264 RTSP |
| 18 | Mobotix MJPEG HTTP |
| 19 | Generic MJPEG RTSP |
| 20 | Generic H264 RTSP |
| 21 | AXIS MJPEG RTSP |
| 22 | AXIS H264 RTSP |
| 23 | Uniview H264 RTSP |
| 24 | Novus H264 RTSP |
| 25 | ACTi H264 RTSP |
| 26 | DIVIOTEC MJPEG HTTP |
| 27 | DIVIOTEC H264 RTSP |
| 28 | Mobotix Move H264 RTSP |
| 29 | Samsung MJPEG HTTP |
| 30 | Mobotix MxPEG HTTP |
| 31 | Mobotix H264 RTSP |
| 32 | Sony MJPEG HTTP |
| 33 | VLC MJPEG HTTP |
Backing Up and Restoring Settings
To back up your configuration:
- Stop the application if it is running
- Copy the INI file (e.g.,
0.ini) to a safe location
To restore a configuration:
- Stop the application if it is running
- Copy the saved INI file back to the application directory
- Start the application
Multiple Instances
When running multiple instances of Metrici Snapshot, each instance must have a unique app_id. Each instance creates its own INI file:
- app_id 0 uses
0.ini - app_id 1 uses
1.ini - app_id 2 uses
2.ini - And so on...
Start different instances with different app_ids:
# Instance 1 (uses 0.ini)
./snapshot

# Instance 2 (uses 1.ini)
./snapshot -app_id 1

# Instance 3 in background mode (uses 2.ini)
./snapshot -app_id 2 -nogui
9. Troubleshooting
Camera Connection Issues
| Problem | Possible Solution |
|---|---|
| Camera won't connect | Verify the IP address is correct. Check that the camera is powered on and accessible on the network. Try pinging the camera from the computer running Metrici Snapshot. |
| "Disconnected" status | Check username and password are correct. Ensure the camera's streaming URL is correct. Verify the port is not blocked by a firewall. |
| No video but connected | Some cameras have multiple streams. Try a different stream type (MJPEG instead of H264). Check if the camera requires specific user permissions for video access. |
| Intermittent connection | Check network stability. Verify the camera isn't overloaded with connections. Consider using the "Started by Trigger" mode if connections are unreliable. |
Trigger Issues
| Problem | Possible Solution |
|---|---|
| Triggers not being detected | Verify trigger type is set correctly. For hardware triggers, check Barix device configuration. For virtual triggers, ensure UDP packets are being sent to the correct port (base port 3500 + app_id). |
| Barix trigger not working | Check that the Barix device is on the network and accessible. Verify the input configuration on the Barix device. Ensure the correct input number (1-4) is selected in settings. |
| Virtual trigger not working | Check that UDP packets are being sent to the correct IP address and port. The default port is 3500. If using app_id, add the app_id to the base port (3500 + app_id). Verify any firewall rules allow UDP traffic. |
Reporting Issues
| Problem | Possible Solution |
|---|---|
| Snapshots not being sent | Verify the reporting URL is correct and accessible from the application. Check network connectivity to the server. Ensure authentication key matches what the server expects. |
| Server not receiving images | Check server logs for incoming requests. Verify the receiving script is properly configured. Test the URL manually with a web request to ensure the server script works. |
| Duplicate events being logged | Check that the duplicate reporting URL is correctly configured or empty if not needed. |
Performance Issues
| Problem | Possible Solution |
|---|---|
| Slow response to triggers | Check network latency to camera. Ensure camera can provide frames quickly when requested. |
| High resource usage | Reduce camera resolution. Consider switching between MJPEG and H264 if bandwidth is limited. |
10. Frequently Asked Questions
Q: How does the trigger system work?
When you configure an external trigger, the application monitors for trigger signals. When a signal is received (either from a hardware device like a Barix or from network UDP packets), the application immediately captures a snapshot from your camera and sends it to the reporting server.
Q: Can I run multiple instances of Metrici Snapshot?
Yes. Each instance must have a unique app_id (0-254). Use the -app_id <n> command line option. Each instance will maintain its own settings file (named <n>.ini) and respond to triggers on different UDP ports (3500 + app_id).
Q: What cameras are supported?
The application supports any IP camera that outputs video over RTSP or HTTP protocols. Major brands like AXIS, HIKVISION, Samsung, Sony, Bosch, Dahua, Vivotek, and many others have specific support. For cameras not listed, the generic options usually work well.
Q: What triggers can I use?
You can use hardware triggers from Barix Barionet 50 devices (4 inputs available), or software triggers via UDP network packets. This allows integration with door sensors, motion detectors, buttons, or any system that can send a signal.
Q: What is a companion stream?
A companion stream is an optional second camera. When a trigger is received, the application captures snapshots from BOTH cameras simultaneously. This gives you two different views of the same event, which is useful for comprehensive documentation.
Q: What's the difference between H264 and MJPEG?
H264 is a compressed video format that requires decoding. It produces smaller data sizes and is more bandwidth-efficient. MJPEG sends individual JPEG images, which is simpler and often has slightly lower latency. Both work well for snapshot capture.
Q: Where are settings stored?
Settings are stored in configuration files named <app_id>.ini. For example, app_id 0 uses "0.ini", app_id 1 uses "1.ini", etc. These files are located in the same directory as the application.
Q: How do I send virtual triggers?
Send a UDP packet to the application's IP address on port 3500 + app_id. The packet content can contain a trigger key string that identifies the trigger source. Any UDP packet received will trigger a snapshot capture.
Q: Do I need a GPU?
No. Unlike video analytics applications, Metrici Snapshot doesn't require GPU acceleration since it simply captures and forwards images rather than analyzing them. A standard CPU is sufficient.
Document Version: 1.0
Application Version: Metrici Snapshot v1.0