Metrici LPR V7.1
User Manual for End Users and System Administrators
Last updated:

Welcome to Metrici LPR! This comprehensive guide will help you understand and configure your License Plate Recognition system. Whether you're setting up a new installation or fine-tuning an existing one, this manual provides clear, step-by-step instructions for every feature.
Table of Contents
- 1. Introduction
- 2. Main Application Interface Overview
- 3. Camera and Stream Configuration- LPR Input Stream
- 4. Detection Window Configuration
- 5. Plate Recognition and Detection Settings
- 6. Country and Plate Selection
- 7. Trigger Modes and Detection Timing
- 8. Vehicle Analysis Features
- 9. External System Integration- Reporting, Check Action and Trigger Out
- 10. GPS Configuration
- 11. Weight Scale and Radar Integration
- 12. Barrier and Traffic Light Control
- 13. Troubleshooting
- 14. Configuration File (INI)
- 15. Appendix: Settings Quick Reference
1. Introduction
What is Metrici LPR?
Metrici LPR v7.1 is an advanced AI based License Plate Recognition system designed to automatically detect, recognize, and record vehicle license plates from video streams. The system can identify plates from over 57 countries worldwide and provides extensive integration capabilities with external systems like barriers, gates, traffic lights, weight scales and speed radars.
Key Features
- Multi-Camera Support: Each detection engine connects up to 2 video streams simultaneously (main and companion camera)
- Wide Camera Compatibility: Supports 35+ camera brands and protocols including MJPEG, RTSP H264, and RTSP H265
- Global Plate Recognition: Recognizes license plates from 57 different countries
- Vehicle Analysis: Identifies vehicle type, manufacturer, and color
- Smart Detection: Configurable detection zones and virtual loops to focus on specific areas
- Multiple Trigger Modes: Works with physical sensors, virtual detection, or continuous scanning
- External Integration: Controls barriers, traffic lights, and sends data to external servers
- GPS Support: Records location and other metadata with each plate detection
Typical Applications
- Parking lot access control
- Toll road systems
- Truck weighing stations
- Traffic monitoring and law enforcement
- Border control checkpoints
- Security and surveillance systems
First Settings - Add Cameras
Metrici Control Panel starts automatically when the server is on. You will add here the cameras and do settings for your location. You can have active as many cameras/applications as licenses acquired.
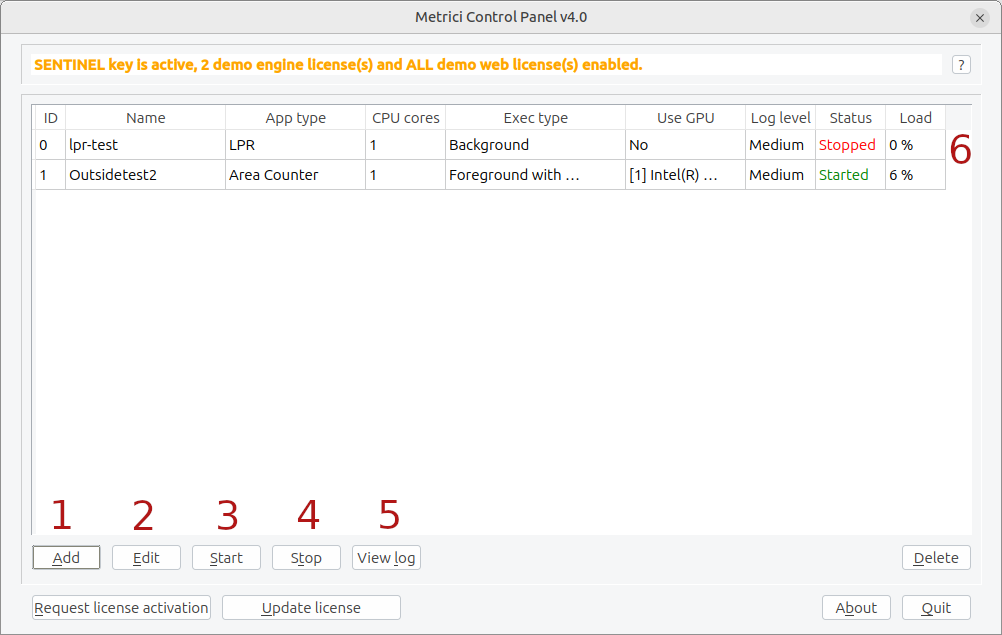
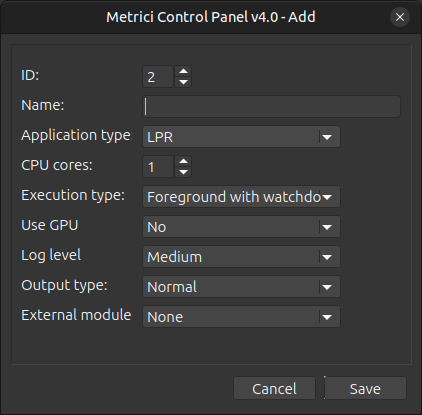
To add a camera click on Add (1) button. A popup window will show as in the next image with the following fields
- ID Number generated by Metrici. Starting with zero
- Name Fill in a name that you can easily recognize and identify the camera
- Application Type A list of Metrici detection engines-LPR, Area Counter Line Counter etc. Choose for what application this camera will be used for in this case LPR.
- CPU Cores number of processing cores for each camera. The more processing power for each camera, the better the detection, and the application will operate more frames in real time. Do not allocate to cameras more processing power than the actual physical cores.
- Execution Type Choose Foreground with watchdog - this allows setting the camera for the next steps. After done settings Metrici recommends switching to Background with watchdog
- Use Gpu Metrici recommends using a GPU to lower the load on processor and better performance. From drop-down menu, choose the one installed on the server
- Log Level Metrici recommends setting it to Medium
- Output type Set it to Normal
- External Module For integration with Skidata or Bebarmatic access control systems. Applicable only in LPR installations. Otherwise set it to None.
2. Main Application Interface Overview
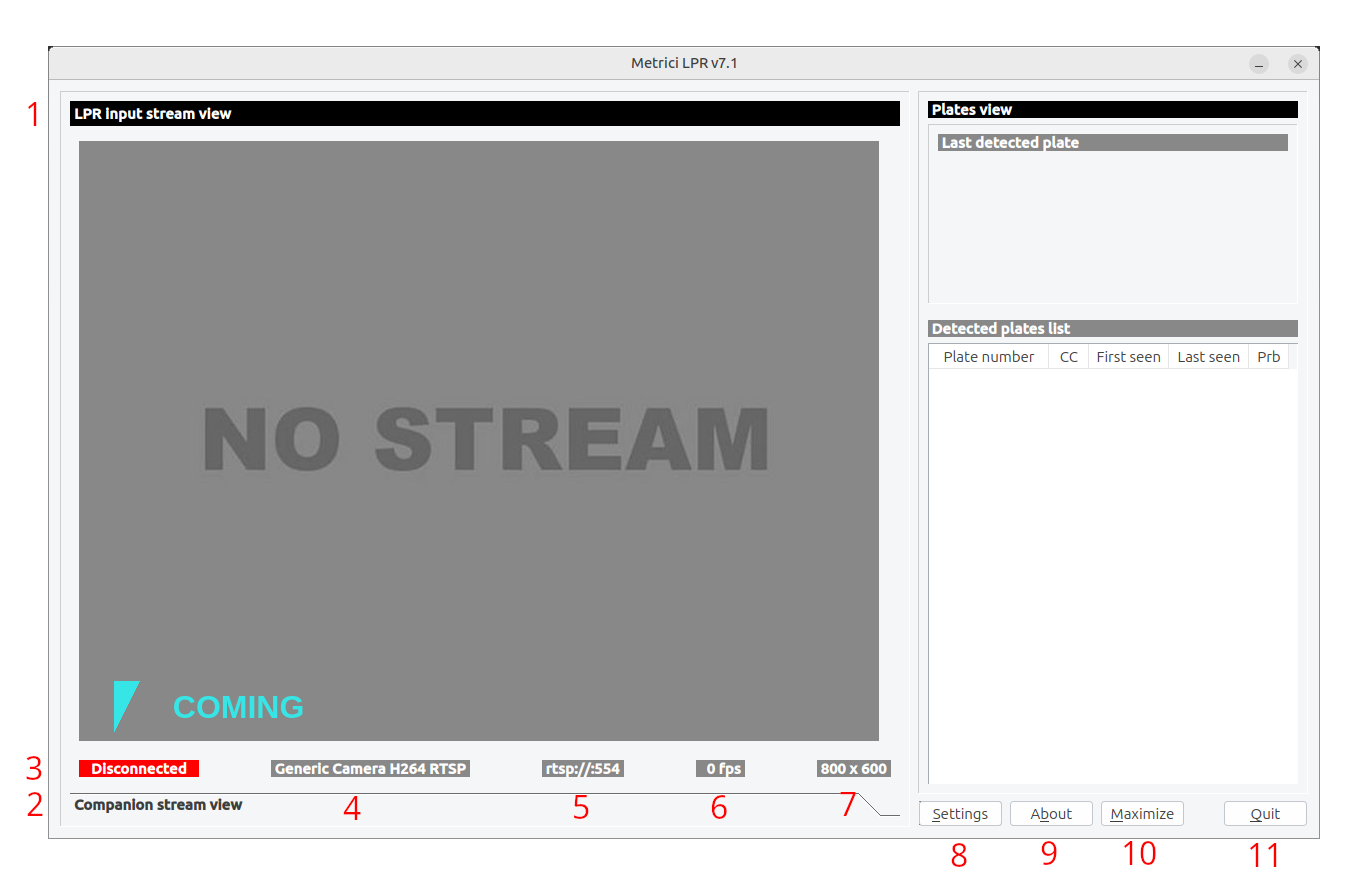
When all above settings were done, a window like next one appears and it is designed to give you immediate visibility into the recognition process for each detection engine/ camera while providing easy access to all configuration options. Understanding the layout will help you monitor the system effectively and quickly identify any issues.
Video Display Area
The main window displays your video streams in a tabbed interface. You can switch between the LPR input stream view (your main camera — see Fig.1 Main Interface (1) ) and the Companion stream view (optional secondary camera — see Fig.1 Main Interface (2)).
Each video display shows:
- Connection Status: A colored indicator showing if the camera is connected (green), disconnected (red), or connecting (orange) — see Fig.1 Main interface (3).
- Stream Type: The protocol being used (e.g., RTSP, MJPEG, HTTP) — see Fig.1 Main interface (4).
- Address: The IP address or hostname of the camera — see Fig.1 Main interface (5).
- FPS: Current frame rate in frames per second — see Fig.1 Main interface (6).
- Resolution: The video resolution (e.g., 800 x 600) — see Fig.1 Main interface (7).
Plates Panel
The right side of the interface shows detected plates information:
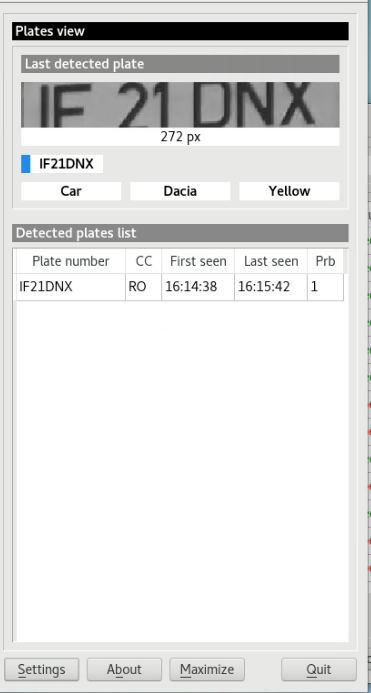
- Last Detected Plate: Shows the most recently recognized plate number, vehicle type, maker, and color
- Detected Plates List: A table showing all recently detected plates with timestamps, confidence levels, and country codes
- See Fig.2 Plates view.
Also Info about what type of vehicle, color, brand, plate size, last seen and probability.
Control Buttons
- Settings: Opens the configuration window where you can adjust all system parameters — see Fig.1 Main interface (8).This is the first one to use when added a camera.
- About: Displays version information and system details — see Fig.1 Main interface (9).
- Maximize/Minimize: Toggles between full-screen and compact view — see Fig.1 Main interface (10).
- Quit: Closes the application — see Fig.1 Main interface (11).
3. Camera and Stream Configuration
Proper camera configuration is essential for accurate plate recognition. The system supports two video streams: a main LPR input stream and an optional companion stream. The companion stream can provide additional context, such as a wider view of the detection area.
Stream Type Options
Metrici LPR supports multiple camera protocols and formats. Choose the option that matches your camera type:
| Protocol | Description | Best For |
|---|---|---|
| MJPEG over HTTP | Motion JPEG stream via standard web protocol | Most IP cameras, easy setup |
| RTSP H264/H265 | Real-time streaming protocol with compressed video | High-resolution cameras, low bandwidth |
| Video File | Process pre-recorded video files | Testing and batch processing |
Supported Camera Brands
The system includes optimized drivers for many popular camera brands:
- ACTi: suported codecs: MJPEG, H264; standard protocols (HTTP, RTSP)
- Android: suported codecs: MJPEG; standard protocols (HTTP)
- Arecont Vision: suported codecs: MJPEG; standard protocols (HTTP)
- Axis: suported codecs: MJPEG, H264; standard protocols (HTTP, RTSP)
- Bosch: suported codecs: MJPEG, H264; standard protocols (RTSP)
- Dahua: suported codecs: MJPEG; standard protocols (HTTP)
- Divotec: suported codecs: MJPEG, H264; standard protocols (HTTP, RTSP)
- Hikvision: suported codecs: MJPEG, H264; standard protocols (HTTP, RTSP)
- Mobotix: suported codecs: MJPEG, MxPEG; standard protocols (HTTP)
- Novus: suported codecs: MJPEG, H264; standard protocols (HTTP, RTSP)
- Pelco: suported codecs: MJPEG; standard protocols (RTSP)
- Roseek: RAW
- Samsung:suported codecs: MJPEG, H264; standard protocols (HTTP, RTSP)
- VLC: suported codecs: MJPEG; standard protocols (HTTP)
- Vivotek: suported codecs: MJPEG; standard protocols (HTTP)
- Generic: suported codecs: MJPEG, H264; standard protocols (HTTP, RTSP). When your camera is not on the list, choose this protocol.
Configuring Camera Connection- LPR Input Stream
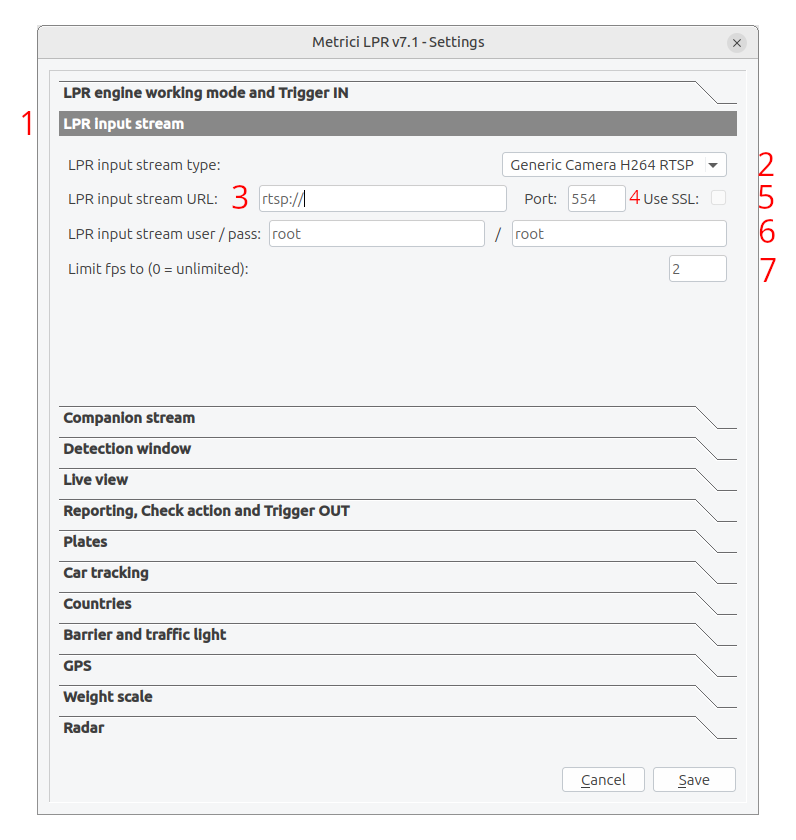
Step-by-Step Setup:
- Click the Settings button on the main interface — see Fig.1 Main Interface (8).
- Select "LPR input stream" from the settings categories — see Fig.3 LPR input stream (1).
- Stream Type: Select your camera's protocol from the dropdown list — see Fig.3 LPR input stream (2).
- IP Address: Enter the camera's IP address or hostname (without http://) — see Fig.3 LPR input stream (3).
- Port: Enter the HTTP port (default HTTP is usually 80)-other protocols have different ports — see Fig.3 LPR input stream (4).
- Use SSL: Enable if your camera requires secure connection — see Fig.3 LPR input stream (5)
- Username/Password: Enter credentials if your camera is password protected — see Fig.3 LPR input stream (6).
- Limit FPS: Set to 0 for unlimited, or specify a maximum frame rate — see Fig.3 LPR input stream (7).
Use Companion Stream tab and fill in data only if one camera (different from LPR one) is available for this purpose. Otherwise leave it blank.
Tip:Higher frame rates provide more opportunities to capture clear images of passing vehicles. In parking lots, 2-3 FPS is usually enough. More are required on highways.
Camera Positioning Guidelines Proper camera placement significantly impacts recognition accuracy. Consider these factors:
- Angle: Position the camera so license plates are visible without extreme angles. Ideally, the plate should be facing the camera within maximum 30 degrees from perpendicular
- Lighting: Ensure adequate illumination or IR for the detection zone. Avoid direct sunlight that causes glare on plates
- Resolution: At the expected detection distance, license plates should appear at least 200 pixels wide in the image
- Weather Protection: Use weatherproof housing for outdoor installations
Testing Your Camera Setup
After configuring the camera, the connection status indicator on the main interface will show:
- RED - Disconnected: Check your IP address and network connection
- ORANGE - Connecting: Wait a few seconds for the connection to establish
- GREEN - Connected: Camera is streaming successfully
4. Detection Window Configuration
The detection window allows you to define a specific area within the camera view where the system will look for license plates. This is crucial for improving accuracy and reducing false detections from areas where plates cannot be found.
Why Use a Detection Window?
- Improved Accuracy: Focuses recognition efforts on relevant areas
- Reduced Processing: Smaller detection areas use less CPU power
- Fewer False Positives: Ignores irrelevant objects in other parts of the image
- Reduced Area: Can initiate detection when vehicles enter specific areas
Configuring the Detection Window
Manual Configuration:
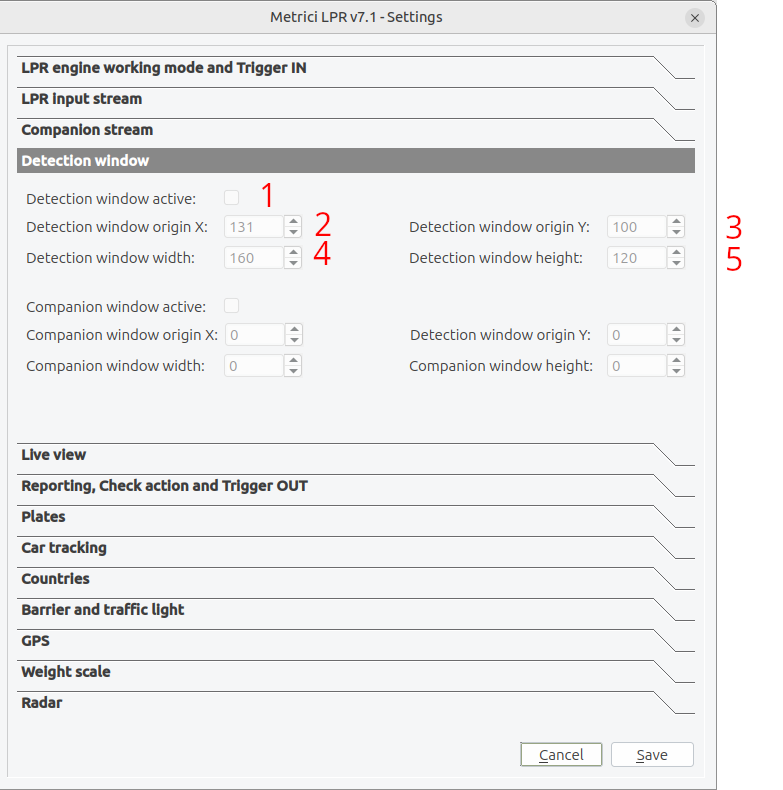
- Open Settings and navigate to "Detection window" — see Fig.1 Main Interface (8).
- Check "Detection window active" to enable the feature — see Fig.4 Detection Window (1).
- Set the origin coordinates (X, Y) for the top-left corner of the detection area — see Fig.4 Detection Window (2, 3).
- Set the width and height for the detection area dimensions — see Fig.4 Detection Window (4, 5).
- Or just drag the corners of the polygon in the main window
Companion Window
If you're using a companion camera stream, you can also configure a detection window for it. The companion window works similarly to the main detection window and can be used for additional validation or wider area coverage. As this camera is not usually used for detection, a window will not affect overall recognition performance but displaying it and streaming can overload bandwith and power. However it is useful in Red Light runner detection applications, when a window is to be placed for the traffic light.
Interactive Configuration:
For easier setup, you can position the detection window directly on the video feed:
Important! If you want to position the detection window directly on the video feed you need to have the Settings menu open!
- In Settings, navigate to the Detection window section
- Click on the video display in the main window
- Drag the corners of the detection box to resize
- Drag the center to reposition the window
Note: Width and height values must be divisible by 4. This is a technical requirement for the recognition engine to function correctly.
5. Plate Recognition and Detection Settings
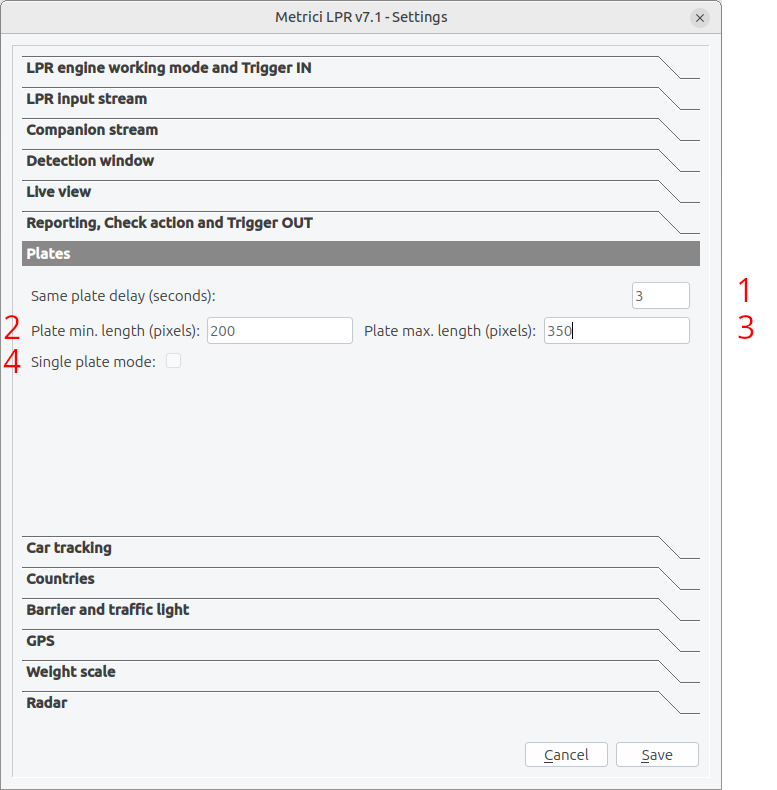
Fine-tuning recognition settings helps balance between detection accuracy, processing speed, and the types of vehicles you want to capture. To access the plates menu go to settings, Plates — see Fig.5 Plates.
Same Plate Delay (seconds)
This setting defines the minimum time (in seconds) before the same license plate can be detected and reported again. During this delay, repeated detections of the same plate are ignored. — see Fig.5 Plates (1). This is useful if the view is briefly obstructed by an object.
Minimum Plate Width
This setting defines the smallest plate size (in pixels) that will trigger a detection. Plates smaller than this threshold will be ignored — see Fig.5 Plates (2). Recommended value=200.
| Setting Value | Effect | Use Case |
|---|---|---|
| 100-150 pixels | More sensitive, captures distant plates. Prone to errors. | Wide-angle views, longer detection ranges |
| 200-250 pixels | Balanced detection | Typical parking or access control. High speed also. |
| 300+ pixels | Only close plates detected | Tight spaces, high accuracy requirement |
Recommendation: For optimal recognition quality, set the minimum plate width to at least 200 pixels. Smaller plates often result in poor recognition accuracy.
Maximum Plate Width
Sets the largest plate size that will trigger a detection. This prevents very large objects from being mistakenly identified as plates and reduces processing of oversized images — see Fig.5 Plates (3).
Single Plate Mode
When enabled, this mode assumes there is only one license plate in the camera view at any time — see Fig.5 Plates (4). This is particularly useful for:
- Truck weighing stations where vehicles stop and wait
- Drive-through configurations
- Areas with low traffic volume
Caution: Single plate mode may miss vehicles when multiple cars are present in the frame. Only enable this when your specific use case requires it.
6. Countries and Plate Selection
Metrici LPR can recognize license plates from 57 countries worldwide. Selecting the correct countries improves recognition accuracy by telling the system which plate formats to expect.
Selecting Countries
In the Settings Window:
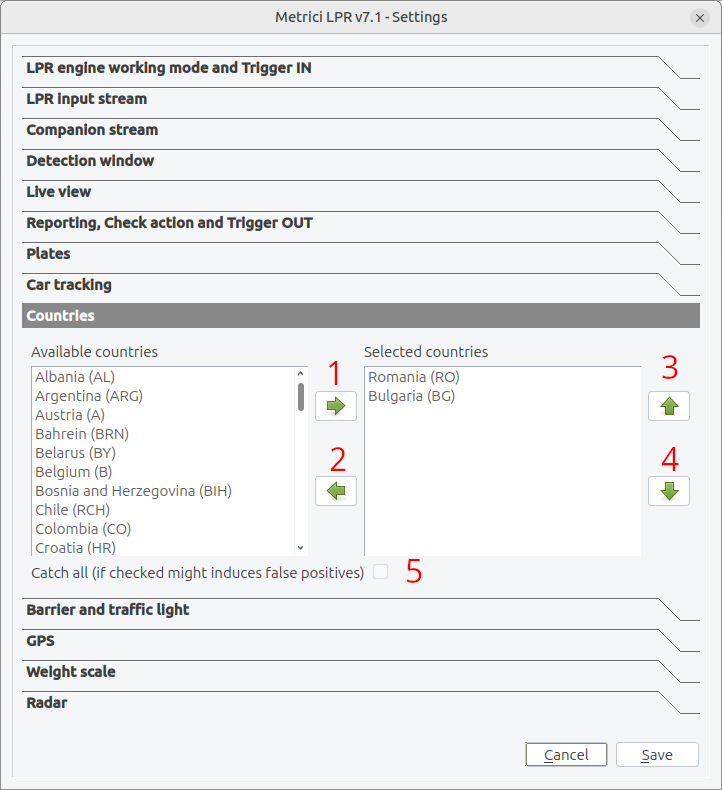
- Open Settings and select "Countries" — see Fig.6 Countries.
- You will see two lists: "Available countries" and "Selected countries".
- Select a country from the available list and click Push (→) to add it to selected — see Fig.6 Countries (1).
- To remove a country, select it and click Pop (←) — see Fig.6 Countries (2).
- Use Up/Down arrows to change the priority order (first in list = higher priority) — see Fig.6 Countries (3, 4).The country where the installation is in should always be first on the list. No matter how many countries are on the detection list, when first syntax match is done, Metrici will stop looking further. This is why it is important to place countries acoording to the probability top.
Country List
The system supports plates from these regions:
- Europe: Albania (AL), Austria (A), Belarus (BY), Belgium (B), Bosnia (BIH), Bulgaria (BG), Croatia (HR), Cyprus (CY), Czech Republic (CZ), Denmark (DK), Estonia (EST), Finland (FIN), France (F), Germany (D), Great Britain, Greece (GR), Hungary (H), Ireland (IRL), Italy (I), Kosovo (KS), Kuwait (KW), Latvia (LV), Lithuania (LT), Luxembourg (L), Macedonia (MK), Malta (MT), Moldova (MD), Montenegro (MNE), Netherlands (NL), Norway (N), Poland (PL), Portugal (P), Romania (RO), Russia (RUS), Serbia (SRB), Slovakia (SLO), Slovenia (S), Spain (E), Sweden (S), Switzerland (CH), Turkey (TR), Ukraine (UA), United Kingdom (GB)
- Middle East: Israel (IL), Jordan (JO), Saudi Arabia (KSA), Bahrein, Qatar
- Asia:Hong Kong, India (IND), Kazakhstan (KZ), Philippines (PH),
- Americas: Argentina (RA), Chile (RCH), Colombia (CO), Peru (PE),
- Other, Africa: Tanzania, Zanzibar
Catch-All Mode
When "Catch all" is enabled, the system will attempt to recognize and report ANY license plate, even from countries not in your selected list. — see Fig.6 Countries (5).
Warning: Catch-all mode may increase false positives because the system attempts to read plates using all available country formats. Use this only when you need to detect plates from many different countries.
7. Trigger Modes and Detection Timing
This tab allows settings the way the engine acts. The trigger mode determines when the system processes video frames to look for license plates. Choosing the right trigger mode affects both recognition accuracy and system resources.
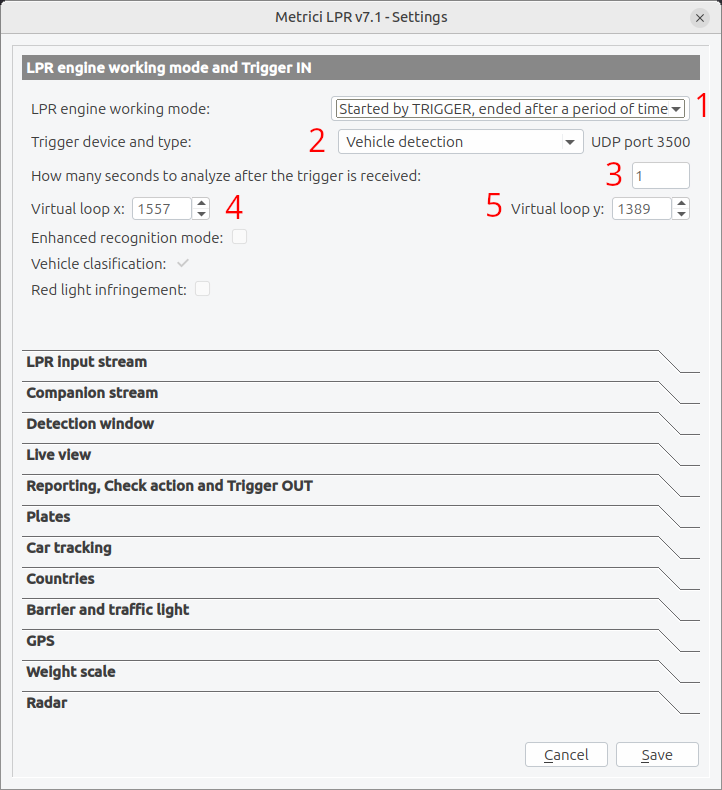
LPR Engine Working Modes
From "LPR engine working mode:" — see Fig.7 LPR engine (1), you can choose between three options:
1. Continuous Mode
- Description: The system constantly analyzes every video frame
- Best for: High-traffic areas, monitoring entry/exit points
- Resource usage: High - uses more CPU/GPU
2. Triggered - End After Time Period
- Description: Detection starts when a trigger signal is received and continues for a set duration
- Best for: Access control with gate sensors, truck weighing
- Saves: Processing power when no vehicles are present
3. Triggered - End After Level Change
- Description: Detection runs while the trigger signal is active (high), stops when it returns to inactive (low)
- Best for: Integration with physical sensors like induction loops or Metrici Virtual Trigger
Trigger Device Types
This setting can be changed from "Trigger device and type: " — see Fig.7 LPR engine (2).
| Trigger Type | Description | Use Case |
|---|---|---|
| None | No external trigger, use continuous or internal detection | Standalone operation |
| Barionet 50 | Industrial I/O controller with digital inputs (I1-I4) | Physical sensors, loops |
| Metrici Virtual Trigger | Software trigger controlled by the other application | Testing, virtual loops |
| Multicontroller | Multi-function controller with RFID support | Access control systems |
| Vehicle Detection | Internal detection of vehicles in video- Metrici Virtual Loop | No external hardware needed |
Trigger Duration Settings
When using time-based trigger modes, set "How many seconds to analyze after trigger" to define how long the system continues processing after receiving a trigger signal. — see Fig.7 LPR engine (3).
Tip: Set this value based on typical traffic flow.
Virtual Loop Configuration
The virtual loop is a Metrici proprietary specific point within the detection window that triggers plate recognition when a vehicle passes over it. This mimics the functionality of physical induction loops used in some access control systems.
Setting Up Virtual Loop:
- In Settings, under "LPR engine working mode and Trigger IN", you need to select "Vehicle detection" — see Fig.7 LPR engine (2).
- Set Virtual loop X and Virtual loop Y coordinates— see Fig.7 LPR engine (4,5).
- These coordinates define where in the image the "trigger point" is located.
- You can also use the mouse to move the Virtual Loop icon on the live stream in the main interface, if the settings window is open.
8. Vehicle Analysis Features
Beyond license plate recognition, the system can analyze vehicle characteristics using deep learning. These features require additional processing power and work best with GPU acceleration.
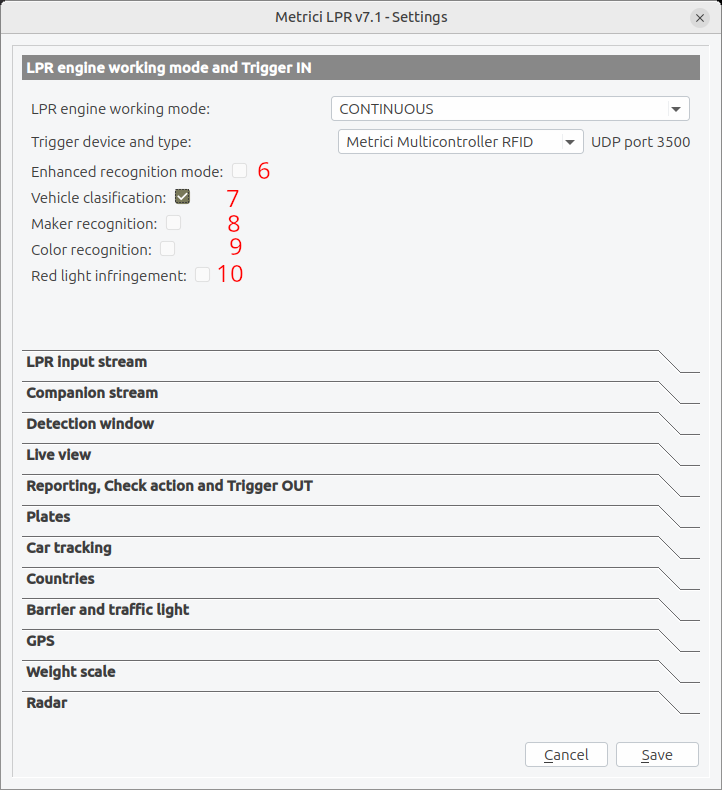
Vehicle Classification
When enabled, the system identifies the type of vehicle detected:
- Car
- Motorcycle
- Bus
- Truck
- Semi-truck
- Van
- SUV/Pick-up
- Tram
- Other vehicles
Vehicle Maker Recognition
Identifies the manufacturer (brand) of the detected vehicle (Over 60 brands recognized). This is useful for:
- Vehicle fleet management
- Security applications (identify specific brands)
- Traffic analysis by vehicle type
Color Recognition
Determines the vehicle's primary color. Common colors detected include:
- Black
- Grey/Silver
- White
- Beige
- Red
- Yellow
- Blue
- Green
- Orange
- Brown
- Purple
- Other
Red Light Infringement
When combined with traffic light monitoring, this feature can identify vehicles that pass through intersections when the light is red. This requires:
- Detection of traffic light state (red/green)
- Plate recognition during red light
- Correlation of timing between light state and vehicle position
Requirements: Vehicle analysis features require significant processing power. They are recommended only when:
- You have a dedicated GPU available
- Your system isn't already at maximum processing capacity
- You actually need these features for your application
Enhanced Recognition Mode
This mode increases recognition accuracy at the cost of:
- Longer processing time per frame
- Reduced maximum frame rate
- Higher likelihood of missing fast-moving vehicles
When to use: Enable enhanced mode when accuracy is critical and vehicles move slowly (under 30 km/h). Disable for high-speed traffic monitoring. Metrici recommeds to keep it OFF.
9. External System Integration - Reporting, Check Action and Trigger Out
Metrici LPR can integrate with various external systems to create automated workflows. This section covers the communication protocols and configuration for external connections.
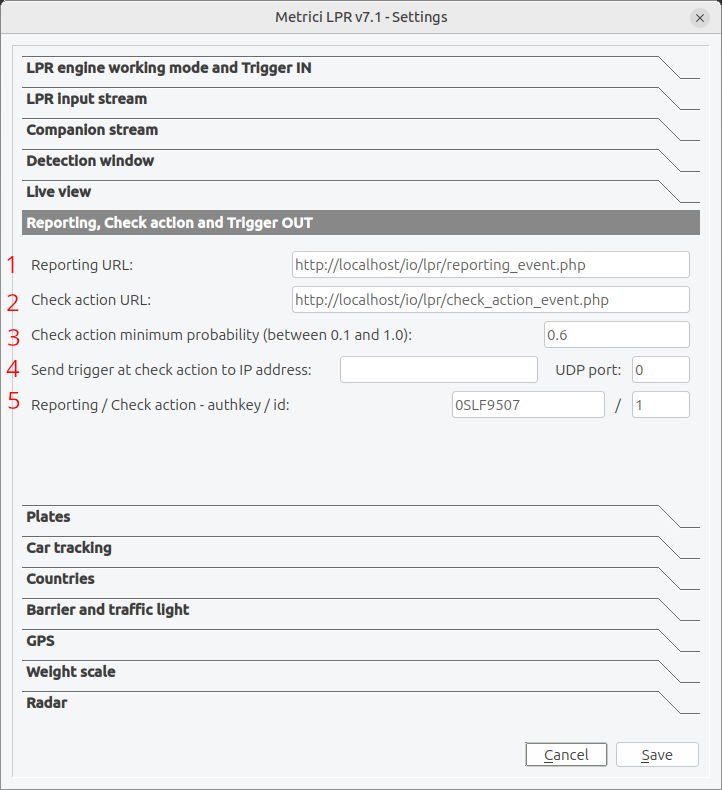
Reporting URL
The reporting URL specifies where the system sends detection events. Each time a plate is recognized, the system sends data to this address: http://IP_ADDRESS/path/reporting_event.php. In case the reporting and administration interface is installed on the same computer as the analysis application, IP_ADDRESS will be 127.0.0.1 or localhost and path will be /io/lpr/ — see Fig.9 Reporting... (1). This address is usually where the Metrici Interface License is installed, to see all events in Interface and build database, reports, etc.
Data Format:
POST http://your-server.com/path/reporting_event.php
Content-Type: application/x-www-form-urlencoded

plate_number=ABC123&country=RO×tamp=20240101120000&confidence=0.95
Check Action URL
This address specifies where the system sends a request to check which actions should be executed when a license plate is recognized. Actions are configured in the Metrici LPR Web Interface and may include opening a barrier, sending an e-mail, showing a pop-up message on the screen, or changing a traffic light.
The URL has the following format: http://IP_ADDRESS/path/check_action_event.php. If the reporting and administration interface is installed on the same computer as the analysis application, set IP_ADDRESS to 127.0.0.1 or localhost and path to io/lpr. — see Fig.9 Reporting... (2).
The Reporting URL and Check Action URL may be different. The system typically calls the Check Action URL first, when a vehicle is detected, and sends the Reporting event later, when the vehicle exits the camera’s field of view. In parking or barrier-control scenarios, you can define rules in the Metrici Interface for the camera connected to the barrier, for example: open the barrier when a specific plate number is recognized; or use a wildcard rule (e.g., “%”) to grant access to all vehicles.
Minimum Probability Threshold
Only plates recognized with a confidence above this threshold will trigger check actions, preventing false recognitions from causing unwanted responses. Check action minimum probability (0.1–1.0) sets the minimum confidence required before a recognized license plate is checked against the database for possible actions. In other words, it defines how certain the engine must be that the reading is correct. We recommend a value of 0.6, which typically means the plate has been detected consistently (e.g., in at least two frames) before actions are evaluated. — see Fig.9 Reporting... (3).
| Threshold | Effect |
|---|---|
| 0.40 (40%) | More actions, higher false positive risk |
| 0.60 (60%) | Balanced setting |
| 0.90 (90%) | Fewer but more accurate actions |
Authentication Key
The authkey and ID provide authentication for external server communications — see Fig.9 Reporting... (5). These credentials are obtained from the Metrici web interface where you configure your LPR cameras into the location.
Trigger Output- Send trigger at check action...
When a Check Action returns a positive result, the system can trigger external devices or other Metrici engines by sending a UDP packet to a configured IP address and port. This is typically used to synchronize events between systems—for example, triggering a second camera/engine to start recognition when the first camera detects a vehicle. — see Fig.9 Reporting... (4).
10. GPS Configuration
GPS integration adds location data to every plate detection, useful for mobile installations or when you need to verify where detections occurred.
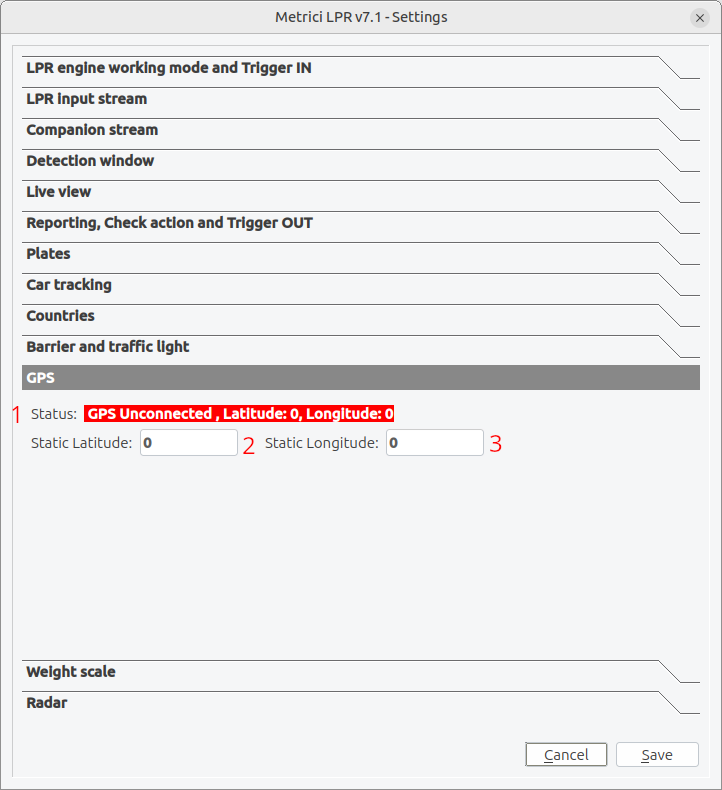
GPS Features
- Position Tracking: Records latitude and longitude with each detection.
- Status Monitoring: Shows GPS signal quality (connected, good signal, low signal, error).
- Static Location: Can use fixed coordinates instead of GPS receiver.
Configuration Options
Using GPS Receiver:
- Connect a GPS receiver to your system (typically via USB or serial port).
- The system automatically detects and connects to GPS devices.
- GPS status indicator shows connection quality — see Fig.10 GPS (1).
Using Static Location:
- Enter coordinates in Static Latitude and Static Longitude fields — see Fig.10 GPS (2,3).
- Use format: decimal degrees (e.g., 44.4268 for Bucharest).
- This overrides GPS receiver if both are configured.
GPS Status Indicators
| Status | Meaning |
|---|---|
| Unconnected | No GPS receiver detected |
| Error | GPS receiver found but communication failed |
| Low Signal | Receiving data but insufficient satellites for accurate fix |
| Good Signal | Accurate position data available |
11. Weight Scale and Radar Integration
For commercial vehicle monitoring applications, integrating weight scales and speed radars provides additional data for each detection.
Weight Scale Integration
Connect to weight measurement systems for truck weighing and cargo monitoring:
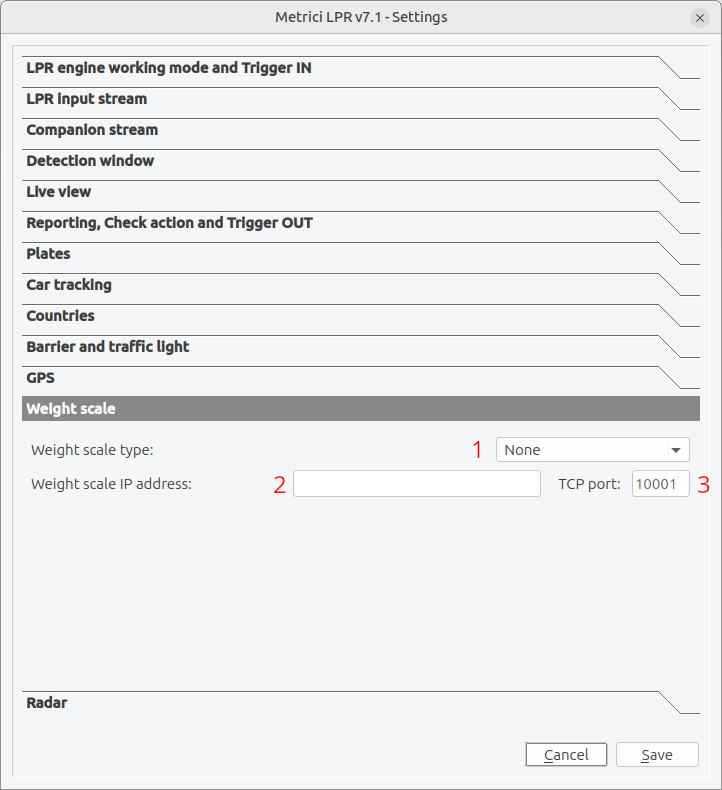
Supported Weight Scale Types:
- Generic Scale: Multi-platform weighing controller
- Dini Argeo: Industrial weighing systems
- Bilancia D400: Weighing terminal
- Custom STXLF: Generic serial protocol
- Custom STXETX: Generic serial protocol
Configuration:
- In Settings, select "Weight scale" — see Fig.11 Weight scale.
- Choose the weight scale type from dropdown — see Fig.11 Weight scale (1).
- Enter the IP address of the weight scale controller — see Fig.11 Weight scale (2).
- Enter the TCP port number — see Fig.11 Weight scale (3).
Display:
When a weight scale is connected and configured, the measured weight appears on the video display overlay, near the plate detection result.
Radar Speed Detection
Integrate with speed radar devices to capture vehicle speed along with plate recognition:
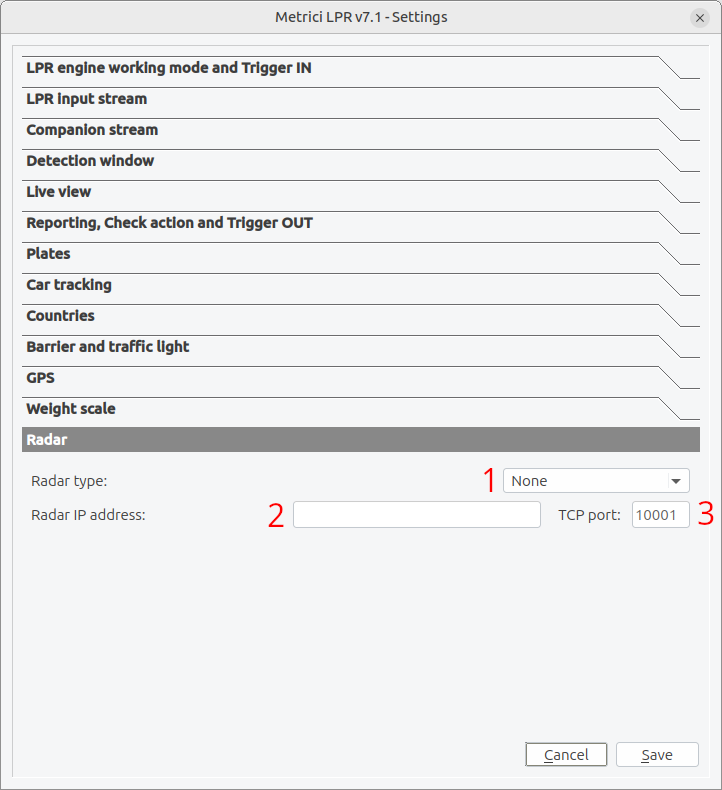
Supported Radar Types:
- Metrici Observer Radar
Configuration:
- In Settings, select "Radar" — see Fig.12 Radar.
- Choose the radar type- Observer Radar — see Fig.12 Radar (1).
- Enter the IP address of the radar controller — see Fig.12 Radar (2) .
- Enter the TCP port number — see Fig.12 Radar (3).
Display:
When connected, detected vehicle speed appears on the video overlay during playback.
Integration Note: Both weight scale and radar use IP connectivity. Ensure both devices are on the same network as your LPR system and that firewall rules allow communication on the configured TCP ports.
12. Barrier and Traffic Light Control
Metrici LPR can automatically control barriers and traffic lights based on plate recognition results. This enables fully automated access control systems.
Barrier Control
Configure URLs that the system will call to open and close vehicle barriers:
Configuration Fields:
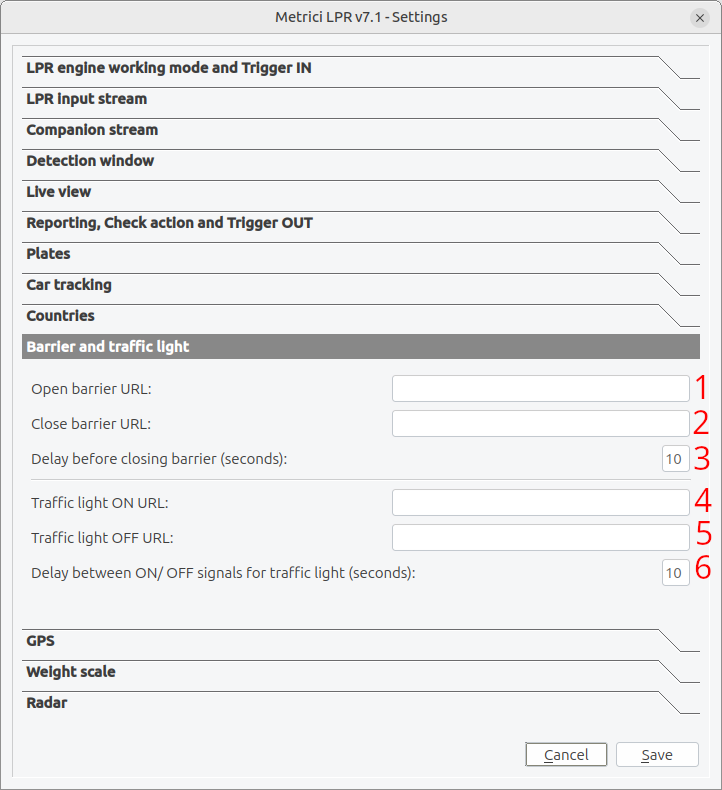
- Open barrier URL: HTTP address to send open command — see Fig.13 Barrier and Traffic light (1).
- Close barrier URL: HTTP address to send close command — see Fig.13 Barrier and Traffic light(2).
- Delay before closing (seconds): will set the time interval, in seconds, the system waits before closing the barrier after it opened it for a recognized license plate — Usually this time can be set in barrier settings as reset time and can be left blank here. Fig.13 Barrier and Traffic light (3).
Example Configuration:
Open barrier URL: http://192.168.1.100/barrier/open
Close barrier URL: http://192.168.1.100/barrier/close
Delay before closing: 10 seconds
Traffic Light Control
Traffic light ON URL is used when a traffic light is installed and configured to switch when a license plate is detected; the light will commute only if this option is enabled for that specific plate number in the Action list, for example in intersection monitoring or traffic management scenarios.
Configuration Fields:
- Traffic light ON URL: Command to turn lights on (red) — see Fig.13 Barrier and Traffic light (4).
- Traffic light OFF URL: Command to turn lights off (green) — see Fig.13 Barrier and Traffic light (5).
- Delay between ON/OFF: Duration of red light phase — see Fig.13 Barrier and Traffic light (6).
Integration with Check Actions
Barrier and traffic light control is typically triggered by the check action system:
- Plate is recognized
- System queries check action URL
- Check action returns response (allow/deny/action)
- System executes configured URLs based on response
13. Troubleshooting
This section covers common issues and their solutions to help you get the most out of your Metrici LPR system.
Camera Connection Issues
Problem: Camera shows "Disconnected" status
Solutions:
- Verify the camera IP address is correct and accessible
- Check network connectivity (can you ping the camera?)
- Confirm the correct stream type is selected
- Check if username/password are correct
- Verify the camera port is not blocked by firewall
- Ensure camera is configured to allow MJPEG/RTSP streams
Problem: Video is choppy or FPS is low
Solutions:
- Reduce camera resolution
- Limit FPS in settings
- Check network bandwidth
- Reduce detection window size
- Upgrade network infrastructure (use wired instead of WiFi)
Recognition Problems
Problem: No plates are being detected
Solutions:
- Check if detection window is properly positioned over the road/lane
- Verify minimum plate width is not set too high
- Ensure adequate lighting on the detection area
- Confirm country selection includes plates from your region
- Check if trigger mode is correctly configured
Problem: Recognition accuracy is poor
Solutions:
- Increase minimum plate width to 200+ pixels
- Improve camera positioning for better plate angles
- Enhance lighting in the detection area
- Enable enhanced recognition mode
- Clean camera lens
- Adjust or reduce detection window to focus on best viewing area
Problem: False detections (recognizing plates that don't exist)
Solutions:
- Enable single plate mode if only one vehicle at a time
- Increase minimum probability threshold
- Reduce detection window to exclude irrelevant areas
- Disable catch-all mode and select only relevant countries
Problem: Same vehicle detected multiple times
Solutions:
- Increase "same plate delay" setting
- Configure virtual loop for single trigger point
- Use trigger mode instead of continuous scanning
Performance Issues
Problem: System runs slowly or lags
Solutions:
- Reduce video resolution or frame rate
- Shrink detection window size
- Disable vehicle analysis features (maker, color, type)
- Disable red light infringement detection
- Use GPU acceleration if available
- Upgrade computer hardware (more RAM, faster CPU/GPU)
External Integration Issues
Problem: External servers not receiving data
Solutions:
- Verify URL is correct and accessible
- Check firewall allows outbound connections
- Confirm authkey and ID are correct
- Review server logs for errors
- Test URL manually in browser
Problem: Barrier/traffic light not responding
Solutions:
- Verify control URLs are correct
- Check device is powered on and connected to network
- Confirm integration settings are saved
- Test URLs manually
- Check device documentation for correct command format
GPS Issues
Problem: GPS status shows error or no signal
Solutions:
- Verify GPS receiver is connected and powered
- Check COM port or USB connection
- Ensure GPS has clear view of the sky
- Wait for GPS to acquire satellite signal (can take several minutes)
- Use static coordinates if GPS signal is unreliable
Getting Help
If you continue to experience issues after trying these solutions:
- Check the application logs for detailed error messages
- Contact technical support with error descriptions and log excerpts
- Include details about your camera model, system configuration, and specific scenarios where issues occur
14. Configuration File (INI)
Metrici LPR stores all its settings in a configuration file called lpr.ini (or numbered variants like 0.ini, 1.ini for multi-camera setups). Understanding this file allows you to:
- Back up and restore configurations
- Deploy the same settings across multiple installations
- Troubleshoot configuration issues
- Edit settings manually when needed
File Location and Naming
The configuration file is located in the same directory as the application executable. By default, it's named lpr.ini. For multi-camera setups where multiple LPR instances are managed by a central system, files may be numbered:
0.ini- First camera configuration1.ini- Second camera configurationlpr.ini- Default configuration
File Format
The INI file uses standard Windows-style INI format with key-value pairs organized into sections (though Qt's QSettings may flatten sections in some configurations). Here's an example of what the file looks like:
; Metrici LPR v7.1 Configuration File
; This file contains all settings for the LPR system
; Edit with care - incorrect settings may affect system behavior

[General]
input_stream_type=5
input_stream_address=192.168.1.100
input_stream_tcp_port=80
input_stream_use_ssl=0
input_stream_username=admin
input_stream_password=secret123
input_stream_fps_limit=15

companion_stream_type=0
companion_stream_address=
companion_stream_tcp_port=80
companion_stream_use_ssl=0

[Recognition]
plate_min_length=200
plate_max_length=350
single_plate_mode=0
enhanced_recognition_mode=0
countries=RO,BG
catch_all=0

[Detection]
input_stream_window_active=1
input_stream_window_origx=0.35
input_stream_window_origy=0.45
input_stream_window_resx=0.3
input_stream_window_resy=0.2
virtual_loop_x=0.5
virtual_loop_y=0.6

[Vehicle Analysis]
vehicle_detection=1
maker_detection=0
color_detection=0
red_light_infringement=0

[External Systems]
reporting_url=http://localhost/io/lpr/reporting_event.php
check_action_url=http://localhost/io/lpr/check_action_event.php
check_action_min_probability=0.6
open_barrier_url=http://admin:admin@192.168.1.100/outs.cgi?out0=0
close_barrier_url=http://admin:admin@192.168.1.100/outs.cgi?out0=1
open_close_barrier_delay=10

[GPS]
gps_latitude=44.4268
gps_longitude=26.1025

[Integration]
reporting_check_action_id=1
reporting_check_action_authkey=your_auth_key_here
Complete Settings Reference
Video Stream Settings
| Setting Name | Default Value | Description |
|---|---|---|
input_stream_type |
0 | Camera type (1=MJPEG HTTP, 2=RTSP H264, etc.) - see stream type codes below |
input_stream_address |
(empty) | IP address or hostname of the main camera |
input_stream_tcp_port |
80 | HTTP port for camera connection |
input_stream_use_ssl |
0 | Enable SSL for camera connection (0=disabled, 1=enabled) |
input_stream_username |
(empty) | Camera username for authentication |
input_stream_password |
(empty) | Camera password for authentication |
input_stream_fps_limit |
5 | Maximum frames per second for main camera (0=unlimited) |
companion_stream_type |
0 | Companion camera type (0=disabled) |
companion_stream_address |
(empty) | IP address of companion camera |
companion_stream_tcp_port |
80 | Companion camera port |
companion_stream_fps_limit |
5 | Companion camera FPS limit |
rtsp_stream_latency |
100 | RTSP stream latency in milliseconds (for RTSP streams) |
rtsp_stream_protocols |
tcp | RTSP protocol (tcp or udp) |
Recognition Settings
| Setting Name | Default Value | Description |
|---|---|---|
plate_min_length |
200 | Minimum plate width in pixels for detection |
plate_max_length |
350 | Maximum plate width in pixels for detection |
single_plate_mode |
0 | Assume only one plate in view (0=disabled, 1=enabled) |
enhanced_recognition_mode |
0 | Higher accuracy mode (0=disabled, 1=enabled) |
countries |
RO,BG | Comma-separated list of country codes to recognize |
catch_all |
0 | Recognize plates from any country (0=disabled, 1=enabled) |
same_plate_delay |
3 | Seconds to wait before reporting same plate again |
Detection Window Settings
| Setting Name | Default Value | Description |
|---|---|---|
input_stream_window_active |
0 | Enable detection window (0=disabled, 1=enabled) |
input_stream_window_origx |
0.4 | Detection window X position as fraction of image width (0.0-1.0) |
input_stream_window_origy |
0.4 | Detection window Y position as fraction of image height (0.0-1.0) |
input_stream_window_resx |
0.2 | Detection window width as fraction of image width (0.0-1.0) |
input_stream_window_resy |
0.2 | Detection window height as fraction of image height (0.0-1.0) |
companion_stream_window_active |
0 | Enable companion camera detection window |
companion_window_* |
0.4, 0.4, 0.2, 0.2 | Companion detection window settings (same format as main) |
virtual_loop_x |
0.5 | Virtual loop X position as fraction of image |
virtual_loop_y |
0.5 | Virtual loop Y position as fraction of image |
Vehicle Analysis Settings
| Setting Name | Default Value | Description |
|---|---|---|
vehicle_detection |
0 | Enable vehicle type classification (0=disabled, 1=enabled) |
maker_detection |
0 | Enable vehicle maker recognition (0=disabled, 1=enabled) |
color_detection |
0 | Enable vehicle color recognition (0=disabled, 1=enabled) |
red_light_infringement |
0 | Enable red light infringement detection (0=disabled, 1=enabled) |
full_gpu_algorithm |
0 | Run full algorithm on GPU (0=disabled, 1=enabled) |
Trigger Settings
| Setting Name | Default Value | Description |
|---|---|---|
external_trigger_type |
0 | Trigger device type (0=None, 1-4=Barionet, 5=Virtual, etc.) |
external_trigger_seconds |
1 | Seconds to analyze after receiving trigger |
lpr_engine_working_mode |
0 | 0=Continuous, 1=Triggered-time, 2=Triggered-level |
cars_direction |
0 | Vehicle direction angle (0-359 degrees) |
cars_event_type |
1 | 1=Coming, 2=Leaving, 3=Unknown |
External Integration Settings
| Setting Name | Default Value | Description |
|---|---|---|
reporting_url |
http://localhost/io/lpr/reporting_event.php | URL for sending detection reports |
reporting_duplicate_url |
(empty) | Secondary URL for redundant reporting |
check_action_url |
http://localhost/io/lpr/check_action_event.php | URL for checking actions based on plate numbers |
check_action_duplicate_url |
(empty) | Secondary check action URL |
check_action_min_probability |
0.6 | Minimum confidence (0.1-1.0) to trigger check action |
check_action_send_trigger_address |
(empty) | IP address for sending UDP trigger on check action |
check_action_send_trigger_udp_port |
0 | UDP port for trigger output |
check_action_direction_for_sending |
0 | Direction filter for trigger sending |
external_query_url |
http://localhost/io/lpr/get_info.php?plate_number=#INPUT_VALUE | URL for manual plate queries |
reporting_check_action_id |
0 | Camera ID for external system authentication |
reporting_check_action_authkey |
(empty) | Authentication key for external systems |
Barrier and Traffic Light Control
| Setting Name | Default Value | Description |
|---|---|---|
open_barrier_url |
(empty) | URL to call when opening barrier |
close_barrier_url |
(empty) | URL to call when closing barrier |
open_close_barrier_delay |
10 | Seconds to wait before automatically closing barrier |
open_barrier2_url |
(empty) | URL to turn traffic light ON (red) |
close_barrier2_url |
(empty) | URL to turn traffic light OFF (green) |
open_close_barrier2_delay |
10 | Seconds to maintain red light state |
Live View Settings
| Setting Name | Default Value | Description |
|---|---|---|
live_view_active |
1 | Enable periodic live view snapshots (0=disabled, 1=enabled) |
live_view_url |
http://localhost/io/lpr/live_view.php | URL for receiving live view snapshots |
live_view_resolution_divider |
1 | Divide live view resolution by this factor (1=full, 2=half size) |
GPS Settings
| Setting Name | Default Value | Description |
|---|---|---|
gps_latitude |
0 | Static latitude coordinate (decimal degrees) |
gps_longitude |
0 | Static longitude coordinate (decimal degrees) |
Hardware Integration Settings
| Setting Name | Default Value | Description |
|---|---|---|
weight_scale_type |
0 | Weight scale model (0=None, 1=Cantar-I30, 2=Dini Argeo, etc.) |
weight_scale_address |
(empty) | IP address of weight scale controller |
weight_scale_tcp_port |
10001 | TCP port for weight scale connection |
radar_type |
0 | Radar type (0=None, 1=Kestrel Pico Basic) |
radar_address |
(empty) | IP address of radar controller |
radar_tcp_port |
10001 | TCP port for radar connection |
Stream Type Codes Reference
| Code | Stream Type |
|---|---|
| 0 | Disabled |
| 1 | HTTP MJPEG (ACTi) |
| 2 | RTSP H264 (ACTi) |
| 3 | HTTP MJPEG (Android) |
| 4 | HTTP MJPEG (Arecont) |
| 5 | HTTP MJPEG (Axis) |
| 6 | RTSP MJPEG (Axis) |
| 7 | RTSP H264 (Axis) |
| 8 | RTSP MJPEG (Bosch) |
| 9 | RTSP H264 (Bosch) |
| 10 | HTTP MJPEG (Dahua) |
| 11 | HTTP MJPEG (Diviotec) |
| 12 | RTSP H264 (Diviotec) |
| 13 | HTTP MJPEG (Generic) |
| 14 | RTSP MJPEG (Generic) |
| 15 | RTSP H264 (Generic) |
| 16 | RTSP H265 (Generic) |
| 17 | HTTP JPEG Picture (Generic) |
| 18 | HTTP MJPEG (Hikvision) |
| 19 | RTSP H264 (Hikvision) |
| 20 | HTTP MJPEG (Mobotix) |
| 21 | HTTP MxPEG (Mobotix) |
| 22 | RTSP H264 (Mobotix) |
| 23 | RTSP H264 (Mobotix Move) |
| 24 | HTTP MJPEG (Novus) |
| 25 | RTSP H264 (Novus) |
| 26 | RTSP MJPEG (Pelco) |
| 27 | Raw (Roseek) |
| 28 | HTTP MJPEG (Samsung) |
| 29 | RTSP H264 (Samsung) |
| 30 | HTTP MJPEG (Sony) |
| 31 | RTSP H264 (Sony) |
| 32 | RTSP H264 (Uniview) |
| 33 | Video File |
| 34 | HTTP MJPEG (Vivotek) |
| 35 | HTTP MJPEG (VLC) |
Trigger Type Codes
| Code | Trigger Type |
|---|---|
| 0 | None |
| 1 | Barionet 50 Input 1 |
| 2 | Barionet 50 Input 2 |
| 3 | Barionet 50 Input 3 |
| 4 | Barionet 50 Input 4 |
| 5 | Metrici Virtual Trigger-gets command from another engine |
| 6 | Multicontroller Input 1 |
| 7 | Multicontroller Input 2 |
| 8 | Multicontroller RFID |
| 9 | Vehicle Detection- Virtual Loop |
Weight Scale Type Codes
| Code | Weight Scale Type |
|---|---|
| 0 | None (Disabled) |
| 1 | GenericScale |
| 2 | Dini Argeo |
| 3 | Bilancia D400 |
| 4 | Custom STXLF Protocol |
| 5 | Custom STXETX Protocol |
Editing the Configuration File
Manual Editing
- Make a backup copy of the current INI file
- Open the file in a text editor (Notepad, TextEdit, or any code editor)
- Find the setting you want to change
- Modify the value after the equals sign
- Save the file
- Restart the LPR application or reload settings
Important: When editing the INI file manually, be careful to:
- Keep the format exactly as shown (key=value)
- Use only numbers for numeric values (no commas, units, or text)
- Preserve decimal points for floating-point values
- Do not remove semicolons from commented lines
Automating Configuration Deployment
For deployments across multiple sites:
- Create a "master" INI file with your standard settings
- Deploy this file to all installations
- Only modify site-specific values (IP addresses, auth keys) per installation
- Use version control to track configuration changes
Configuration Backup and Restore
Regular backups ensure you can recover from configuration issues:
What to Include in Backup:
- The main INI file (lpr.ini or numbered variant)
- Any custom country recognition files
- OCR training data if customized
Backup Best Practices:
- Backup before making major configuration changes
- Name backups with dates (e.g.,
lpr_20240115_backup.ini) - Test restored configurations in a non-production environment first
- Document why each configuration was changed
Troubleshooting Configuration Issues
Settings Not Taking Effect
Possible causes and solutions:
- Application didn't reload the INI file - restart the application
- Editing the wrong INI file - check which file the application is using
- Syntax error in INI file - open in text editor and look for issues
- Permissions issue - ensure the file is readable by the application
Application Won't Start After Editing INI
Recovery steps:
- Rename the problematic INI file to something else
- Start the application - it will create a new default INI
- Compare the original and new files to identify the error
- Copy correct settings from the new file
Common Configuration Mistakes
- Using comma-separated values where space-separated is required
- Forgetting that boolean values must be 0 or 1 (not "true"/"false")
- Setting numeric values outside valid ranges
- Leaving spaces around equals signs (use
key=value, notkey = value)
Advanced: Multiple Camera Setup
For systems managing multiple LPR cameras:
- Each camera typically has its own numbered INI file (0.ini, 1.ini, etc.)
- The main application tracks which camera each file belongs to
- Settings can be different for each camera
- Some settings (like external system URLs) may be shared across cameras
INI File Security Considerations
The INI file may contain sensitive information:
- Passwords: Camera access credentials are stored in plain text
- Auth keys: External system authentication tokens
- URLs: Server addresses that could reveal network topology
Security recommendations:
- Restrict file permissions to only application users
- Consider using external configuration management for sensitive values
- Regularly rotate authentication credentials
- Avoid storing production passwords in version control
15. Appendix: Settings Quick Reference
Recommended Settings by Application
Parking Entry/Exit:
- Working Mode: Continuous or Triggered (vehicle detection)
- Min Plate Width: 200 pixels
- Same Plate Delay: 15-30 seconds
- Countries: Select your country
Truck Weighing Station:
- Working Mode: Triggered (level change)
- Single Plate Mode: Enabled
- Min Plate Width: 250 pixels
- Same Plate Delay: 60 seconds
- Integration: Weight scale required
Toll Road:
- Working Mode: Continuous
- Min Plate Width: 180 pixels
- Same Plate Delay: 5 seconds
Border Control:
- Working Mode: Continuous
- Countries: Multiple (all expected nationalities)
- Catch All: May be enabled
- Check Action Mandatory: Required for blacklist checking and database check
Final Note: Every installation is unique. Use these recommendations as starting points and adjust based on your specific requirements and observed results. Regular monitoring and fine-tuning will optimize performance for your particular situation.
Metrici LPR v7.1
License Plate Recognition System
Copyright © 2026