Parking Place Detector
User Manual for End Users and System Administrators

Table of Contents
- Introduction
- Main Window Overview
- Configuration Settings
- Camera Stream Configuration
- Detection Settings
- Reporting Configuration
- Managing Parking Spaces
- Troubleshooting
- INI Configuration File
1. Introduction
What This Application Does
Parking Place Detector is an automated surveillance solution that:
- Connects to one or more cameras monitoring a parking area.
- Continuously analyzes video frames to detect vehicles or other objects.
- Monitors the status (free/occupied) of each parking space.
- Sends real-time occupancy data to your reporting server.
- Provides a live view of the parking area with detection overlays.
Key Concepts
- Input Stream: The primary camera feed showing the parking area.
- Companion Stream: An optional secondary camera for different overview.
- Trigger: An external signal (from sensors or other systems) that can start/stop detection.
- Recognition Enhancement: How thoroughly the system analyzes each frame for detection.
2. Main Window Overview
When you launch the application, you'll see the main window containing several important areas:
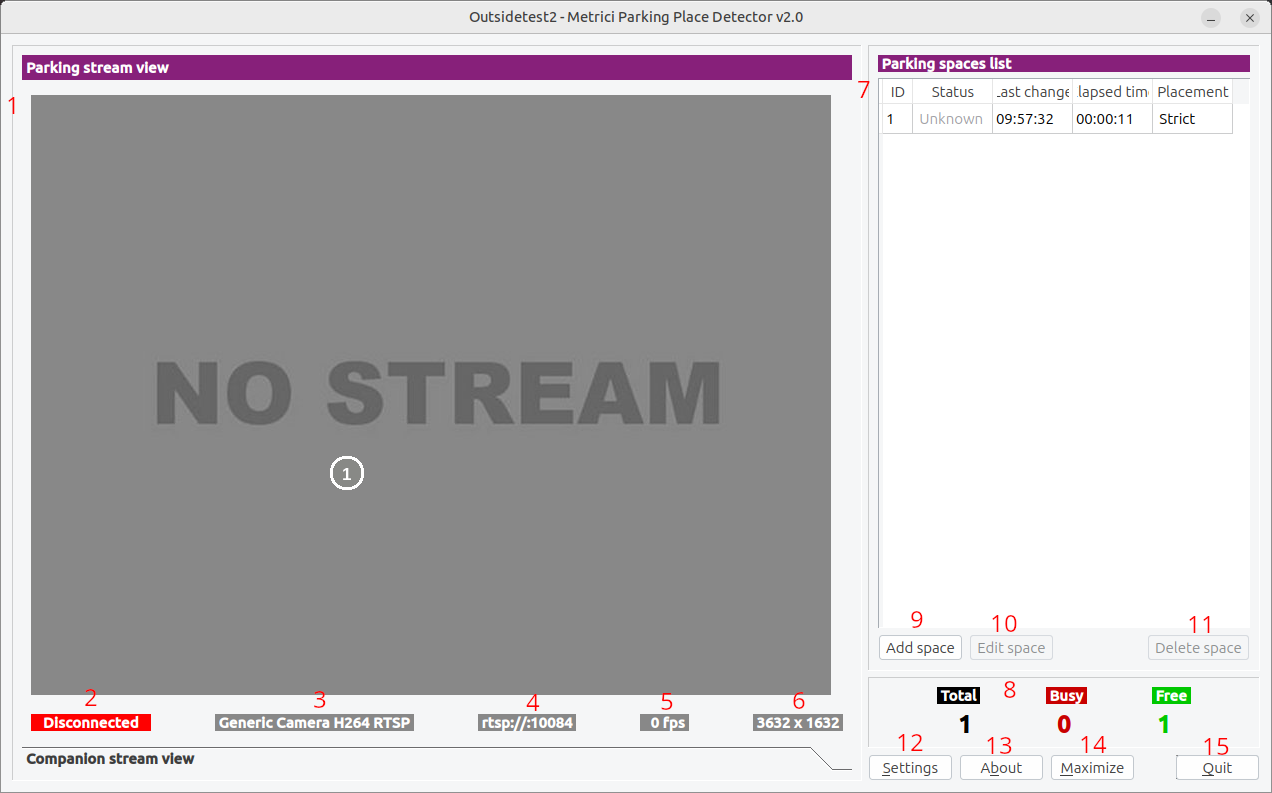
2.1 Video Display Area
The main portion of the window shows the live camera feed. This is where you can:
- Watch the real-time video from your parking camera.
- See colored boxes (bounding boxes) around detected vehicles.
- Observe the current status of each parking space.
2.2 Connection Status Indicators
Located below the video display, these indicators show:
- Connection Status: Whether the camera is connected, disconnected, or connecting — see Fig.1 Main Interface (2).
- Stream Type: What type of video stream is being used (RTSP, HTTP, etc.) — see Fig.1 Main Interface (3).
- Stream Address: The IP address or URL of the camera — see Fig.1 Main Interface (4).
- FPS: Frames per second being processed — see Fig.1 Main Interface (5).
- Resolution: The video resolution (width x height) — see Fig.1 Main Interface (6).
2.3 Parking Spaces Table
A table showing all configured parking spaces — see Fig.1 Main Interface (7):
- ID: Unique identifier for each space.
- Status: Free, Busy.
- Double Parking: Whether a vehicle is parked across two spaces.
2.4 Counter Summary
At the bottom, you'll see three counters showing — see Fig.1 Main Interface (8):
- Total: Total number of parking spaces configured.
- Busy: How many spaces are currently occupied.
- Free: How many spaces are currently available.
2.5 Control Buttons
The main window includes these control buttons:
- Add space: Add a new parking space — see Fig.1 Main Interface (9).
- Edit space: Edit an existing parking place — see Fig.1 Main Interface (10).
- Delete space: Delete an existing parking place — see Fig.1 Main Interface (11).
- Settings: Opens the configuration panel — see Fig.1 Main Interface (12).
- About: Shows version and license information — see Fig.1 Main Interface (13).
- Maximize: Toggles the window between normal and maximized view — see Fig.1 Main Interface (14).
- Quit: Closes the application — see Fig.1 Main Interface (15).
3. Configuration Settings
Click the Settings button to open the configuration panel — see Fig.1 Main Interface (12).
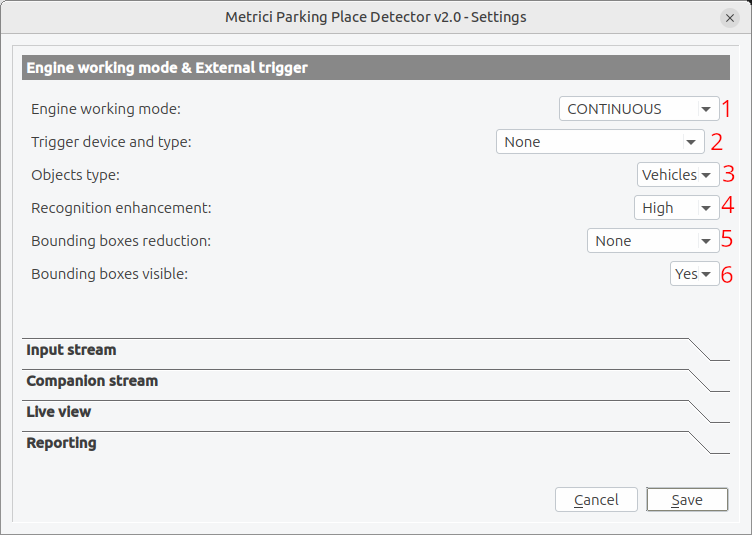
3.1 Engine Working Mode & External Trigger
This tab controls how the detection system operates.
Engine Working Mode
Choose how the detection engine should operate — see Fig.2 Engine Working Mode & External Trigger (1):
- CONTINUOUS: The system constantly analyzes video frames. Use this for round-the-clock monitoring.
- Started by TRIGGER: The system only analyzes frames when it receives an external signal. Use this if you want to save resources or only monitor during certain events.
Trigger Device and Type
If you selected "Started by TRIGGER" mode, configure the trigger source — see Fig.2 Engine Working Mode & External Trigger (2):
- None: No external trigger (same as CONTINUOUS mode).
- Barix Barionet 50 (inputs 1-4): A hardware device that sends trigger signals via network.
- Metrici Virtual Trigger: A software-based trigger from another Metrici engine.
Note: When using external triggers, the system listens on UDP port 3500. If you need to run multiple instances of the application, each additional instance uses the next port number (3501, 3502, etc.). The port number is calculated as: 3500 + your App ID.
How Many Seconds to Analyze After Trigger
When a trigger signal is received, the system will continue analyzing for this many seconds before stopping. This allows the system to capture multiple frames after the initial trigger event. This setting only apears only when a trigger device and type is selected. — see Fig.3 Seconds.

Valid range: 1 to 65535 seconds
Objects Type
Select what types of objects the system should detect — see Fig.2 Engine Working Mode & External Trigger (3):
- Vehicles: Cars, buses, trucks, semi-truck, vans, SUVs/pick-ups, motorcycles, trams, other
- Boats: Jet-skis, Inflatable, Dinghy, Sailboat, Motor-yacht, Passenger-ship, Catamaran, Other
- People: Human detection for pedestrian monitoring
Recognition Enhancement
This setting controls how thoroughly the system analyzes each frame. Higher settings mean more accurate detection but require more processing time and computer resources — see Fig.2 Engine Working Mode & External Trigger (2):
- Low: Fastest processing, basic detection quality
- Medium: Balanced speed and accuracy
- Normal: Standard detection quality
- High: Better accuracy, moderate speed
- Ultra: High accuracy, slower processing
- Insane: Maximum accuracy, slowest processing
Bounding Boxes Reduction
Detection boxes around objects can sometimes overlap. This setting shrinks the boxes to avoid false overlaps that might cause incorrect occupancy readings — see Fig.2 Engine Working Mode & External Trigger (5):
- None: No reduction (boxes shown at full size)
- 25% both axes: Boxes reduced by 25% in width and height.
- 50% both axes: Boxes reduced by half in both directions.
- 75% both axes: Boxes reduced to 25% of original size.
- 25% horizontal: Width reduced by 25%.
- 50% horizontal: Width reduced by 50%.
- 75% horizontal: Width reduced by 75%.
- 25% vertical: Height reduced by 25%.
- 50% vertical: Height reduced by 50%.
- 75% vertical: Height reduced by 75%.
Bounding Boxes Visible
Choose whether to show the detection boxes overlay on the live video — see Fig.2 Engine Working Mode & External Trigger (6):
- No: Hide detection boxes (cleaner view).
- Yes: Show detection boxes (helps with debugging).
4. Camera Stream Configuration
4.1 Input Stream (Primary Camera)
The Input Stream tab configures your main parking camera.
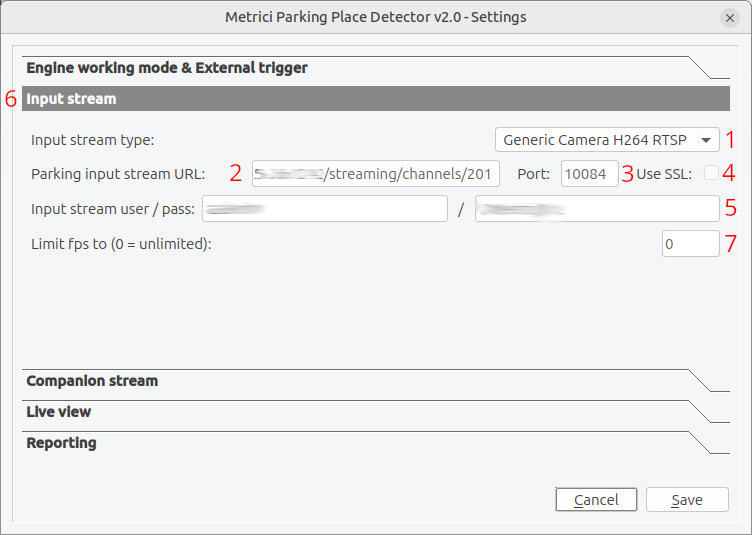
Input Stream Type
Select the type of camera or video source you're using. The application supports many camera brands and protocols:
- ACTi: suported codecs: MJPEG, H264; standard protocols (HTTP, RTSP).
- Android: suported codecs: MJPEG; standard protocols (HTTP).
- Arecont Vision: suported codecs: MJPEG; standard protocols (HTTP).
- Axis: suported codecs: MJPEG, H264; standard protocols (HTTP, RTSP).
- Bosch: suported codecs: MJPEG, H264; standard protocols (RTSP).
- Dahua: suported codecs: MJPEG; standard protocols (HTTP).
- Divotec: suported codecs: MJPEG, H264; standard protocols (HTTP, RTSP).
- Hikvision: suported codecs: MJPEG, H264; standard protocols (HTTP, RTSP).
- Mobotix: suported codecs: MJPEG, MxPEG; standard protocols (HTTP).
- Novus: suported codecs: MJPEG, H264; standard protocols (HTTP, RTSP).
- Pelco: suported codecs: MJPEG; standard protocols (RTSP).
- Roseek: RAW
- Samsung:suported codecs: MJPEG, H264; standard protocols (HTTP, RTSP).
- Sony:suported codecs: MJPEG, H264; standard protocols (HTTP, RTSP).
- Uniview:suported codecs: MJPEG, H264; standard protocols (HTTP, RTSP).
- VLC: suported codecs: MJPEG; standard protocols (HTTP).
- Vivotek: suported codecs: MJPEG; standard protocols (HTTP).
- Generic: suported codecs: MJPEG, H264; standard protocols (HTTP, RTSP). When your camera is not on the list, choose this protocol.
Step-by-Step Setup:
- Click the Settings button on the main interface — see Fig.1 Main Interface (12).
- Select "Input stream" from the settings categories — see Fig.4 Input Stream .
- Stream Type: Select your camera's protocol from the dropdown list — see Fig.4 Input Stream (1).
- IP Address: Enter the camera's IP address — see Fig.4 Input Stream (2).
- Port: Enter the HTTP port (default HTTP is usually 80) other protocols have different ports — see Fig.4 Input Stream (3).
- Use SSL: Enable if your camera requires secure connection — see Fig.4 Input Stream (4).
- Username/Password: Enter credentials if your camera is password protected — see Fig.4 Input Stream (5).
- Limit FPS: Set to 0 for unlimited, or specify a maximum frame rate — see Fig.4 Input Stream (7).
Use Companion Stream tab and fill in data only if one camera (different from PPD one) is available for this purpose. Otherwise leave it blank.
Tip: In parking lots, 1 FPS or lower is enough for PPD.
Testing Your Camera Setup
After configuring the camera, the connection status indicator on the main interface will show:
- RED - Disconnected: Check your IP address and network connection
- ORANGE - Connecting: Wait a few seconds for the connection to establish
- GREEN - Connected: Camera is streaming successfully
4.2 Companion Stream (Secondary Camera)
The Companion Stream tab configures an optional second camera. This can be useful for:
- Getting a different angle on the parking area
- Using a higher-resolution camera for license plate recognition
The configuration options are identical to the Input Stream tab.
5. Detection Settings
5.1 Live View
Live View Active
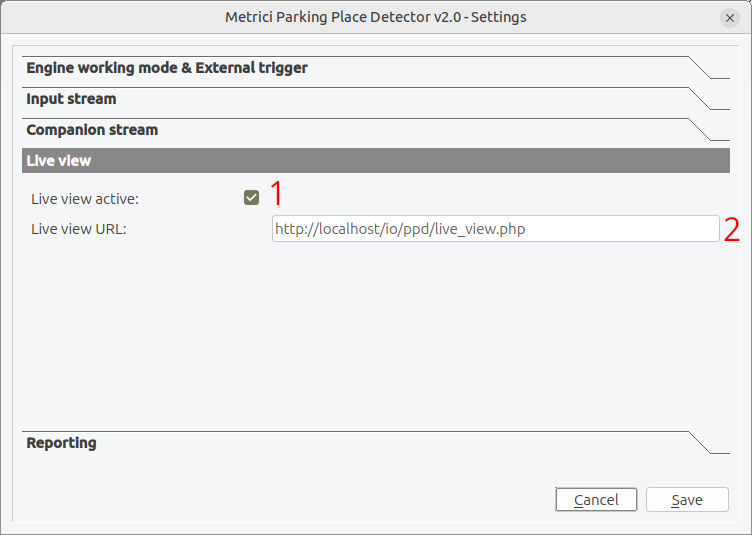
Enable this checkbox to allow stream to be broadcast to the server — see Fig.5 Live view (1).
Live View URL
Enter the web address where stream should be sent. — see Fig.5 Live view (2).
Example:
http://yourserver.com/io/ppd/live_view.php
6. Reporting Configuration
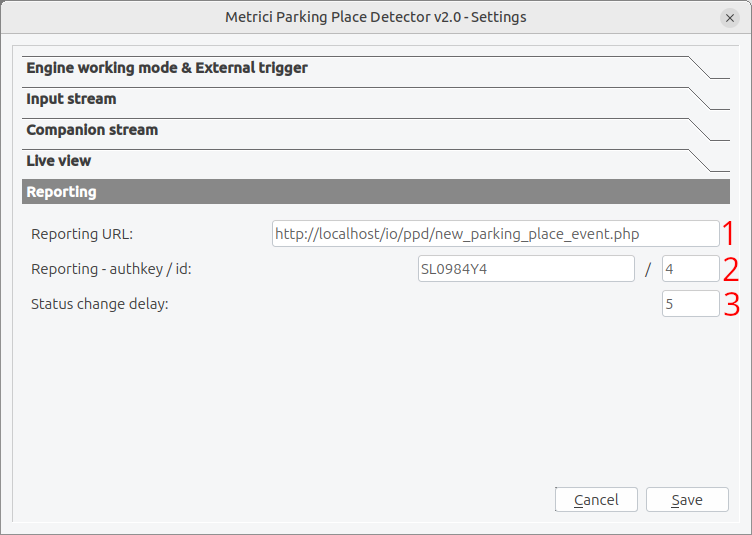
The Reporting tab configures how the system sends occupancy data to your management software.
Reporting URL
Enter the web address where the system should send parking status updates. This is typically your parking management system's API endpoint — see Fig.6 Reporting (1).
Example:
http://your_server.com/io/ppd/new_parking_place_event.php
Reporting - Authkey / ID
These fields identify your installation to the reporting server — see Fig.6 Reporting (1).
- Authkey: A security key that authenticates your installation. It is to be found in Metrici Interface when configuring the location and cameras
- ID: The numeric identifier for this specific camera/install location
These values are provided by Metrici web Interface. Fill the data in here to facilitate the communication between detection engines and Interface.
Status Change Delay
This setting prevents false readings when vehicles are temporarily passing through a parking space — see Fig.6 Rep... (3):
- How it works: When a vehicle enters or leaves, the system waits this many seconds before changing the status
- Purpose: Prevents "flickering" status when a car is just passing through
- Recommended: 5-15 seconds for typical parking scenarios
Valid range: 1 to 65535 seconds
7. Managing Parking Spaces
Parking spaces are the specific areas within the camera view that you want to monitor. Here's how to configure them:
7.1 Adding a New Parking Space
- In the main window, find the parking spaces table.
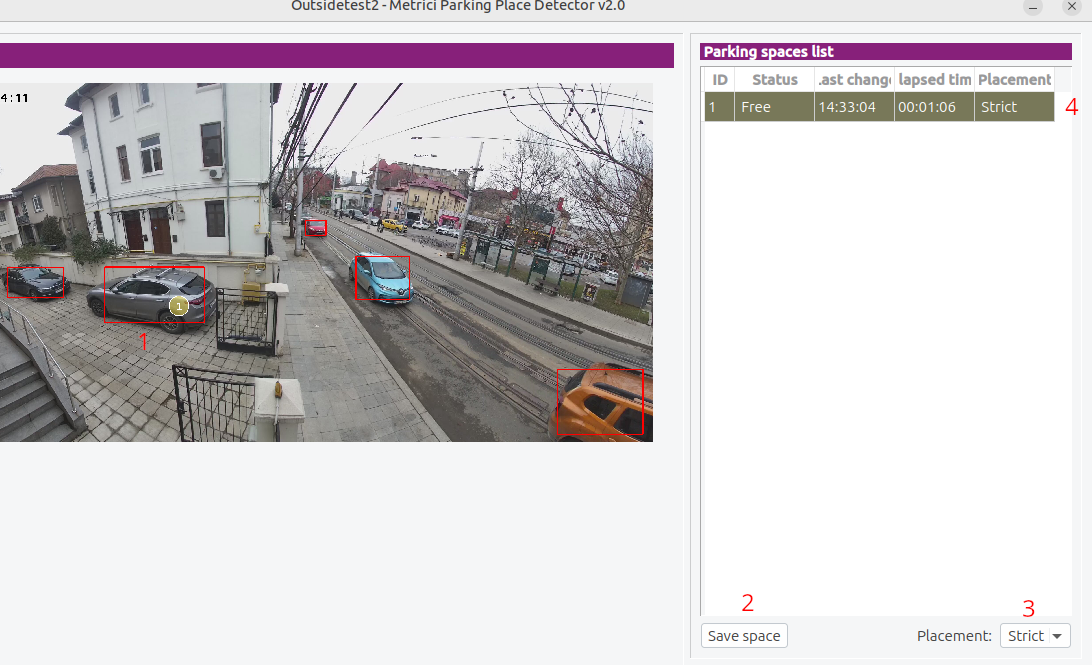
- Click the Add button — see Fig.1 Main Interface (9).
- A new row appears in the table with default values — see Fig.7 Add Space (4).
- The new space is automatically selected for editing — see Fig.7 Add Space (1).
- Move the circle with the number inside over the area that you consider a parking space.
- Click save after you're done — see Fig.7 Add Space (2).
- Repeat for how many parking spaces you have or you need to have cheked.
7.2 Editing a Parking Space
To modify an existing parking space:
- Click on the parking space row to select it — see Fig.7 Add Space (4). We are using the same figure (Fig.7) beacause the menu looks the same.
- Click the Edit button — see Fig.1 Main Interface (10).
- Make your changes by clicking on the video display.
- Click Save to confirm — see Fig.2 Add Space (2).
7.3 Deleting a Parking Space
To remove a parking space:
- Click on the parking space row to select it — see Fig.7 Add Space (4).
- Click the Delete button — see Fig.1 Main Interface (11).
- Confirm the deletion when prompted.
7.5 Placement Mode
When placing parking spaces, you can choose between — see Fig.7 Add Space (3):
- Strict: Vehicles (in fact its bounding box) must completely cover the defined space number to count as occupying it.
- Loose: Vehicles that partially overlap with the space count as occupying it.
8. Troubleshooting
8.1 Camera Connection Problems
- Verify the camera IP address is correct and the camera is powered on
- Check that the camera is on the same network as this computer, or that network routing is configured
- Confirm the username and password are correct
- Try accessing the camera stream directly in a web browser first
- Check if the camera's HTTP/RTSP ports are not blocked by a firewall
8.2 Detection Accuracy Issues
- Increase the Recognition Enhancement setting
- Adjust Bounding Boxes Reduction to prevent overlapping detection boxes
- Check camera angle - shadows and glare can affect detection
- Increase Status Change Delay if status flickers frequently
- Verify the correct Objects Type is selected
8.3 Application Performance
- Cut the Recognition Enhancement setting
- Reduce the FPS Limit in the input stream settings
- Consider using a lower resolution video stream
- Close other applications that use significant CPU resources
- If you have multiple processors, consider using more processing threads (requires restart)
8.4 Reporting Problems
- Verify the Reporting URL is correct
- Check that the Authkey and ID are correctly configured
- Ensure the server is accessible from this computer
- Check server logs for any rejected requests
- Verify network connectivity to the server
8.5 External Trigger Issues
- Confirm the trigger device is configured correctly
- Check that the UDP port is not blocked by a firewall
- Verify the trigger device is sending to the correct port (50000 + App ID)
- Ensure the Engine Working Mode is set to "Started by TRIGGER"
9. INI Configuration File
All application settings are stored in a configuration file called <app_id>.ini. This INI file allows you to configure the application manually or via automation scripts without using the graphical interface.
9.1 File Location and Name
- File Name:
<app_id>.iniwhere<app_id>is the application ID (default: 1, resulting in1.ini) - Location: The same directory as the application executable
- Format: Standard INI format using QSettings
app_id to generate a unique INI filename (e.g., 1.ini, 2.ini, 3.ini).
9.2 Configuration Keys Reference
The following table lists all available configuration keys, their data types, default values, and descriptions. Keys are case-sensitive.
| Key | Type | Default | Description |
|---|---|---|---|
input_stream_type |
int | 0 | Input stream type (see Section 4 for valid values) |
input_stream_address |
string | (empty) | IP address or URL of the input camera |
input_stream_tcp_port |
int | 80 | Network port for the input stream |
input_stream_use_ssl |
int | 0 | Enable SSL/TLS for input stream (0=No, 1=Yes) |
input_stream_username |
string | (empty) | Username for camera authentication |
input_stream_password |
string | (empty) | Password for camera authentication |
input_stream_fps_limit |
float | 0 | Maximum FPS to process (0=unlimited) |
companion_stream_type |
int | 0 | Companion stream type (see Section 4 for valid values) |
companion_stream_address |
string | (empty) | IP address or URL of the companion camera |
companion_stream_tcp_port |
int | 80 | Network port for the companion stream |
companion_stream_use_ssl |
int | 0 | Enable SSL/TLS for companion stream (0=No, 1=Yes) |
companion_stream_username |
string | (empty) | Username for companion camera authentication |
companion_stream_password |
string | (empty) | Password for companion camera authentication |
rtsp_stream_latency |
int | 100 | RTSP stream latency in milliseconds |
rtsp_stream_protocols |
string | tcp | RTSP transport protocol (tcp, udp, or multicast) |
reporting_url |
string | Defined by REPORTING_URL constant | URL endpoint for reporting parking status |
reporting_duplicate_url |
string | (empty) | Secondary URL for redundant reporting |
reporting_check_action_id |
int | 0 | Camera/instance ID for reporting |
reporting_check_action_authkey |
string | (empty) | Authentication key for reporting server |
input_stream_resx |
int | 640 | Input stream horizontal resolution (width) |
input_stream_resy |
int | 480 | Input stream vertical resolution (height) |
companion_stream_resx |
int | 640 | Companion stream horizontal resolution (width) |
companion_stream_resy |
int | 480 | Companion stream vertical resolution (height) |
live_view_active |
int | 1 | Enable live view snapshots (0=Disabled, 1=Enabled) |
live_view_url |
string | Defined by LIVE_VIEW_URL constant | URL endpoint for live view snapshots |
external_trigger_type |
int | 0 | External trigger type (see Section 3.1 for valid values) |
external_trigger_seconds |
int | 1 | Seconds to analyze after receiving trigger signal |
engine_working_mode |
int | 0 | Engine working mode (0=Continuous, 1=Triggered) |
recognition_enhancement |
int | 2 | Recognition enhancement level (0-5, higher = more thorough) |
bounding_boxes_reduction |
int | 0 | Bounding boxes reduction mode (see Section 3.1) |
bounding_boxes_visible |
int | 0 | Show bounding boxes overlay (0=Hide, 1=Show) |
objects_type |
int | 0 | Type of objects to detect (0=Vehicles, 1=Boats, 2=People) |
status_change_delay |
int | 5 | Delay in seconds before changing parking space status |
parking_spaces_list |
string | (empty) | Comma-separated list of defined parking space IDs |
9.3 Example INI File
Below is an example 1.ini file with common settings configured:
[General]
input_stream_type=4
input_stream_address=192.168.1.100
input_stream_tcp_port=80
input_stream_use_ssl=0
input_stream_username=admin
input_stream_password=secret123
input_stream_fps_limit=10
companion_stream_type=0
companion_stream_address=
companion_stream_tcp_port=80
companion_stream_use_ssl=0
companion_stream_username=
companion_stream_password=
rtsp_stream_latency=100
rtsp_stream_protocols=tcp
reporting_check_action_id=1
reporting_check_action_authkey=your-auth-key-here
reporting_url=http://yourserver.com/io/ppd/new_parking_place_event.php
reporting_duplicate_url=
input_stream_resx=1280
input_stream_resy=720
companion_stream_resx=640
companion_stream_resy=480
status_change_delay=5
live_view_active=1
live_view_url=http://yourserver.com/io/ppd/live_view.php>
external_trigger_type=0
external_trigger_seconds=1
engine_working_mode=0
recognition_enhancement=2
bounding_boxes_reduction=0
bounding_boxes_visible=0
objects_type=0
parking_spaces_list=1,2,3,4,5,6,7,8
9.4 Manually Editing the INI File
You can manually edit the INI file to configure the application:
- Open
<app_id>.iniin a text editor - Modify the desired configuration keys
- Save the file
9.5 Automation Script Example
Here's a bash script example that creates a configuration file for automated deployments:
#!/bin/bash
APP_ID=1
INI_FILE="${APP_ID}.ini"

cat > "${INI_FILE}" << 'EOF'
[General]
input_stream_type=4
input_stream_address=CAMERA_IP_ADDRESS
input_stream_tcp_port=80
input_stream_use_ssl=0
input_stream_username=CAMERA_USER
input_stream_password=CAMERA_PASS
input_stream_fps_limit=10
reporting_url=http://yourserver.com/io/ppd/new_parking_place_event.php
reporting_check_action_id=1
reporting_check_action_authkey=AUTH_KEY
reporting_duplicate_url=
input_stream_resx=1280
input_stream_resy=720
companion_stream_resx=640
companion_stream_resy=480
status_change_delay=5
live_view_active=1
live_view_url=http://yourserver.com/io/ppd/live_view.php>
external_trigger_type=0
external_trigger_seconds=1
engine_working_mode=0
recognition_enhancement=2
bounding_boxes_reduction=0
bounding_boxes_visible=0
objects_type=0
parking_spaces_list=1,2,3,4,5
EOF

echo "Configuration file ${INI_FILE} created successfully"
9.6 Configuration Migration
When migrating configurations between systems or upgrading the application:
- Copy the entire
<app_id>.inifile to the new location - Ensure the
app_idmatches the instance you're configuring - Review and update IP addresses, URLs, and authentication credentials as needed
- Test the configuration by starting the application
10. Command Line Options
When starting the application from the command line, you can use these options:
| Option | Description |
|---|---|
-nogui |
Run without displaying the graphical interface (headless mode) |
-debug |
Enable debug mode with additional logging |
-disable_gpu |
Disable GPU acceleration even if available |
-use_gpu <n> |
Use GPU number n for processing (if multiple GPUs) |
-detection_threads <n> |
Number of processing threads (1-8, default is 1) |
-log_level <n> |
Logging level: 0 (none), 1 (low), 2 (medium), 3 (high) |
-app_id <n> |
Application ID for multi-instance deployments |
-v |
Show version information |
11. Glossary
| Term | Definition |
|---|---|
| API | Application Programming Interface - how the application communicates with your server |
| Bounding Box | A rectangle drawn around a detected object in the video |
| Double Parking | A vehicle occupying more than one parking space |
| FPS | Frames Per Second - how many video frames are processed each second |
| GPU | Graphics Processing Unit - can speed up video analysis |
| H.264/H.265 | Video compression formats used by modern cameras |
| HTTP | HyperText Transfer Protocol - standard web communication |
| IP Address | Network address of a device (like 192.168.1.100) |
| MJPEG | Motion JPEG - a video format where each frame is a separate JPEG image |
| RTSP | Real Time Streaming Protocol - standard for streaming video over networks |
| SSL/TLS | Security protocols for encrypted communication |
| UDP | User Datagram Protocol - a fast network protocol for sending trigger signals |
12. Getting Help
If you encounter issues not covered in this manual:
- Check the application logs for detailed error messages
- Contact your system administrator for configuration assistance
- Contact technical support with the following information:
- Application version
- Camera make and model
- Error messages (from logs)
- Steps you were taking when the problem occurred