Parking Module for LPR
User Manual for End Users and System Administrators

Introduction
The Parking module extends the core LPR functionality with a set of features designed for parking lot management. These include the ability to create tenants and subtenants, reserve designated parking spaces for specific tenants, and organize a location by floors or sections for more granular control.
To access the Parking module settings in the interface, two prerequisites must be met: at least one camera must be configured as type Parking for LPR under General Settings → Locations and Camera, and a valid Metrici license with Parking module support must be active.
Some features are shared across all LPR modules, while others are specific to the Parking module.
The system allows you to define the total number of parking spaces in a lot. It calculates occupied spaces in real time and can command a traffic light or display to indicate when the parking lot is full or approaching a defined capacity threshold. An unlimited number of spaces can be managed, and the parking lot can be organized by sections or floors, each managed individually. The system can display the total number of available spaces by section or floor, along with customized messages on a LED display. It continuously tracks vehicles, free spaces, occupied spaces, and totals — any of this information can be sent to a LED display.
Users can define an unlimited number of timetables and pricing units — by the hour, half-hour, daily, fixed price, single pass, and more. A timetable can also be configured to deny access during specific hours (e.g., after 10 PM). A configurable grace period allows a vehicle to exit without charge within a set time window (e.g., 15 minutes, 2 hours). The system supports pricing roundup modes (round up or nearest value) and integrates with cash registers. It automatically calculates the time spent inside, the total amount due, and can generate a receipt. Receipt calculation is based on the timetables defined by the manager — for example, differentiated pricing for day and night, weekdays and weekends, or working hours and non-working hours. Depending on the time of entry and the duration of the stay, the system generates a receipt with fully customizable printed information. A separate time interval can also be configured to allow a client to exit after payment within a defined window.
An unlimited number of tenants can be defined in the interface. Each tenant receives their own dedicated interface to manage their vehicle fleet, access schedules, and access lists. Tenants can organize their own subtenants — for example, a company can allocate a number of spaces to each department, and those departments can further allocate to subdepartments. The number of subtenant levels is unlimited. The Preserve Tenant Spaces option ensures that spaces reserved for tenants remain unavailable to other clients, even when unoccupied. When enabled, these reserved spaces are excluded from the available space count.
The system supports special access lists. A White List allows vehicles to have a distinct status: automatic barrier opening, free access, or no charge. A Black List triggers an alert — via email, SMS, or pop-up — whenever a listed plate is detected. Any plate in the database can have individual settings, such as the timetable during which access is permitted or specific entrances where entry is allowed. The system also supports granting access based on an SMS containing the license plate number. As a security measure, the sender's phone number must be on an approved list of numbers authorized to grant access. This feature can also be customized to function as a payment method. Special privileges can be assigned to individual vehicles or groups, granting free-of-charge access.
The system can send alerts via email or SMS when specific events occur — for example, when a particular plate is detected or when a vehicle remains in the parking lot longer than a defined period.
An ambient camera can be paired with the LPR camera, and images from both are linked and stored in the database. This provides a wider view of the detection moment or a different angle, such as capturing the driver's face. The system supports continuous operation or trigger-based activation using inductive loops, radar, or sensors. A detection window can be configured to control when the system actively processes detections. The barrier can also be opened manually from the live view — the event is recorded in the database.
The system supports an unlimited number of operators, LPR cameras, and cash registers. Each operator can be assigned individual administration rights. Groups of vehicles with subscription-based or free access can be defined.
Administrators have access to detailed reports covering traffic, payments, top vehicles, daily and monthly vehicle counts, detections per camera, peak hours, and more. Reports can be exported in PDF or XLS format. The system calculates the time between two consecutive detections for each plate — including time spent inside, time on track, and last events in the past day, week, or month. The database can be searched and filtered by plate number, location, date, camera, country, or group.
The parking lot can be managed from anywhere in the world and from any device — smartphone, computer, or tablet — with internet access through the dedicated web interface.
The system supports integration with external systems and databases. Metrici logs all communication with external systems, and in case of a malfunction, the log file can be reviewed to diagnose the issue. All user actions and changes are tracked and recorded for accountability.
Settings
Editing Parking Settings
Click the green Edit Parking Settings button in the upper-right corner to modify the values for your parking location.
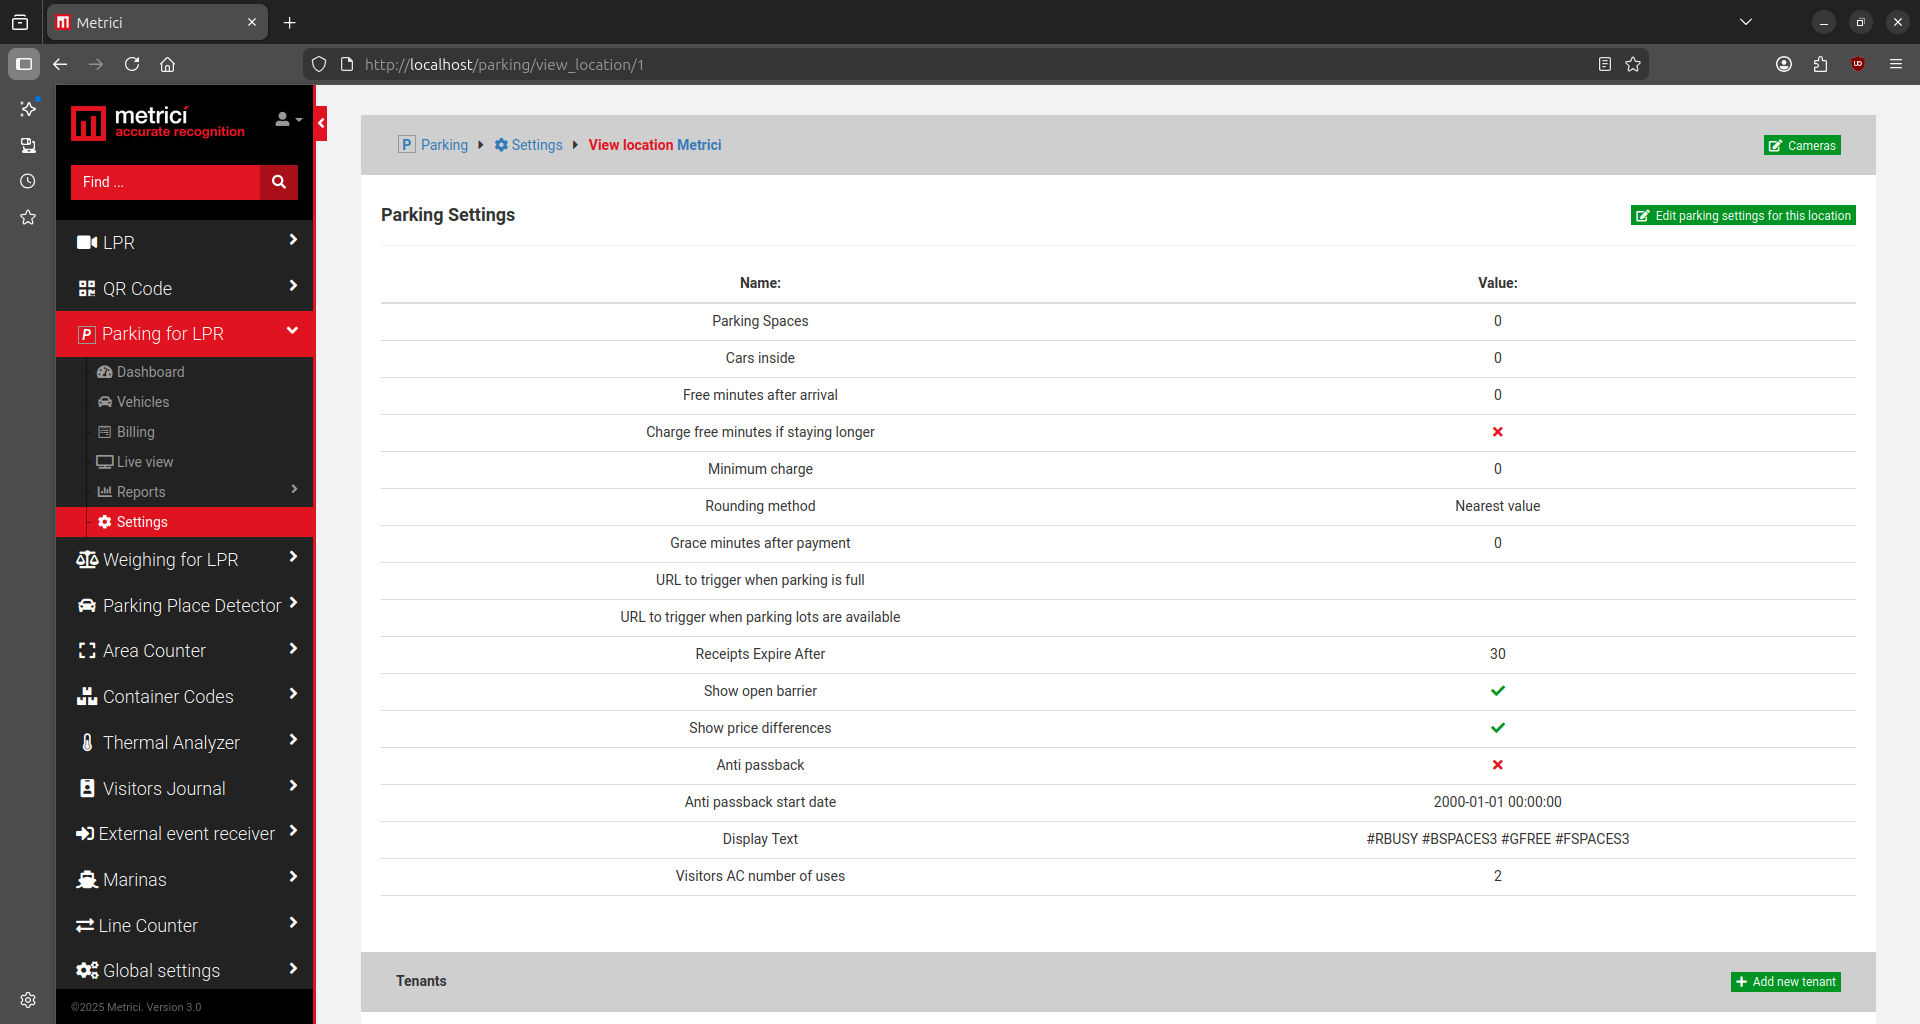
Parking Spaces defines the total number of spaces available within the location.
Cars Inside represents the number of vehicles already present in the parking lot at the time the Parking module was activated. This value updates in real time as vehicles enter and exit. However, you can manually adjust it at any time to ensure the count remains accurate. You also have the option to reset the parking to zero from this menu, or add a specific number according to your needs.
Be aware that if a vehicle exits the parking lot without being detected by Metrici, the system will still consider it as inside. When Metrici determines that the parking lot is full, it will stop opening the barrier. This situation can occur if a barrier is opened via remote control, or even from the Metrici Live View without entering a license plate number and direction.
Free Minutes After Arrival defines a grace period during which a vehicle that has entered the parking lot can exit without being charged.
Charge Free Minutes If Staying Longer — when this option is enabled, the free minutes defined above will be added to the total billable time if the vehicle stays beyond the grace period. The full duration, including the initially free minutes, will be included in the amount to be paid.
Minimum Charge is the minimum amount a client will be charged regardless of how long they stayed.
Rounding Method determines how the system rounds the total amount to be paid. Two methods are available:
Ceiling — the system always rounds up to the next full unit. For example, a stay of 2 hours and 15 minutes will be charged as a 3-hour stay.
Nearest Value — the system rounds to the closest full unit. For example, a stay of 2 hours and 29 minutes will be calculated as 2 hours, while a stay of 2 hours and 31 minutes will be rounded up to 3 hours.
Grace Minutes After Payment defines the time interval during which a client can exit the parking lot after completing payment.
URL Triggers
URL to Trigger When the Parking Is Full is the address of a hardware device that will be activated when no more spaces are available. This can be a LED display, a traffic light, a barrier, or any other connected device.
URL to Trigger When Parking Lots Are Available is the IP address of a hardware device that will be activated when free spaces become available again.
Receipts Expire After defines the validity period of a receipt, expressed in minutes.
Show Open Barrier — when enabled, a button to manually open the barrier is displayed on the Live View screen.
Show Price Differences — when enabled, this feature is useful for situations where a client has paid but does not exit within the allowed time defined in Grace Minutes After Payment. The system will display the total amount due along with the difference between what has already been paid and the remaining balance owed.
Display Text contains the code that tells a Metrici display what information to show for the specific location. In this section, you will also find the URL that must be entered in the display's configuration so it knows where to retrieve the information. The URL follows this format:
http://IP_OF_THIS_SERVER/io/lpr/location_display.php?id=1
For more detailed information, refer to the display manufacturer's user manual.
Empty Parking — From this menu, you also have the option to empty the parking. When this button is clicked, Metrici resets the count to zero — it will consider that no vehicles are inside and will display all spaces as available.
Anti-Passback is a security rule applied in License Plate Recognition (LPR) systems that prevents a vehicle from using the same credential (its license plate) to enter or exit a controlled area more than once without completing the expected entry/exit sequence.
Visitors AC number of uses allows you to set a number of guest entries to have access inside your location.
Seconds to Suppress Action
Seconds to Suppress Action defines a time interval during which actions will not be executed for a location, even if they are configured in the interface. During this interval, detected plates are temporarily ignored. This is useful in locations where a vehicle is captured by one camera and then almost immediately by another — preventing the barrier from being triggered twice for the same vehicle, for example.
This setting can be found under LPR → Settings. Click the Edit button to configure the number of seconds during which actions should be suppressed.
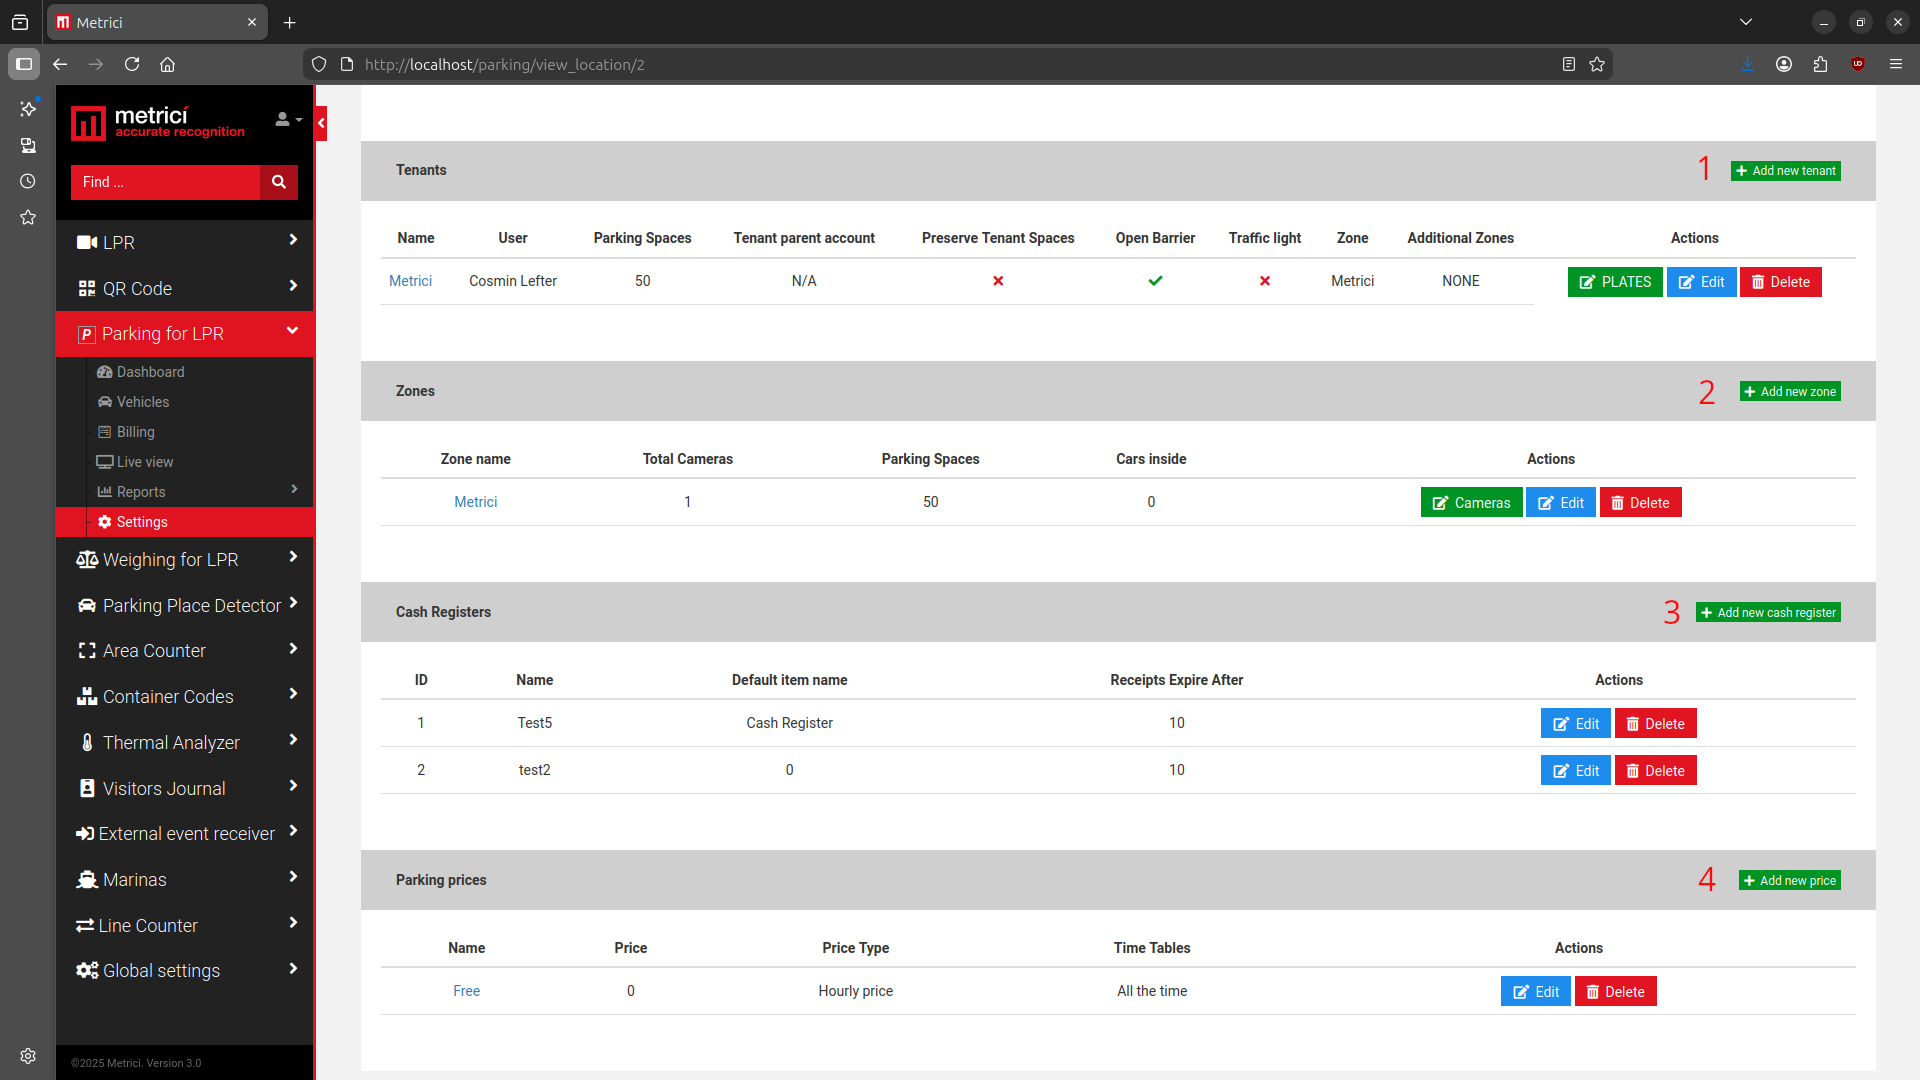
Add Zones
A parking zone represents a distinct area within a parking facility — such as a floor, level, or section. When zones are configured, Metrici tracks the number of free and occupied spaces in real time for each one.
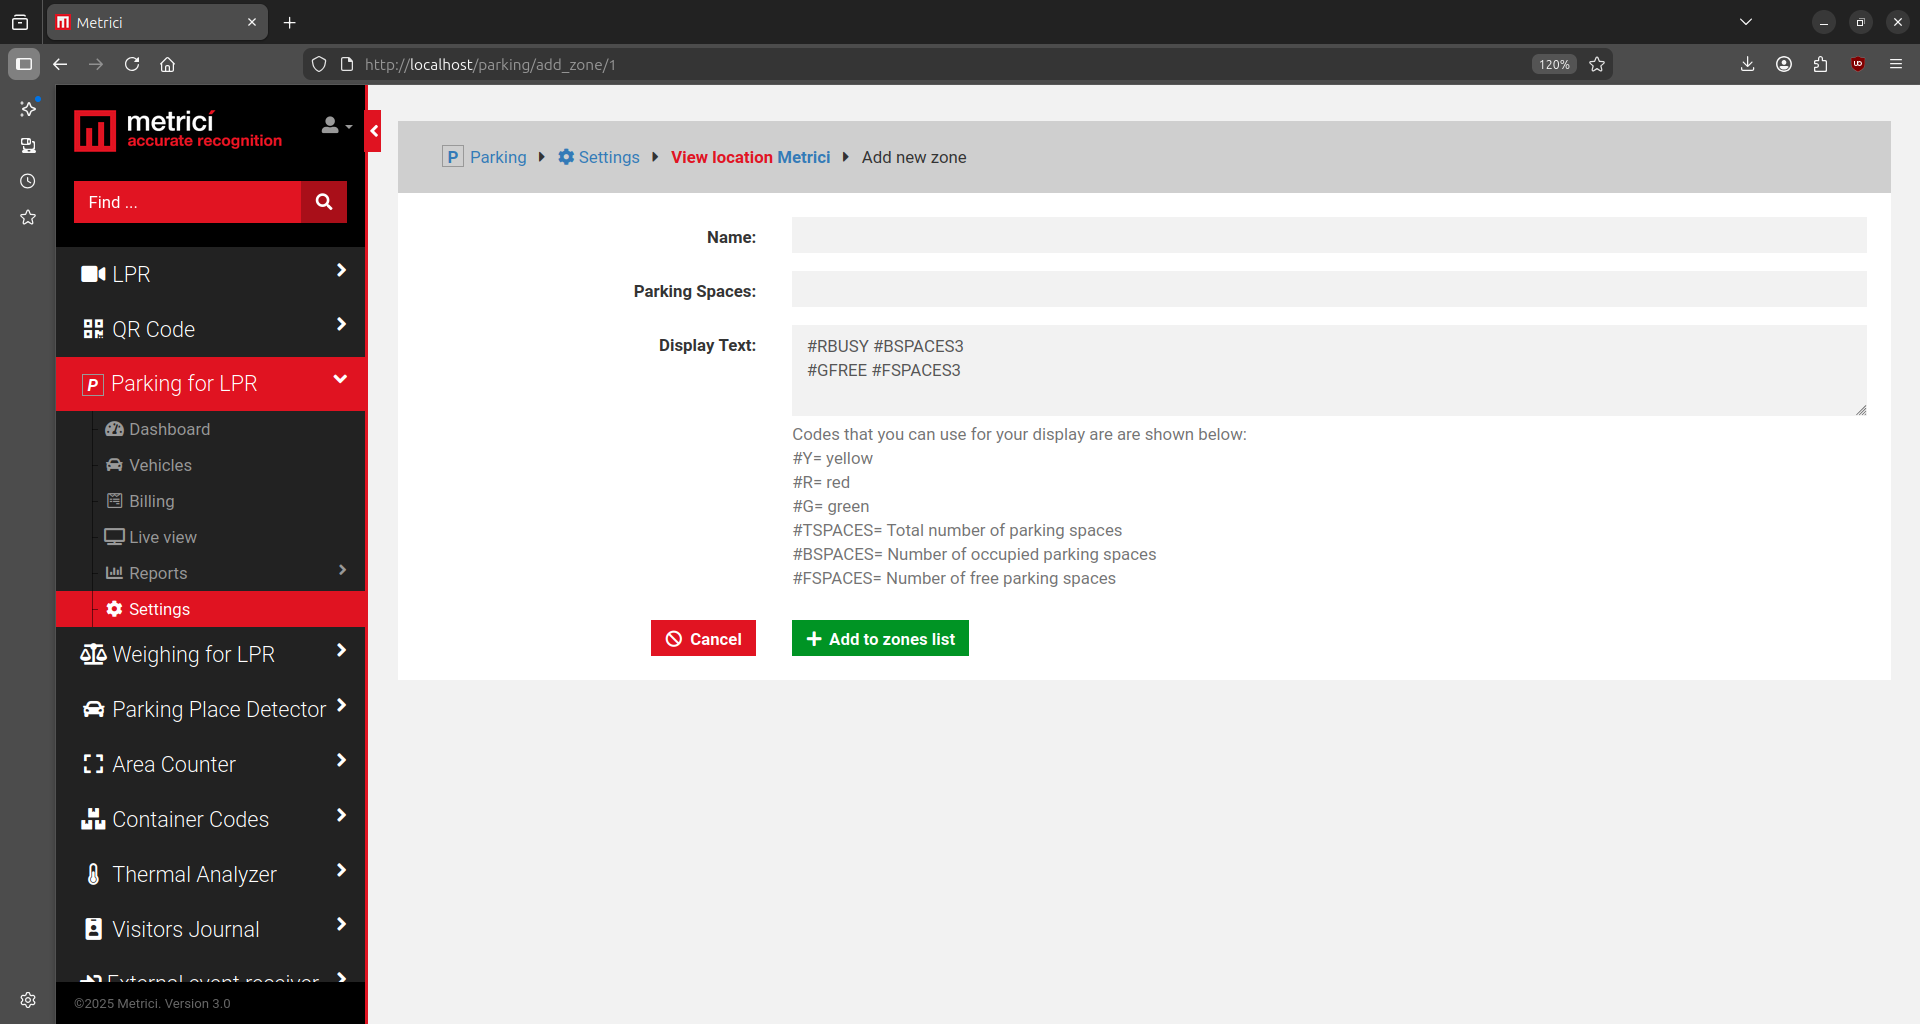
Managing Zones
Click on a zone name or the Edit button to view or modify its details. When setting up a zone, provide the following — see Fig.32 Add Zones:
- Name — A clear label such as Level 1 or Section C
- Parking spaces — The total capacity of the zone
LED Display Configuration
The Display Text field controls what is shown on Metrici LED Displays. You can use dynamic tags to show real-time data. For example:
#RBUSY #BSPACES3 will render as BUSY 385 — where the number is pulled live from the Metrici database, with BUSY shown in red and the space count in blue.
Add Tenants
A tenant is a group of people or vehicles that share something in common. For example, an office building can create a tenant for each company renting space, or a factory can create tenants for each department.
Tenants can have their own subtenants, which in turn can have subtenants of their own — with no limit on nesting levels. The only condition is that a subtenant cannot be allocated more parking spaces than its parent tenant.
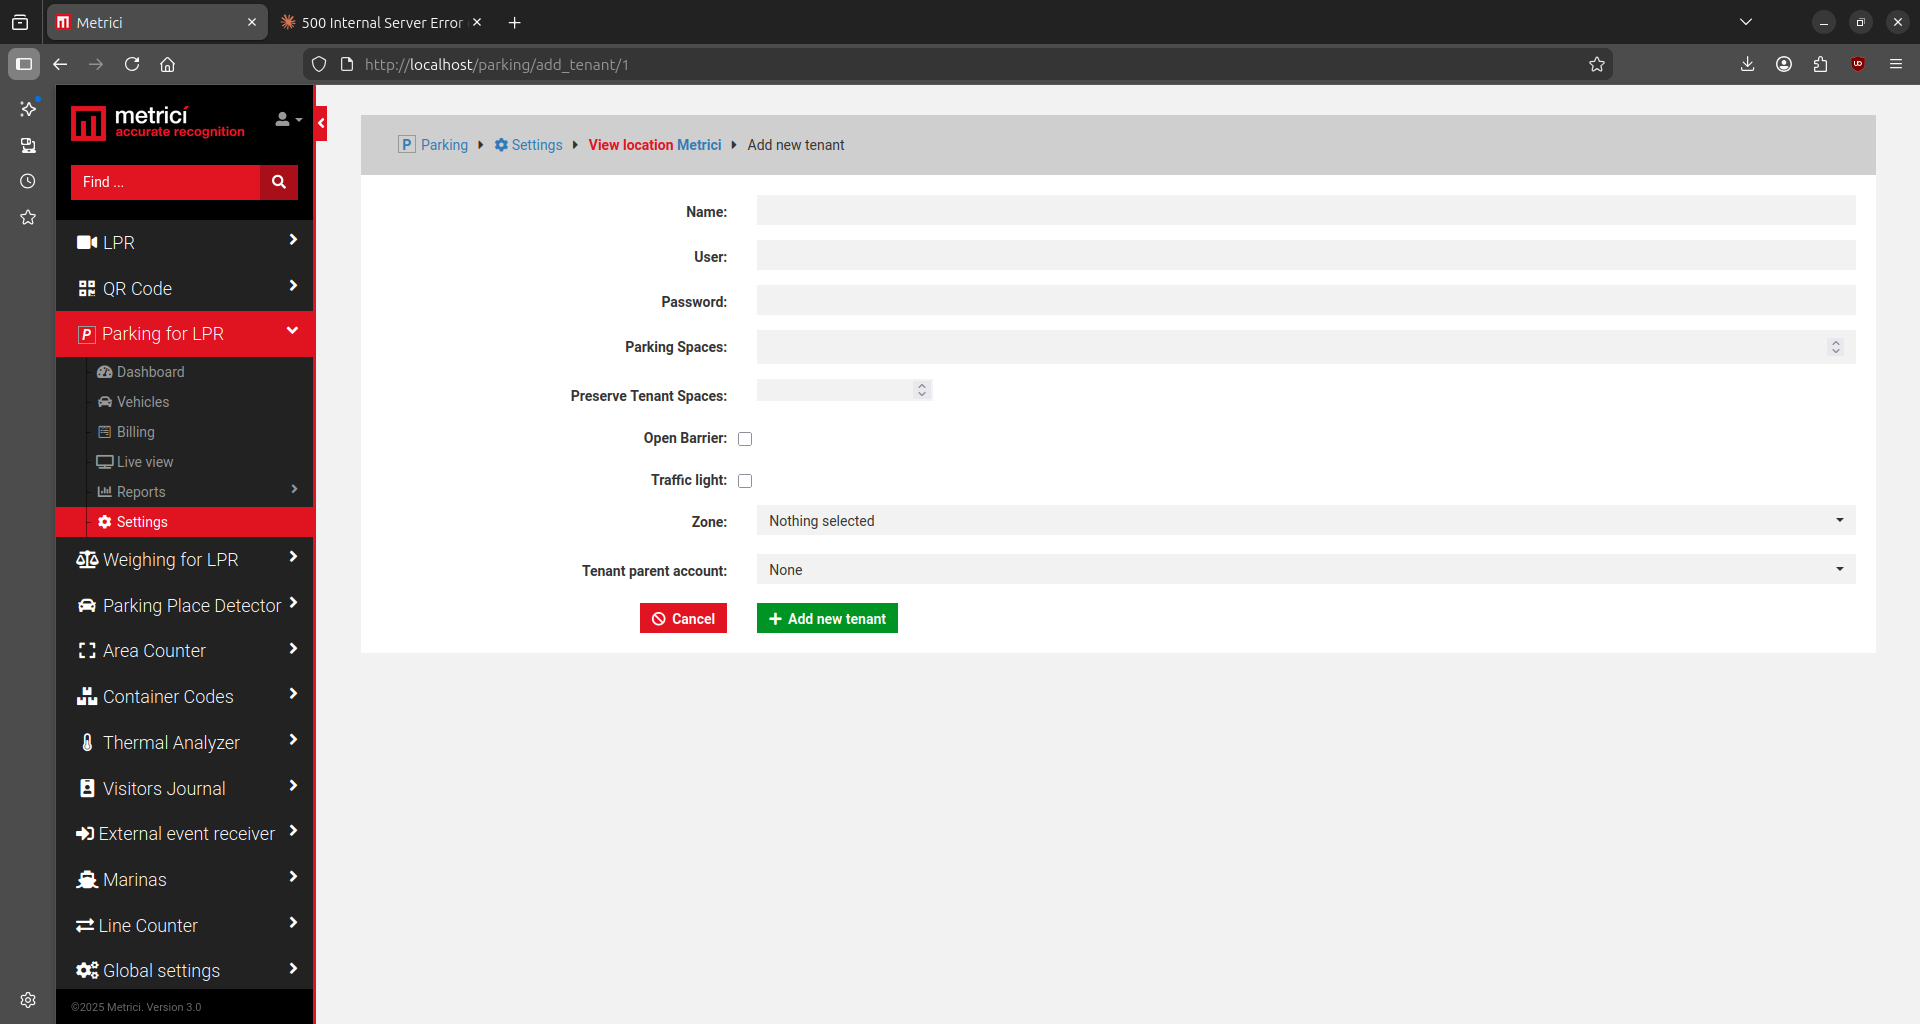
Adding a Tenant
Click the green Add New Tenant button and fill in the following details — see Fig.33 Add Tenants:
- Name — Displayed throughout the Metrici interface
- Username & Password — Credentials this tenant will use to access their own interface and manage their license plates and data. By default these are pre-filled with the credentials of the account creating the tenant, but can be changed.
- Parking spaces — The number of spaces allocated to this tenant
- Preserve Tenant Spaces — When enabled, the tenant's allocated spaces are reserved exclusively for them and are not counted toward the general availability displayed to other users.
- Parent tenant — If this is a subtenant, select the parent tenant it belongs to.
- Open Barrier — Configure barrier behavior for this tenant.
- Traffic light — Configure traffic light behavior for this tenant.
- Zone — Assign the tenant to a specific parking zone.
- Tenant parent account — If this is a subtenant, select the parent tenant it belongs to.
Click Add New Tenant when ready.
Space Limits & Access Control
Managing License Plates
A tenant can add license plates one by one, import a list in bulk, or export their existing list. If a license plate being added is already assigned to another tenant, a warning is displayed and the duplicate entry is not allowed.
Cash Registers
Each cash register is linked to a single camera. Click the green Add New Cash Register button to create one and fill in the following details:
- Name — An internal label to identify this cash register
- Default Item Name — The description printed on the receipt, for example Parking Tax — Mall Promenada
- Receipts Expire After — The time interval during which issued receipts remain valid
Multiple Pricing Options
Parking Prices
You can define as many parking prices as needed. Click the Add Price button to create a new one and fill in the following details:
- Name — A label to identify this price
- Amount — The charge applied under this price
- Timetable — The time interval during which this price is active. The price will only be applied within the selected timetable.
- Price Type — One of the following:
- Hourly — Charges the set amount for each hour of stay
- Half-hour — Charges the set amount for each half-hour of stay
- One-time — A fixed flat fee regardless of how long the vehicle stays
Differentiated Tariffs
If your parking facility uses different rates for weekdays and weekends, or for daytime and overnight periods, follow these steps:
- First, create a timetable for each time interval (e.g. weekdays, weekends, overnight)
- Then define a parking price for each timetable, setting the appropriate type and amount
Dashboard Overview
The dashboard provides a real-time visual summary of your parking facility's current status and daily financials.
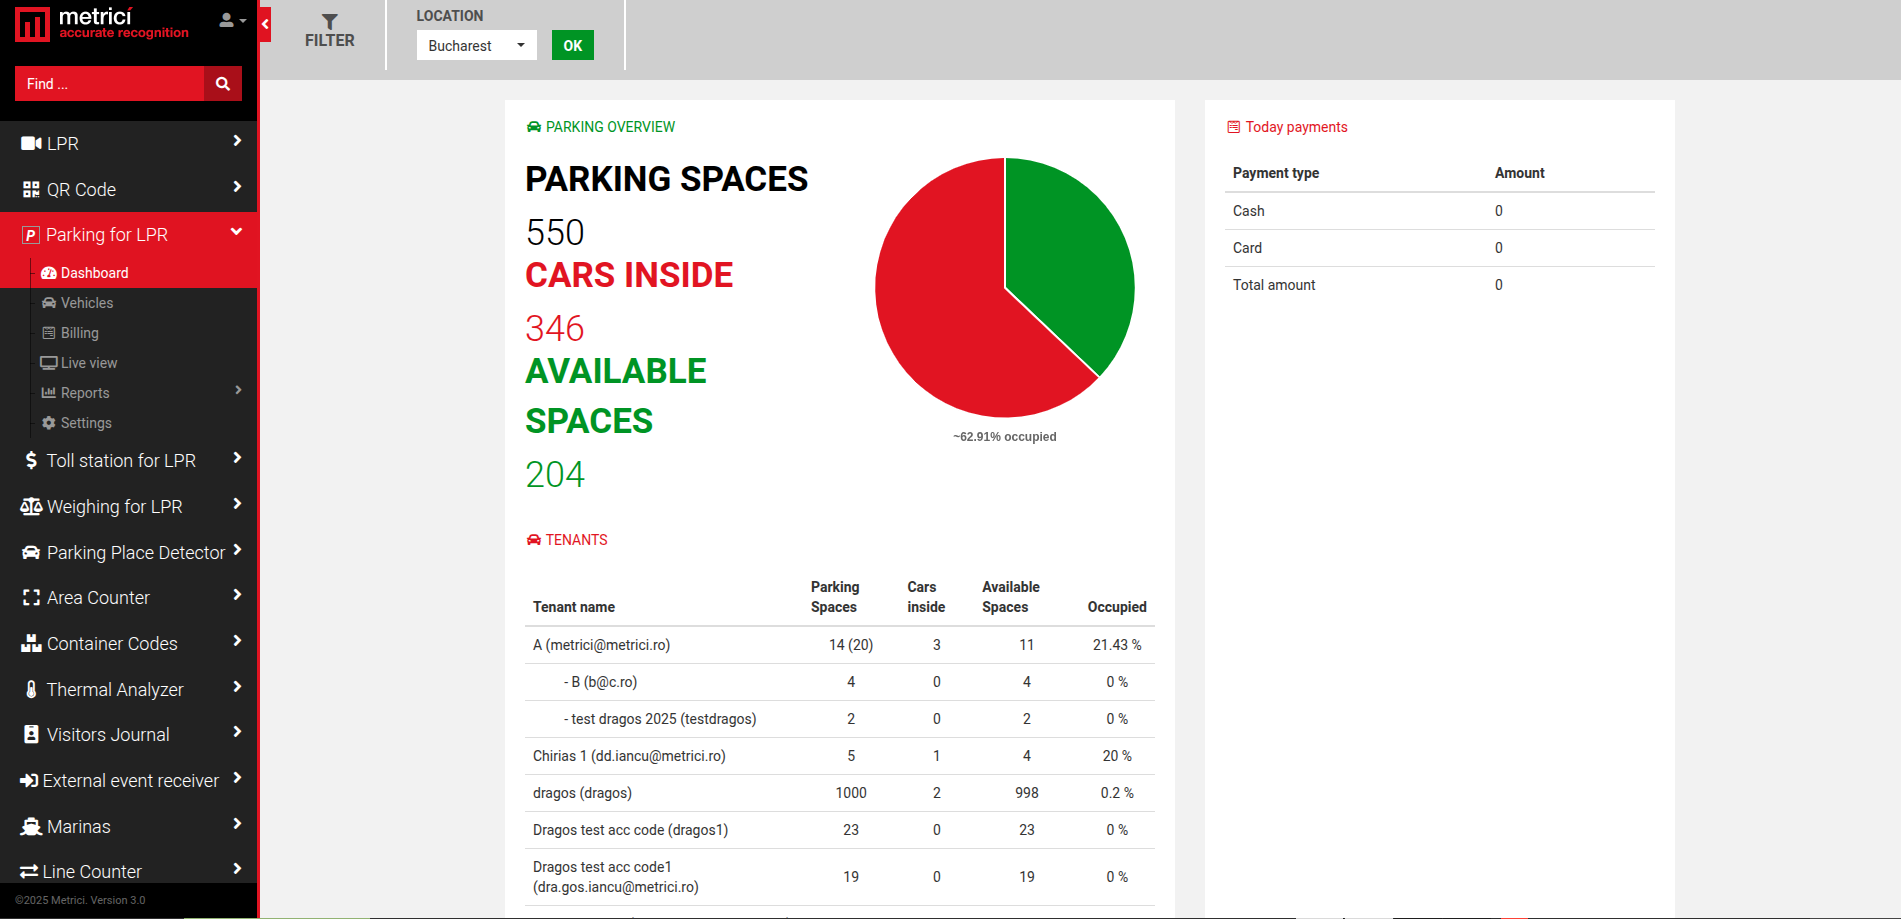
Parking Occupancy
The left side displays charts and key figures for the overall parking lot:
- Total spaces — The total number of parking spaces defined in the facility
- Busy — The number of spaces currently occupied
- Free — The number of spaces currently available
Below this, the tenant breakdown shows how many spaces each tenant is currently occupying.
Financial Summary
The right side displays the financial records for the current day, giving you a quick overview of today's parking revenue.
Billing
This menu is useful when a car wishes to leave and has to pay. The menu is also useful when the number plate is not visible. There are two lists of cars in this menu: cars that are inside the parking and cars that have already paid but haven't left the parking lot.
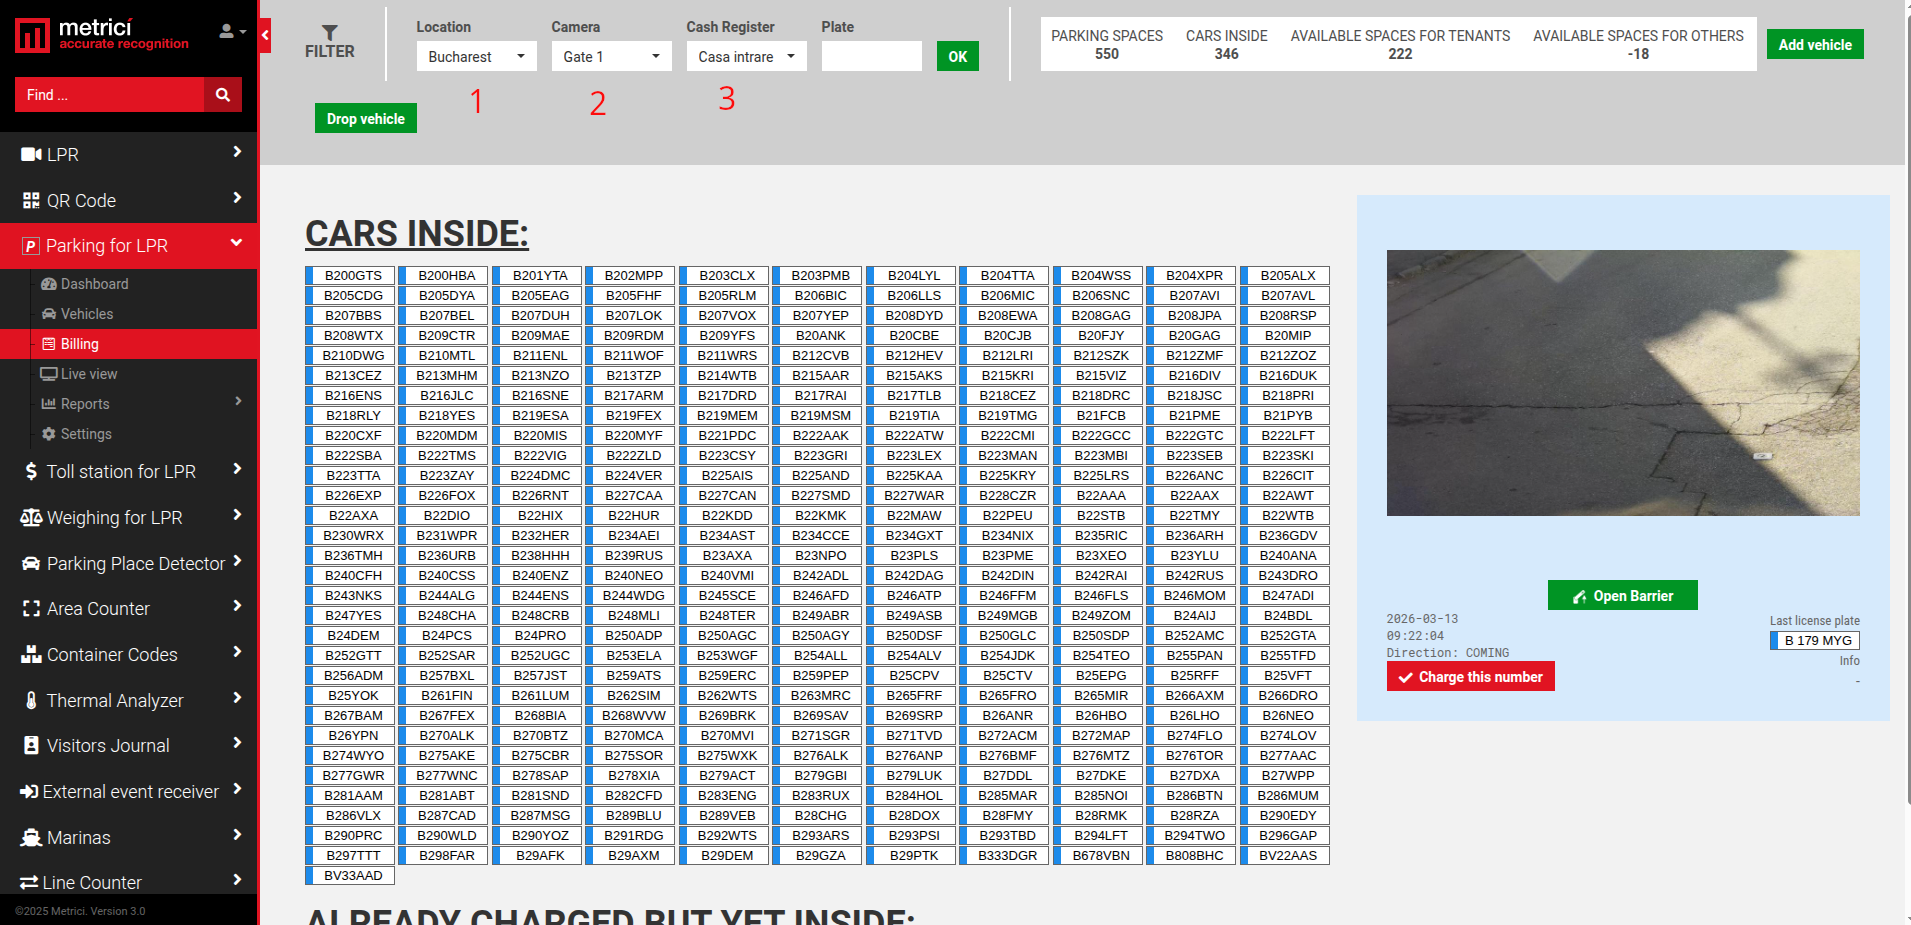
For the data to be shown in this menu, please select the location and the cash register that will be used to bill the car — see Fig.35 Billing (1,2 and 3).
The menu shows information about the cars that are already inside and can be billed. When clicking on a number plate, a window like the next one will open, with all the options for payment available — see Fig.36 Cash Register. The system automatically calculates how long the car stayed in the parking and the amount to be paid if there is an hourly price.
If it is a one-time tariff, choose the appropriate one. All prices are color-coded. The information field is what will be printed on the receipt, besides the usual data (for example, a company name or a Tax Identification Number). The method of payment is cash or card. Choose the appropriate one for the cash register to function properly.
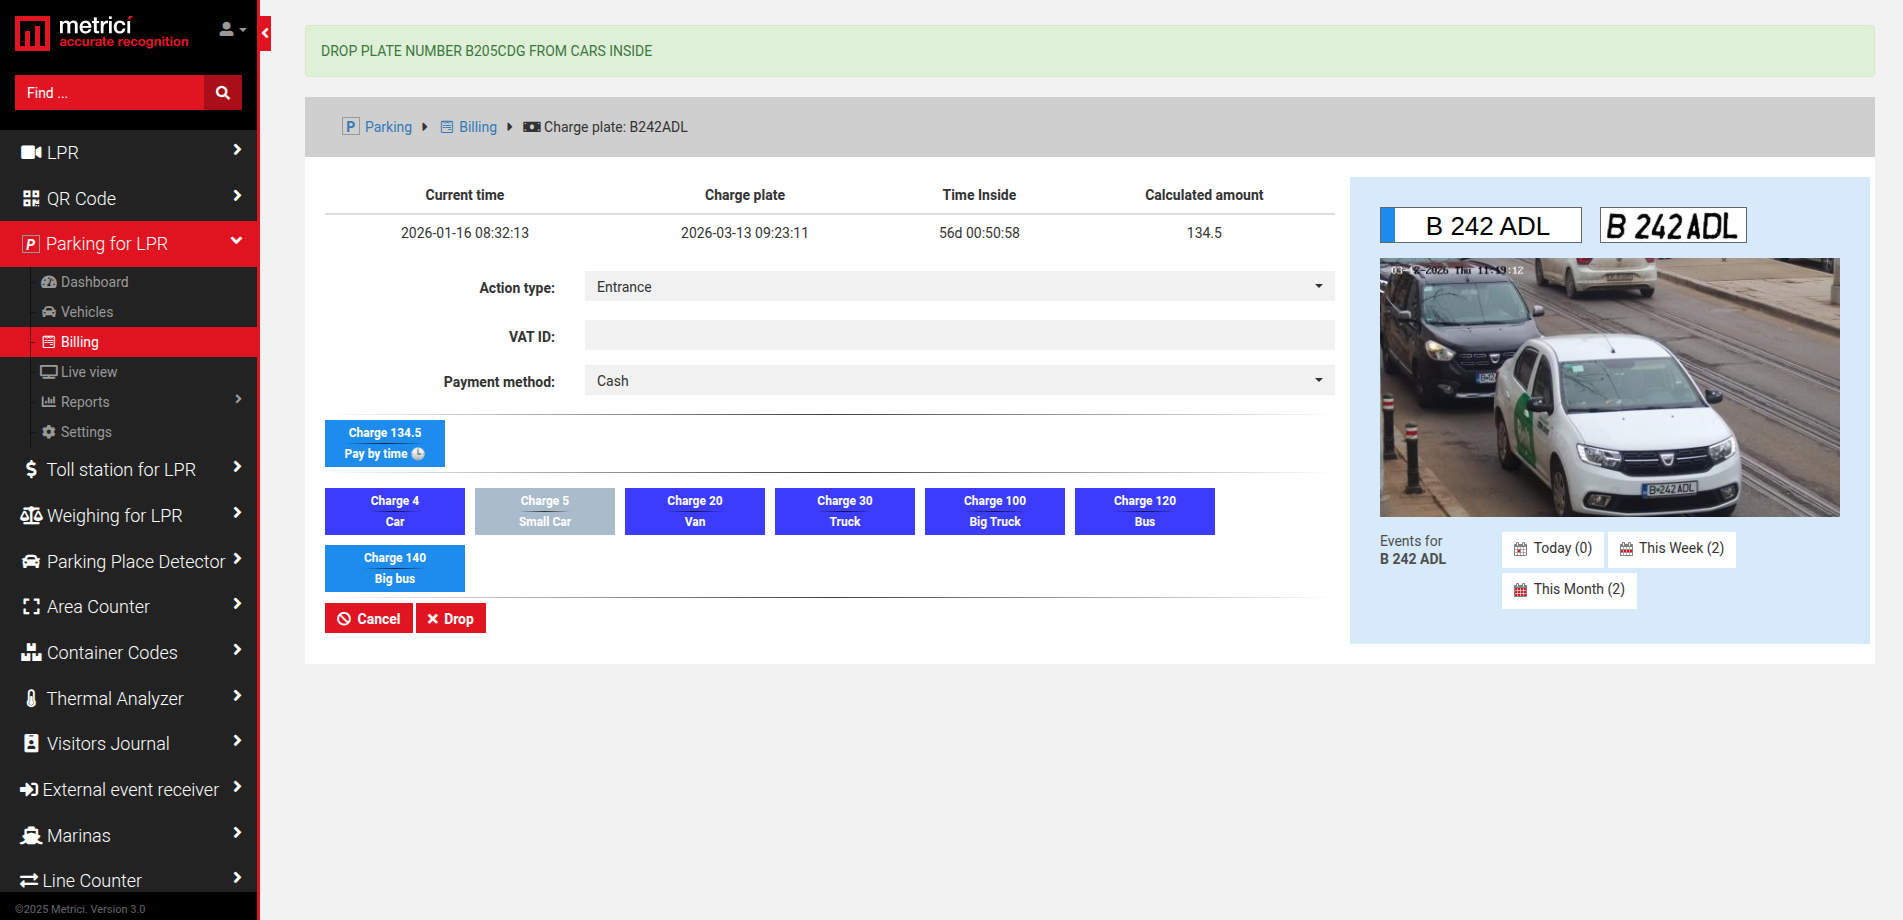
The red Drop button will "take" the car out of the parking, and the number of free spaces is automatically incremented by one — in fact, the vehicle is simply discharged from the system. This is useful when a car has left and the system didn't detect it, or the cameras didn't work, etc.
Live view
This menu allows you to see a real-time flow of cars entering or exiting a parking lot from a single camera or all cameras at the location. When a license plate is detected, an operator can manually open a barrier from the tab on the screen. Additional information is also displayed, such as the tenant (if applicable), how many parking spaces are available for that tenant, and whether access is granted.