Metrici Control Panel v4.0
User Manual for End Users and System Administrators

Table of Contents
- 1. Introduction
- 2. Getting Started
- 3. Main Window Overview
- 4. Managing Applications
- 5. Application Configuration Options
- 6. License Management
- 7. Monitoring Applications
- 8. Log Files and Troubleshooting
- 9. Frequently Asked Questions
- 10. Technical Support
1. Introduction
What is Metrici Control Panel?
The Metrici Control Panel v4.0 is a central management application that allows you to configure, start, stop, and monitor various Metrici recognition and analysis applications. Think of it as a "command center" that gives you complete control over all your Metrici software from a single, easy-to-use interface.
What Applications Can It Manage?
The Control Panel can manage various types of Metrici applications, including:
- LPR (License Plate Recognition) - Reads and identifies vehicle license plates
- QR Code Reader - Scans and decodes QR codes
- CCR (Container Code Recognition) - Identifies shipping container codes
- PPD (Parking Place Detector) - Monitors parking space occupancy
- AC (Area Counter) - Counts people or objects in defined areas
- LC (Line Counter) - Counts objects crossing a line
- TA (Thermal Analyzer) - Processes thermal imaging data
- ID Card Reader - OCR for documents and IDs
- Snapshot - Take images when triggered
- Advanced video analytics - Custom projects
- Line Counter PE - Protection equipment detection
- Area Counter PE - Protection equipment detection
- Live View - Engine detections display
Key Features
- Easy Application Management - Add, configure, start, and stop applications with a few clicks
- Real-time Monitoring - View application status and resource usage in real-time
- License Management - Request new activations and update existing licenses
- GPU Acceleration - Configure applications to use GPU processing for better performance
- Flexible Execution Modes - Run applications in background or foreground, with or without automatic restart
- Comprehensive Logging - Access detailed logs for troubleshooting and monitoring
2. Getting Started
Launching the Control Panel
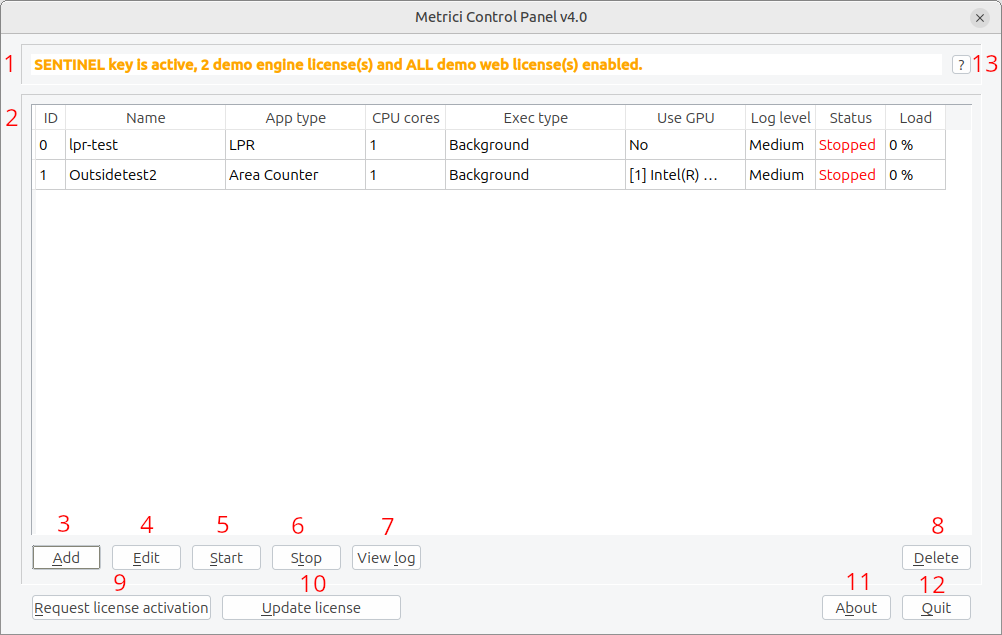
Usually, Control Panel starts automatically when the server is powered on. Or you can start it from command line. The main window will appear, showing you the current status of your applications — see Fig.1 Control Panel.
Command Line Options
If you need to run the Control Panel from the command line, the following options are available:
| Option | Description |
|---|---|
-nogui |
Starts the application without displaying the graphical interface. Useful for running in headless environments or as a service. |
-v |
Displays the version information and exits. |
Understanding the License Status
When you first launch the Control Panel, check the license status indicator at the top of the window — see Fig.1 Control Panel (1). The indicator shows three key pieces of information:
| Status Color | Meaning |
|---|---|
| Green | Your license key is valid and active. The number of enabled licenses is displayed. |
| Orange | You are running in demo mode with limited functionality. |
| Red | No valid license key found. Applications cannot be started. |
3. Main Window Overview
The main window is divided into several sections that give you complete control over your Metrici applications.
Window Sections
Top Bar - License Information
The top section displays important information about your license — see Fig.1 Control Panel (1):
- Key Status - Shows whether your SENTINEL key is detected and valid
- Enabled Licenses - Number of application licenses you have purchased
- Running Licenses - Number of applications currently running
- Available Licenses - Licenses remaining that can be used for new applications
Applications Table
The main table displays all configured applications with their details — see Fig.1 Control Panel (2):
| Column | Description |
|---|---|
| ID | Unique identifier for the application instance |
| Name | Descriptive name you gave to this application instance |
| App type | What kind of Metrici application this is (LPR, QR, etc.) |
| CPU Cores | Number of CPU processor cores allocated to this application |
| Execution Type | How the application runs: Background or Foreground |
| GPU | Which GPU device the application uses (if any) |
| Log Level | How detailed the log files should be |
| Status | Current state: Stopped, Starting, or Started |
| Load | Current CPU load percentage |
Button Bar
The buttons at the bottom or side of the window provide quick access to common operations:
| Button | Function |
|---|---|
| Add | Create a new application configuration see Fig.1 Control Panel (3) |
| Edit | Modify an existing application's settings see Fig.1 Control Panel (4) |
| Delete | Remove an application configuration - see Fig.1 Control Panel (8) |
| Start | Launch the selected application see Fig.1 Control Panel (5) |
| Stop | Stop the running application see Fig.1 Control Panel (6) |
| View Log | View the log file for the selected application see Fig.1 Control Panel (7) |
| Licenses | Show detailed license information see Fig.1 Control Panel (13) |
| License Request | Generate a file to request new license activations see Fig.1 Control Panel (9) |
| License Update | Apply a new license update file see Fig.1 Control Panel (10) |
| About | Show information about the Control Panel software see Fig.1 Control Panel (11) |
| Quit | Close the Control Panel and all applications Fig.1 Control Panel (12) |
4. Managing Applications
Adding a New Application
To add a new application instance:
- Click the Add button in the button bar — see Fig.1 Control Panel (3).
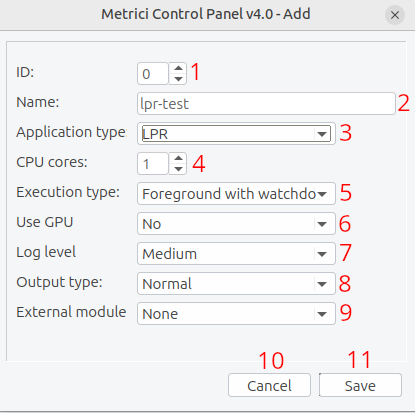
- A configuration menu will appear with various options — see Fig.2 Add Menu.
- Fill in the required information:
- Application Type - Select what kind of application this is
- Name - Give it a descriptive name
- CPU Cores - Choose how many processor cores to allocate
- Execution Type - Decide how it should run. First settings are always done in "Foreground with Watchdog".
- GPU Usage - Choose which GPU to use or if GPU should be disabled. GPU recommended.
- Log Level - Set how detailed logging should be
- Click Save to create the application configuration.
Starting an Application
Once you've configured an application, you can start it:
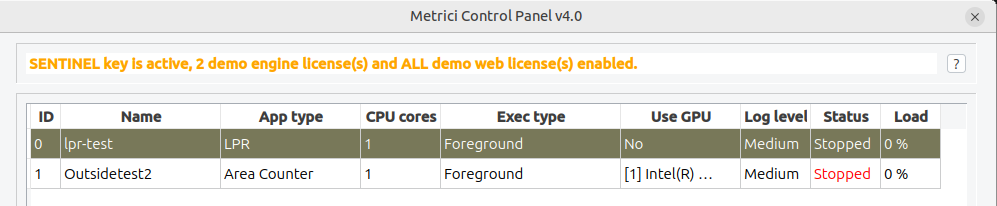
- Select the application in the table by clicking on its row — see Fig.3 Selection:
- Check that the status shows "Stopped"
- Click the Start button — see Fig.1 Control Panel (5).
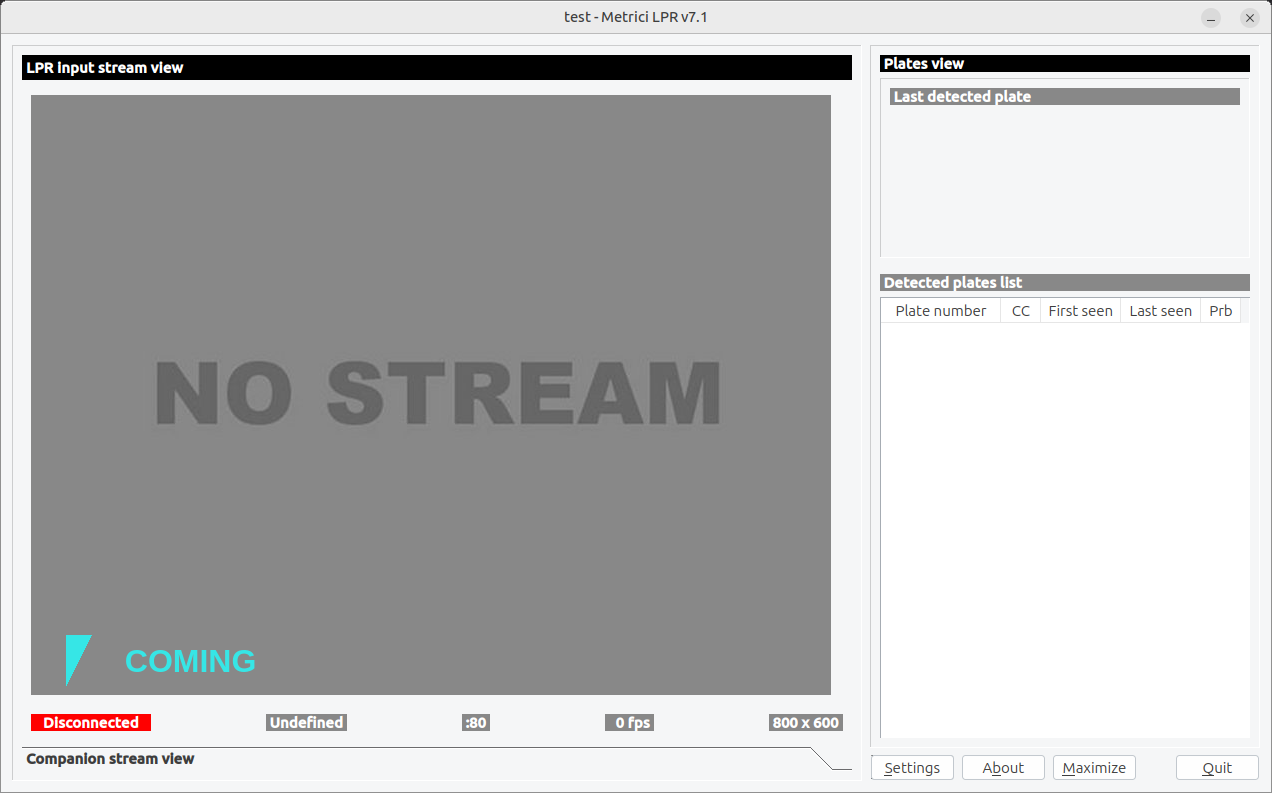
- An interface menu will appear with various options (the interface won’t display anything yet because it hasn’t been configured) — see Fig.4 Main Interface.
- The status will change to "Starting" and then "Started"
- The Control Panel launches the application process
- It verifies a license is available
- The application begins processing according to its configuration
- The status updates to show it's running
Stopping an Application
To stop a running application:
- Select the application in the table — see Fig.3 Selection.
- Ensure the status shows "Started".
- Click the Stop button — see Fig.1 Control Panel (6).
- The status will change to "Stopped".
Editing Application Settings
To modify an existing application's configuration:
- Select the application in the table — see Fig.3 Selection.
- Click the Edit button — see Fig.1 Control Panel (4).
- Modify the desired settings in the dialog.
- Click Save to apply changes — see Fig.2 Add Menu (11).
Deleting an Application
To remove an application configuration:
- Select the application in the table — see Fig.3 Selection.
- Click the Delete button — see Fig.1 Control Panel (8).
- Confirm the deletion when prompted.
Viewing Application Logs
To view an application's log file:
- Select the application in the table — see Fig.3 Selection.
- Click the Log button — see Fig.1 Control Panel (7).
- A log viewer window will open showing detailed information about the application's activities.
Log files are essential for troubleshooting. They contain information about:
- Application startup and shutdown events.
- Processing errors and warnings.
- Performance metrics.
- Any issues that occurred during operation.
- Info about communication with external systems or Metrici database.
5. Application Configuration Options
When adding or editing an application, you'll need to configure various options. This section explains each option in detail.
Application Name
A descriptive name to help you identify this application instance. While optional, giving each application a meaningful name makes it easier to manage multiple instances. — see Fig.2 Add Menu (2).
Application Type
This defines what kind of Metrici application this instance will be. Choose based on your licenses/needs — see Fig.2 Add Menu (3):
| Application Type | Use Case | Description |
|---|---|---|
| LPR | Vehicle access control, parking management | Recognizes license plates from camera images. Ideal for basic license plate reading tasks. LPR Documentation |
| LPR+ | High-security vehicle identification | Enhanced license plate recognition with additional features like vehicle color and brand. |
| QR Code | QR code scanning, inventory tracking | Reads and decodes QR codes from images or video streams. |
| Container Code | Logistics, shipping, port management | Recognizes shipping container identification codes. |
| Parking Place Detector | Smart parking systems | Detects whether parking spaces are occupied or empty. |
| Area Counter | People and vehicles counting | Counts people or objects within a defined area. |
| Line Counter | People and traffic counting | Counts objects that cross a virtual line in the video feed. |
| Thermal Analyzer | Thermal imaging analysis, fire detection | Analyzes thermal camera feeds for temperature monitoring or anomaly detection. |
| ID card reader | OCR | Automatically identifies text and saves it to Metrici database. |
| Snapshot | Image Capture | Take photo from IP cameras when triggered |
| Advanced Video Analytics | Special projects | Detection of custom objects. |
| Line Counter PE | Protection equipment counting | Detects if a person has protection equipment like vest, helmets etc |
| Area Counter PE | Protection equipment detection | Detects if a person has protection equipment like vest, helmets etc |
| Live View | Detections display | View as many engines in real time |
CPU Cores
This setting determines how many CPU processor cores the application can use. More cores allow the application to process data faster, especially when handling multiple video streams — see Fig.2 Add Menu (4).
Execution Type
This setting controls how and where the application runs — see Fig.2 Add Menu (5):
| Execution Type | Description | Use Case |
|---|---|---|
| Background | Application runs invisibly without a window. You won't see any interface, but the application processes data continuously. | Server installations, 24/7 operation, when no monitor is attached |
| Background with Watchdog | Runs in background like above, but if the application crashes or stops unexpectedly, it will automatically restart. | Critical applications that must run continuously without manual intervention |
| Foreground | Application runs with its own window visible on the screen. You can see what it's processing in real-time. | Testing, demonstrations, when you need to monitor the application visually |
| Foreground with Watchdog | Application runs in a visible window but will automatically restart if it crashes. | When you want to see the application running but also need automatic recovery |
USE GPU
Modern computer graphics cards (GPUs) can process visual data much faster than CPUs. This setting controls whether and how the application uses your GPU — see Fig.2 Add Menu (6):
| Setting | Description | When to Use |
|---|---|---|
| Disabled (No GPU) | Application uses only the CPU for processing | Systems without GPUs, or when GPU is needed by another application |
| GPU [Device Number] | Application uses the specified GPU for processing | When you want maximum performance and have a dedicated GPU |
Output Type
This determines how the application sends its results and data — see Fig.2 Add Menu (8):
| Output Type | Description |
|---|---|
| Normal | Sends all event details plus pictures (plate/car images) to the URL using an HTTP POST. |
| Simplified | Sends only the basic event details (plate number, time, confidence, etc.) — usually without pictures. |
| Json | Sends the event details in JSON format (a structured text format). The receiving system must be able to read/parse JSON to use the data. |
External module
External module selects a vendor integration mode. Choose Skidata or Bebarmatic only when your parking hardware/software is from that vendor, so Metrici sends plate events using that vendor’s interface instead of only using Metrici’s internal actions — see Fig.2 Add Menu (9).
| Module Type | Description |
|---|---|
| None | Metrici works on its own. It saves plate events and uses its own rules/actions to control access (e.g., open a barrier). |
| Skidata | Select this if the installation uses a Skidata parking system. Metrici forwards plate events to Skidata so Skidata can handle access/parking logic. |
| Bebarmatic | Select this if the installation uses a Bebarmatic parking system. Metrici forwards plate events to Bebarmatic so Bebarmatic can handle access/parking logic. |
Log Level
The log level determines how much detail is written to the application log file. More detailed logs are useful for troubleshooting but use more disk space — see Fig.2 Add Menu (7):
| Log Level | Detail | Disk Usage | Use Case |
|---|---|---|---|
| None | No logging at all | Minimal | Maximum performance needed, no troubleshooting required |
| Low | Only important events (start, stop, errors) | Low | Normal operation, general monitoring |
| Medium | Standard events and important operations | Medium | Default recommendation for most users |
| High | Very detailed, including debug information | High | Troubleshooting specific issues |
6. License Management
The Metrici Control Panel also manages the software licenses. This section explains how to manage your licenses.
Understanding Your Licenses
Your Metrici software is protected by a SENTINEL key. The key determines:
- What applications you're licensed to use.
- How many instances of each application you can run.
- Whether you have a full or demo version.
Viewing License Summary
To see a summary of all your enabled licenses:
- Click the Licenses button — see Fig.1 Control Panel (13) "?".
- A window will open showing detailed information about each type of license you have.
- This includes both engine licenses and web interface licenses.
Requesting License Activation
If you need to activate new licenses (for example, after purchasing additional applications):
- Ensure your SENTINEL USB key is connected.
- Click the License Request button — see Fig.1 Control Panel (9).
- Enter the product activation key provided by your Metrici distributor when prompted
- A file with extension
.c2vwill be created on your Desktop - Go to http://support.metrici.ro/activate/. In the designated fields write a valid e-mail address to which you have access and a phone number. Load the previously generated c2v file by pressing “Load the license request file”. In the end press “Request activation”. It is important that you have access to the mail you provided because you will receive there the info for activation
- Metrici will process your request and send you a license update file
Updating Licenses
When your distributor sends you a license update file:
- Save the license update file (usually has
.v2cor.v2cpextension) to your computer - Ensure your SENTINEL key is active
- Click the License Update button — see Fig.1 Control Panel (10).
- Navigate to and select the license update file
- Click Open
- The license will be updated and the Control Panel will restart
License Status Indicators
The Control Panel provides visual feedback about your license status:
| Status Display | Meaning | Action Required |
|---|---|---|
| "SENTINEL key is active, X engine licenses and Y web licenses enabled" | Normal operation, licenses working | None |
| "SENTINEL key is active, X demo engine license(s) and ALL demo web license(s) enabled" | Demo/trial version active | Contact distributor for full licenses |
| "SENTINEL key error: invalid, not active, missing or expired" | License key problem detected | Check USB connection, try different USB port, or contact support |
7. Monitoring Applications
The Control Panel provides several ways to monitor your applications in real-time.
Status Column
The status column shows the current state of each application — see Fig.1 Control Panel (2):
| Status | Meaning |
|---|---|
| Stopped | Application is not running |
| Starting | Application is launching (this is temporary) |
| Started | Application is running and processing data |
Load Monitoring
The "Load" column shows the current CPU load of each application as a percentage. This helps you understand how heavily each application is using system resources — see Fig.1 Control Panel (2):
| Load Value | Interpretation |
|---|---|
| 0% | Application is idle or no data is being processed |
| 1-50% | Light processing load |
| 50-80% | Moderate processing load |
| 80-100% | Heavy processing, may affect real-time performance |
Automatic Status Updates
The Control Panel automatically checks the status of all applications every second. The display updates automatically when:
- An application starts or stops
- The load changes significantly
- A watchdog restart occurs
Watchdog Feature
Applications configured with "Watchdog" execution type have built-in crash recovery:
- If the application crashes or stops unexpectedly
- The Control Panel detects this instantly
- Automatically restarts the application
- Logs the event in the system log
8. Log Files and Troubleshooting
Understanding Log Files
Log files contain detailed records of what an application did. They're essential for understanding problems and monitoring performance.
Where Logs Are Stored
Each application creates a log file with a name matching its ID (e.g., 1.log, 2.log). These files are stored in the same directory as the Control Panel.
Viewing Logs
To view an application's log:
- Select the application in the main table
- Click the Log button
- The log viewer opens showing only recent log entries. For older log entries, go to the metrici folder and search the appropriate .log file
Log Rotation
The Control Panel automatically manages log file sizes. When a log file is older than one month, it's automatically rotated:
- The current log file is renamed to
[id].old.log - A new empty log file is created
- Only one backup log file is kept
Common Issues and Solutions
Issue: Application won't start
| Possible Cause | Solution |
|---|---|
| No valid license available | Check that all enabled licenses aren't already in use |
| SENTINEL key not detected | Restart Control Panel |
| Invalid configuration | Review application settings for errors |
| System resources exhausted | Stop some applications or reduce CPU core allocations |
Issue: Application crashes frequently
| Possible Cause | Solution |
|---|---|
| Insufficient resources | Reduce CPU cores, disable GPU, or upgrade hardware |
| GPU driver issues | Update GPU drivers or disable GPU usage |
| Input stream problems | Check camera or video source connections |
Issue: High CPU load
| Possible Cause | Solution |
|---|---|
| Too many applications running | Stop unused applications |
| CPU cores over-allocated | Reduce CPU cores per application |
| High resolution video | Reduce video resolution or frame rate |
Issue: License key error
| Possible Cause | Solution |
|---|---|
| License expired | Contact your distributor to renew licenses |
Getting More Help from Logs
When troubleshooting, check logs for:
- Error messages - Look for lines containing "error" or "Error"
- Warning messages - Look for "warning" or "Warning"
- Stack traces - Long messages starting with "at" indicate the exact location of crashes
- Timestamps - Note when the problem occurred to correlate with other events
9. Frequently Asked Questions
Q: Can I run multiple instances of the same application type?
A: Yes! The Control Panel allows you to create multiple instances of the same application type, as long as you have enough licenses. For example, you could have three different LPR applications monitoring three different cameras.
Q: How many applications can I run at once?
A: The maximum number of applications is determined by your license. Each license allows one concurrent instance. If you try to start more applications than you have licenses for, the Control Panel will show an error.
Q: Can I run the Control Panel without a display (headless mode)?
A: Yes! Use the -nogui command line option. The Control Panel will run in the background without showing a window. Use this for server installations or when you only need the applications running, not the management interface.
Q: How do I backup my application configurations?
A: Application configurations are stored in the cpan.ini file. Simply copy this file to a safe location to backup your configurations. You can restore by copying it back when needed.
Q: What's the difference between "Background" and "Foreground" execution?
A: Background execution runs invisibly (no window), which is ideal for servers and 24/7 operation. Foreground execution shows a window where you can see the application processing in real-time, which is useful for testing and monitoring.
Q: Should I use GPU processing?
A: If you have a compatible GPU (NVIDIA, AMD or Intel Arc), enabling GPU processing can significantly improve performance, especially when processing video. However, some systems don't have GPUs, and integrated graphics may not provide benefits. Try both modes to see which works better for your setup.
Q: How do I know which log level to use?
A: For normal operation, use "Medium" logging. This provides enough information for troubleshooting while not using too much disk space. Increase to "High" only when you're actively debugging a specific problem, then reduce back to "Medium".
Q: What does the watchdog feature do?
A: The watchdog automatically restarts an application if it crashes or stops unexpectedly. This is important for critical applications that must run continuously without manual intervention.
Q: How do I upgrade my licenses?
A: Contact your Metrici distributor to purchase additional licenses. They'll provide you with a product activation key. Use the "License Request" button to create a request file, send it to your distributor, and they will provide a license update file to install.
10. Technical Support
Contact Information
If you need help with the Metrici Control Panel or your Metrici applications:
| Contact Method | Details |
|---|---|
| support@metrici.ro | |
| Website | http://www.metrici.ro |
| Company | Metrici (Copyright 2026) |
Before Contacting Support
To get faster assistance, please gather the following information before contacting support:
- Version Information - Click the "About" button to get the Control Panel version
- License Details - Note your license type and any error messages. Also license serial number
- Log Files - Relevant log entries from the applications having issues
- System Information - Operating system, CPU, GPU, and memory details
- Problem Description - What you were doing when the problem occurred