Container Code Recognition
Web Interface — User Manual for End Users and System Administrators

Welcome to the Container Code Recognition (CCR) module! This page covers the Web Interface side of CCR — everything you manage from the browser under the Container Codes menu. For login, user administration, time tables, locations and cameras, backup and other shared settings, see the Introduction & Global Settings page.
Table of Contents
1. Introduction
Metrici Container Code Recognition (CCR) reads container identification codes (ISO 6346, e.g. CFSU 000560 [1]) from IP cameras and sends every detection to the Web Interface. From there you can browse events with their photos, generate reports and statistics, define automated actions per code, group codes for bulk management, and watch live camera feeds. All of this lives under the Container Codes menu in the left sidebar of the interface.
Before the CCR menu will show any data, two prerequisites must be met in Global Settings:
- At least one location exists, with at least one camera whose Camera Type is set to Container Code Recognition.
- The camera's ID and authkey have been entered in the Control Panel so the engine can send events to the Web Interface.
So a set up must be completed both in this Metrici Interface as well as in Metrici Control Panel, so please follow both guides for a full understanding.
The Container Codes menu groups the following sub-menus, each documented below: Containers, Containers flow, Live view, Reports, Actions (List and Groups), and Settings.
2. Containers
The Containers menu lists every detection recorded by the CCR engines. This is where you review what was seen, when, and where — see Fig.1 Containers.
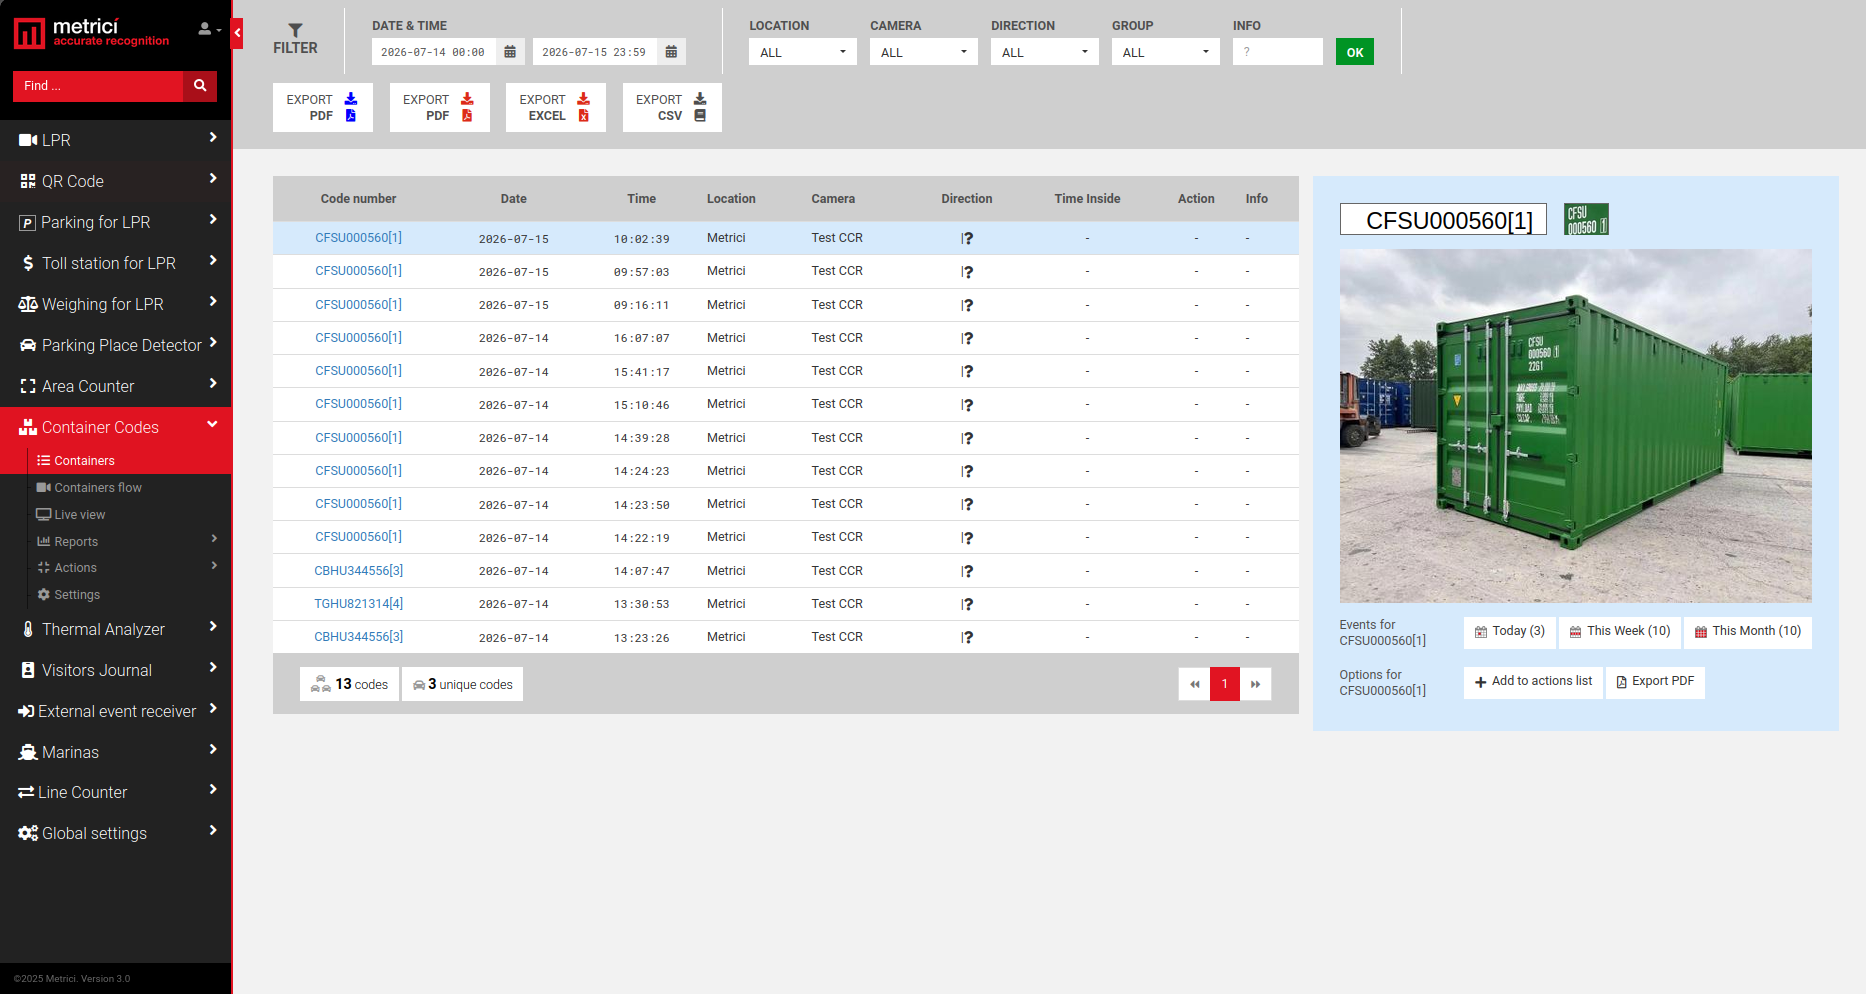
The filter bar at the top lets you narrow down the list of events. The available filters are: Date & Time (from/to), Location, Camera, Direction, Group and Info (a free-text field that can store additional information for a code) — see Fig.1 Containers. Once you have selected the desired filter or filters, press OK to apply them. The result set can be exported in several formats (PDF, Excel or CSV) using the Export PDF, Export Excel and Export CSV buttons.
| Column | Description |
|---|---|
| Code number | The recognized container code, e.g. CFSU000560[1]. The number in brackets is the ISO 6346 check digit. |
| Date / Time | When the container was seen. |
| Location / Camera | Where it was seen and which camera detected it. |
| Direction | Direction of travel (coming or leaving), as configured in the engine's CCR tracking settings. |
| Time Inside | Dwell time, when applicable. |
| Action | Whether an action is set for that particular code. |
| Info | Any additional information attached to the code. |
On the right side of the screen, a panel shows more detail for the selected code: the container photo captured at the moment of detection, and how many events that code has Today, This Week, and This Month. Two options are also available for the selected code — Add to actions list (see the Actions chapter) and Export PDF. Clicking the code or the photo enlarges the image from the moment of detection. At the bottom of the list, counters show the total number of codes and the number of unique codes in the current result.
3. Containers Flow
The Containers flow menu is a live alert view for the user watching the interface. It is similar to Live View, but instead of the full video stream it shows only the last detection, and it can play a beep sound/ alert each time a new detection is made — see Fig.2 Containers Flow.
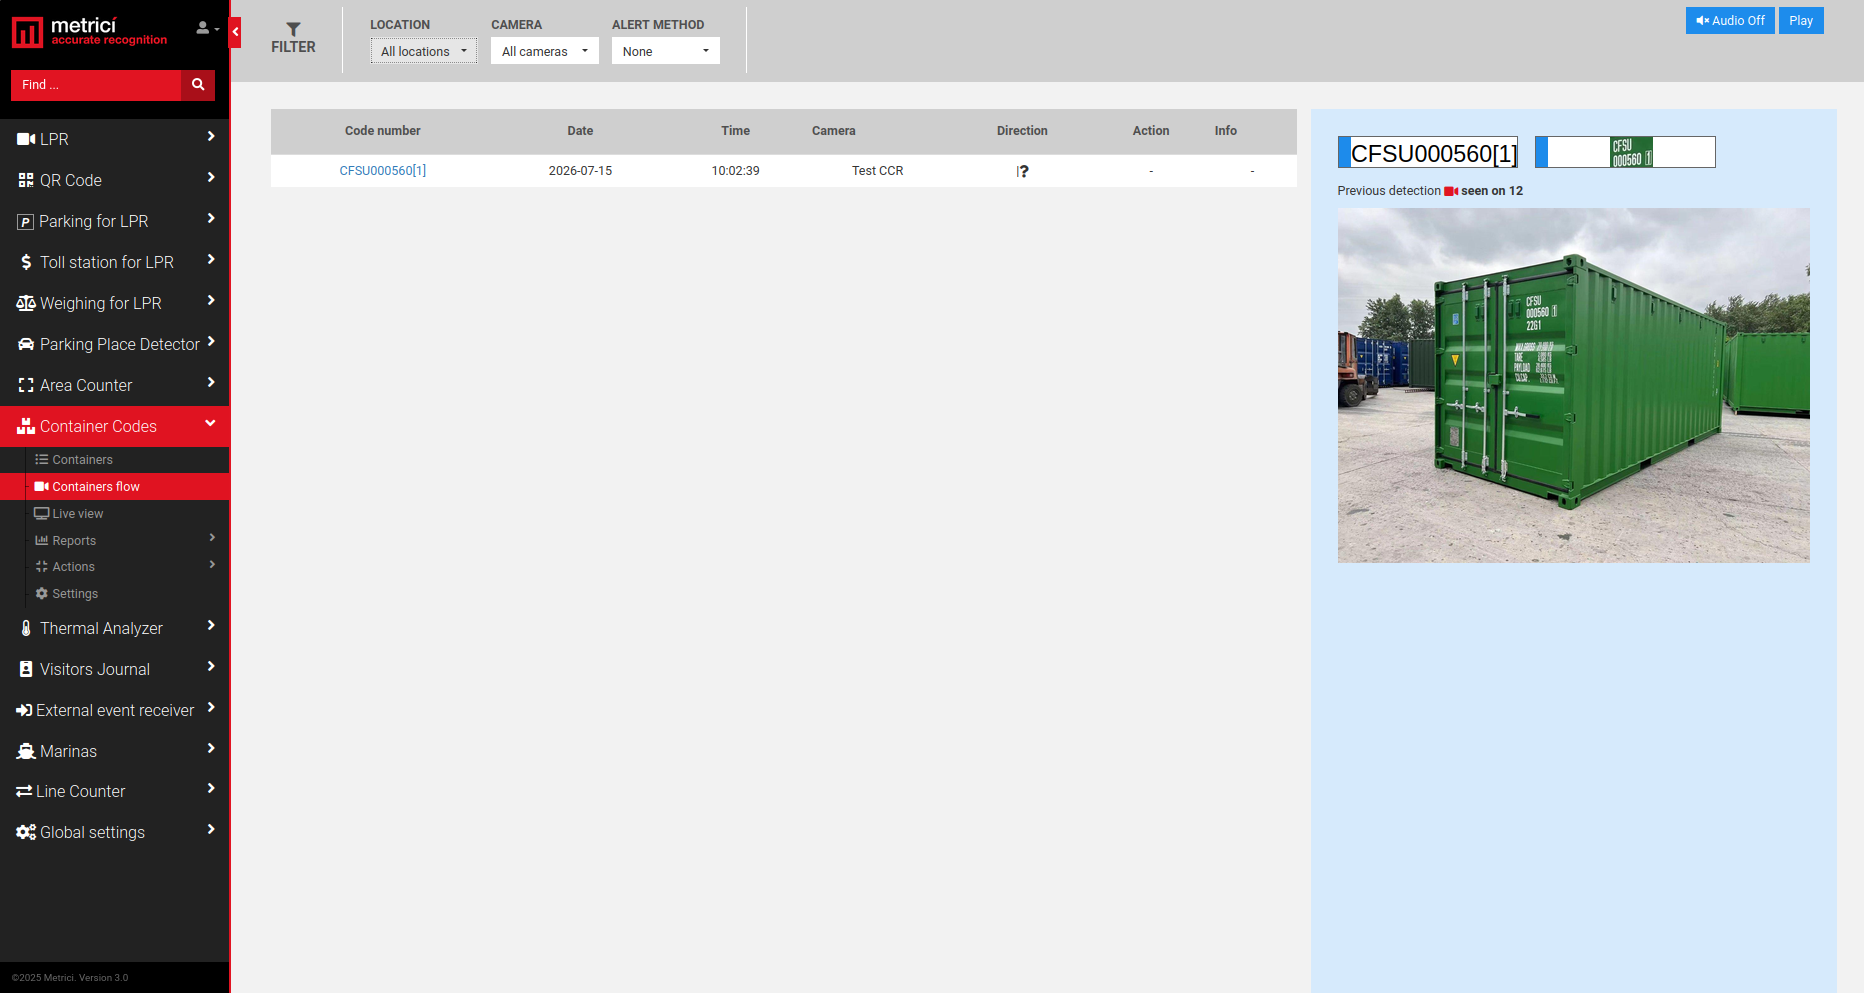
At the top you choose the Location, the Camera, and the Alert Method. The alert method decides which detections appear in the flow:
- Codes on the action list — only codes already in your action lists (whitelist or blacklist) trigger the alert.
- Codes not on the list — only codes that are not in your action lists.
- None — every detection is listed as it happens.
Use the Audio Off / Play controls to toggle the alert sound. If you manage several locations and select only one, the flow shows detections from that location only. Clicking the detected code or the photo maximizes the picture from the moment of detection. The panel also indicates the previous detection for the same code.
4. Live View
Live view displays a live tile for each CCR camera you have defined — see Fig.3 Live View. Each tile shows the camera image together with the last code, the date and time, the Direction, and the Time Inside.
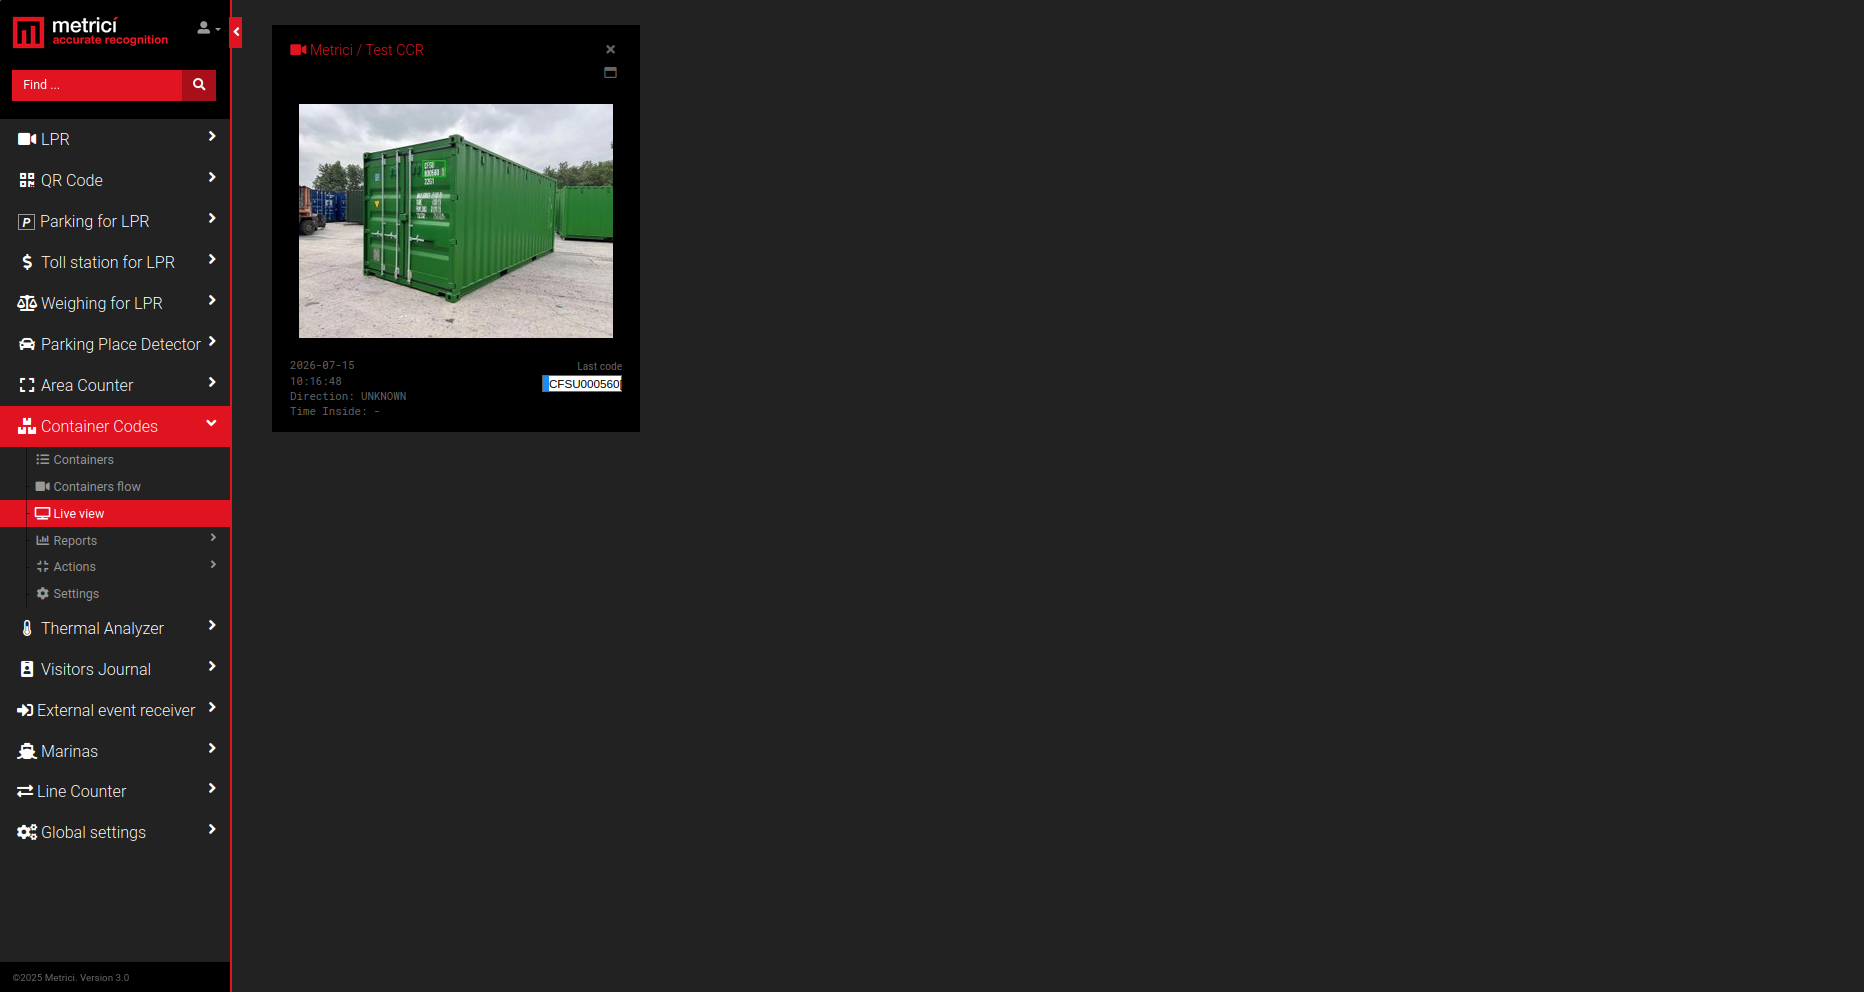
A tile can be made full screen by clicking the monitor icon in its top-right corner. Remove a tile with the × button; after viewing one camera full screen, return to all cameras with the restore (_) control.
http://localhost/io/ccr/live_view.php. If the video is served from another address, replace localhost with the server's IP or hostname.5. Reports
Metrici generates several reports automatically from the CCR events. Each report can be exported to an Excel (XLS) file, and the top bar lets you pick the date range, location, and camera to report on.
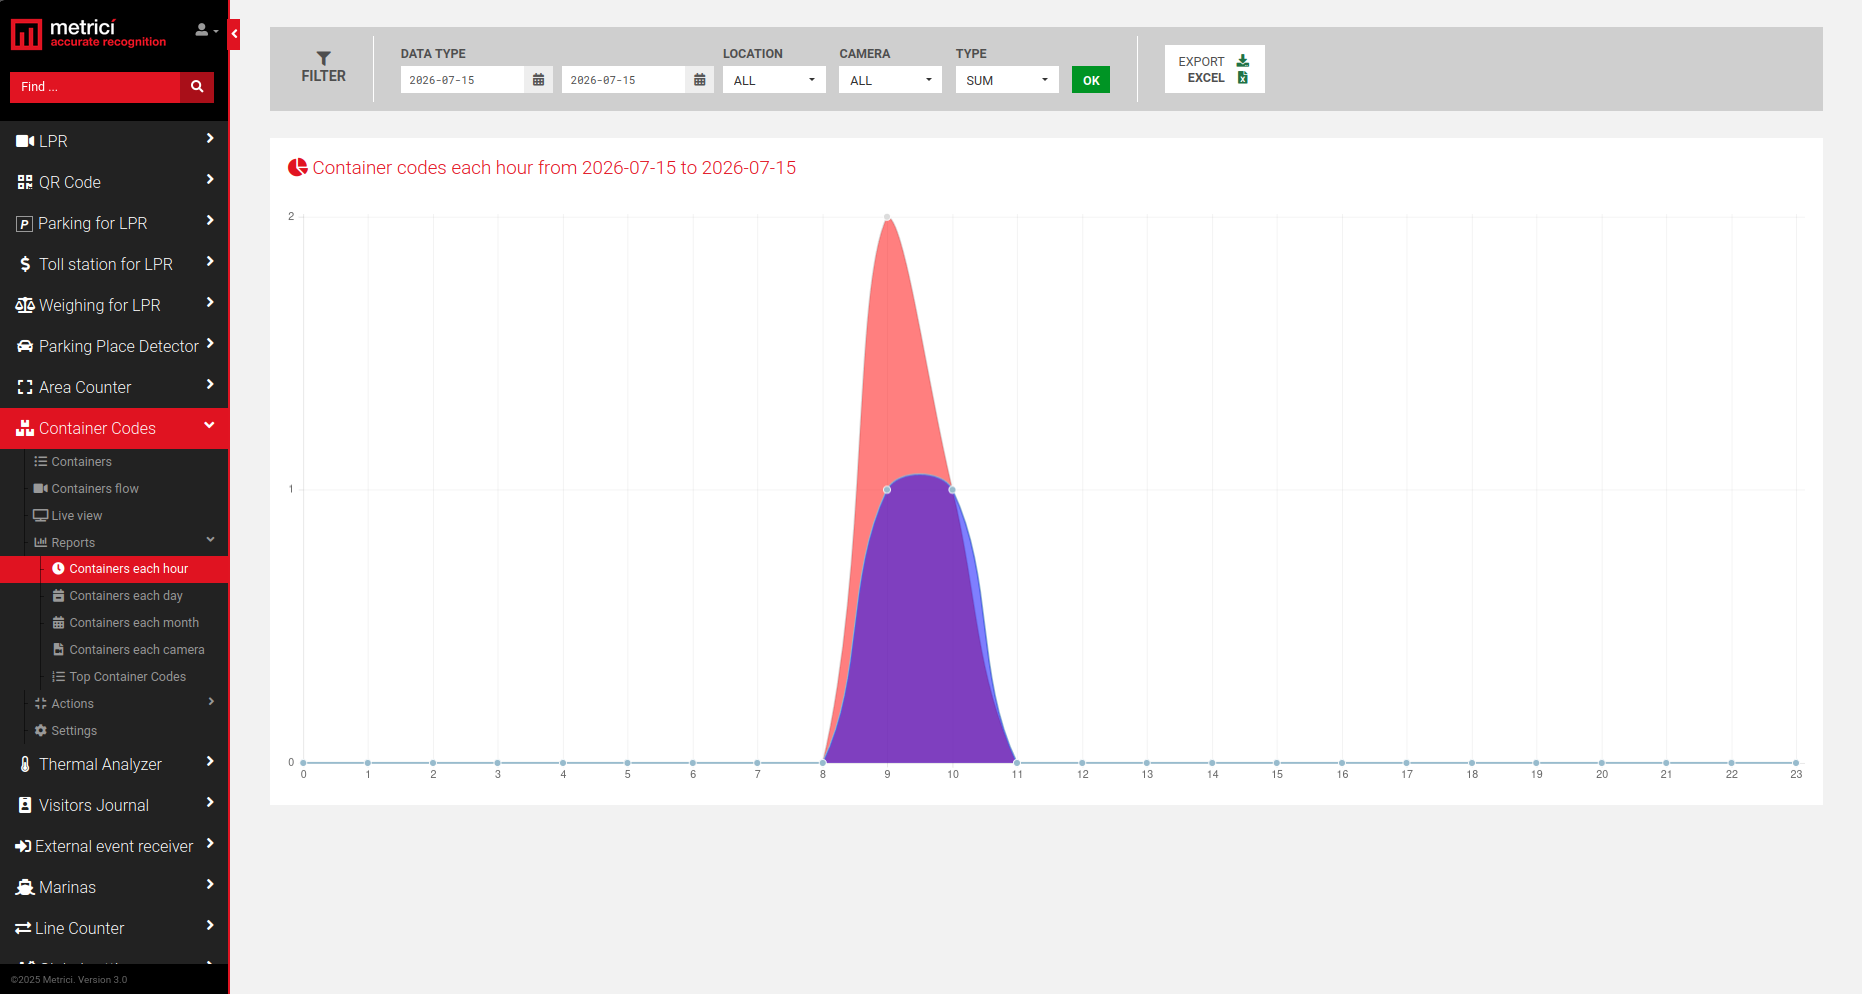
Containers each hour
Shows the number of recognized codes (detections) as well as unique codes for each hour of the day — see Fig.4 Containers each hour. The Type selector chooses between SUM and AVERAGE: the sum adds the detections of each hour across all filtered days, while the average calculates a per-hour average across those days.
Containers each day
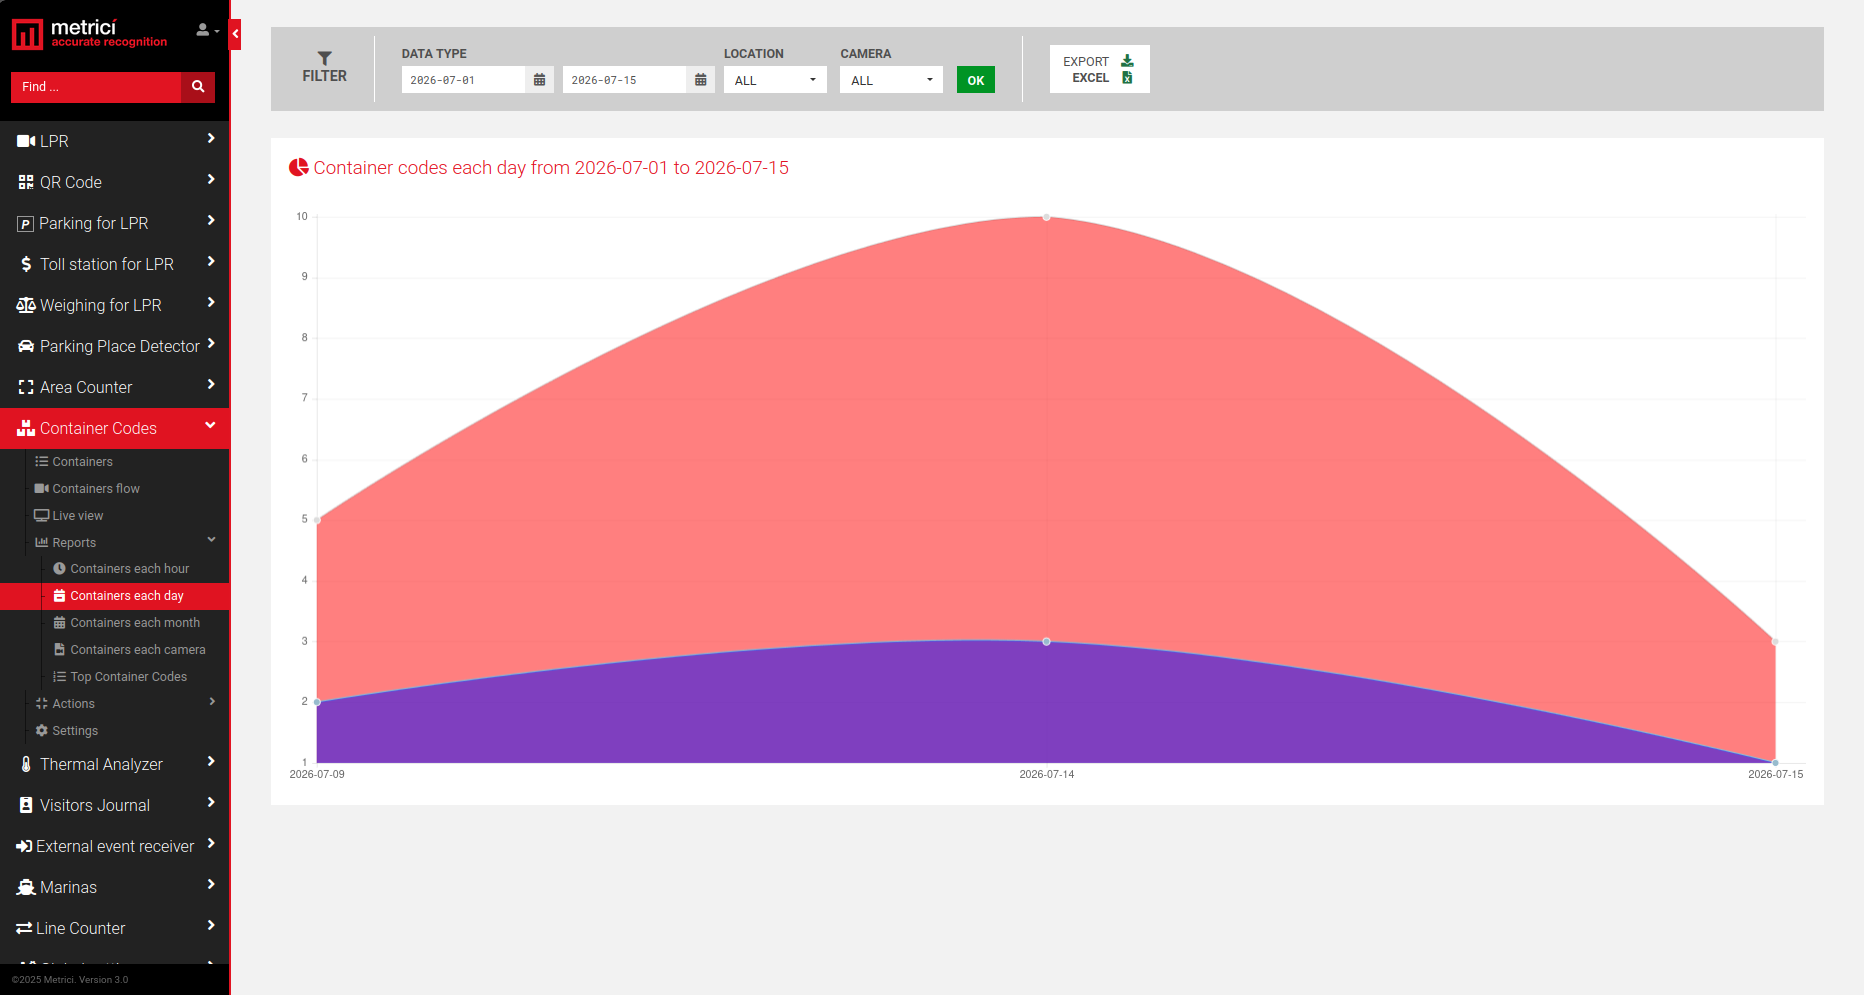
By default this report covers all the days of the current month; more days can be filtered from the top bar — see Fig.5 Containers each day.
Containers each month
By default this report covers all the months of the current year; other months can be chosen for the report.
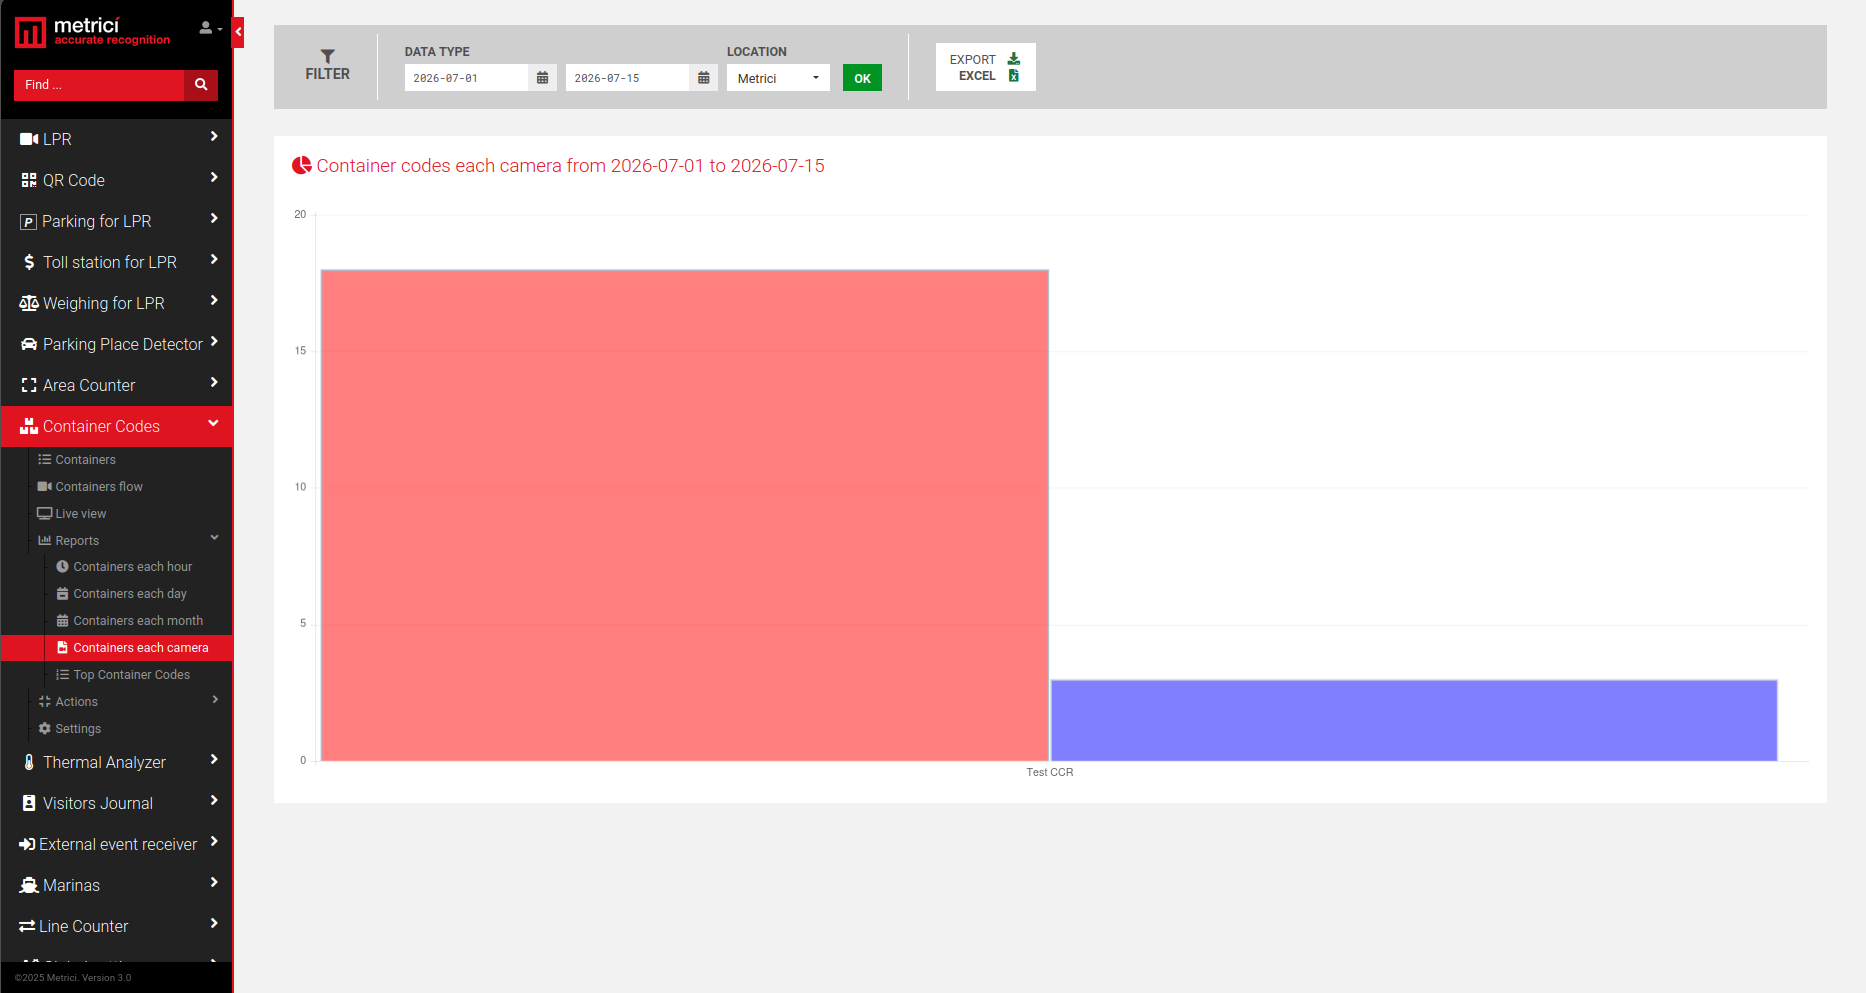
Containers each camera
Generates a report with all the detections seen by each camera in a location — see Fig.6 Containers each camera.
Top Container Codes
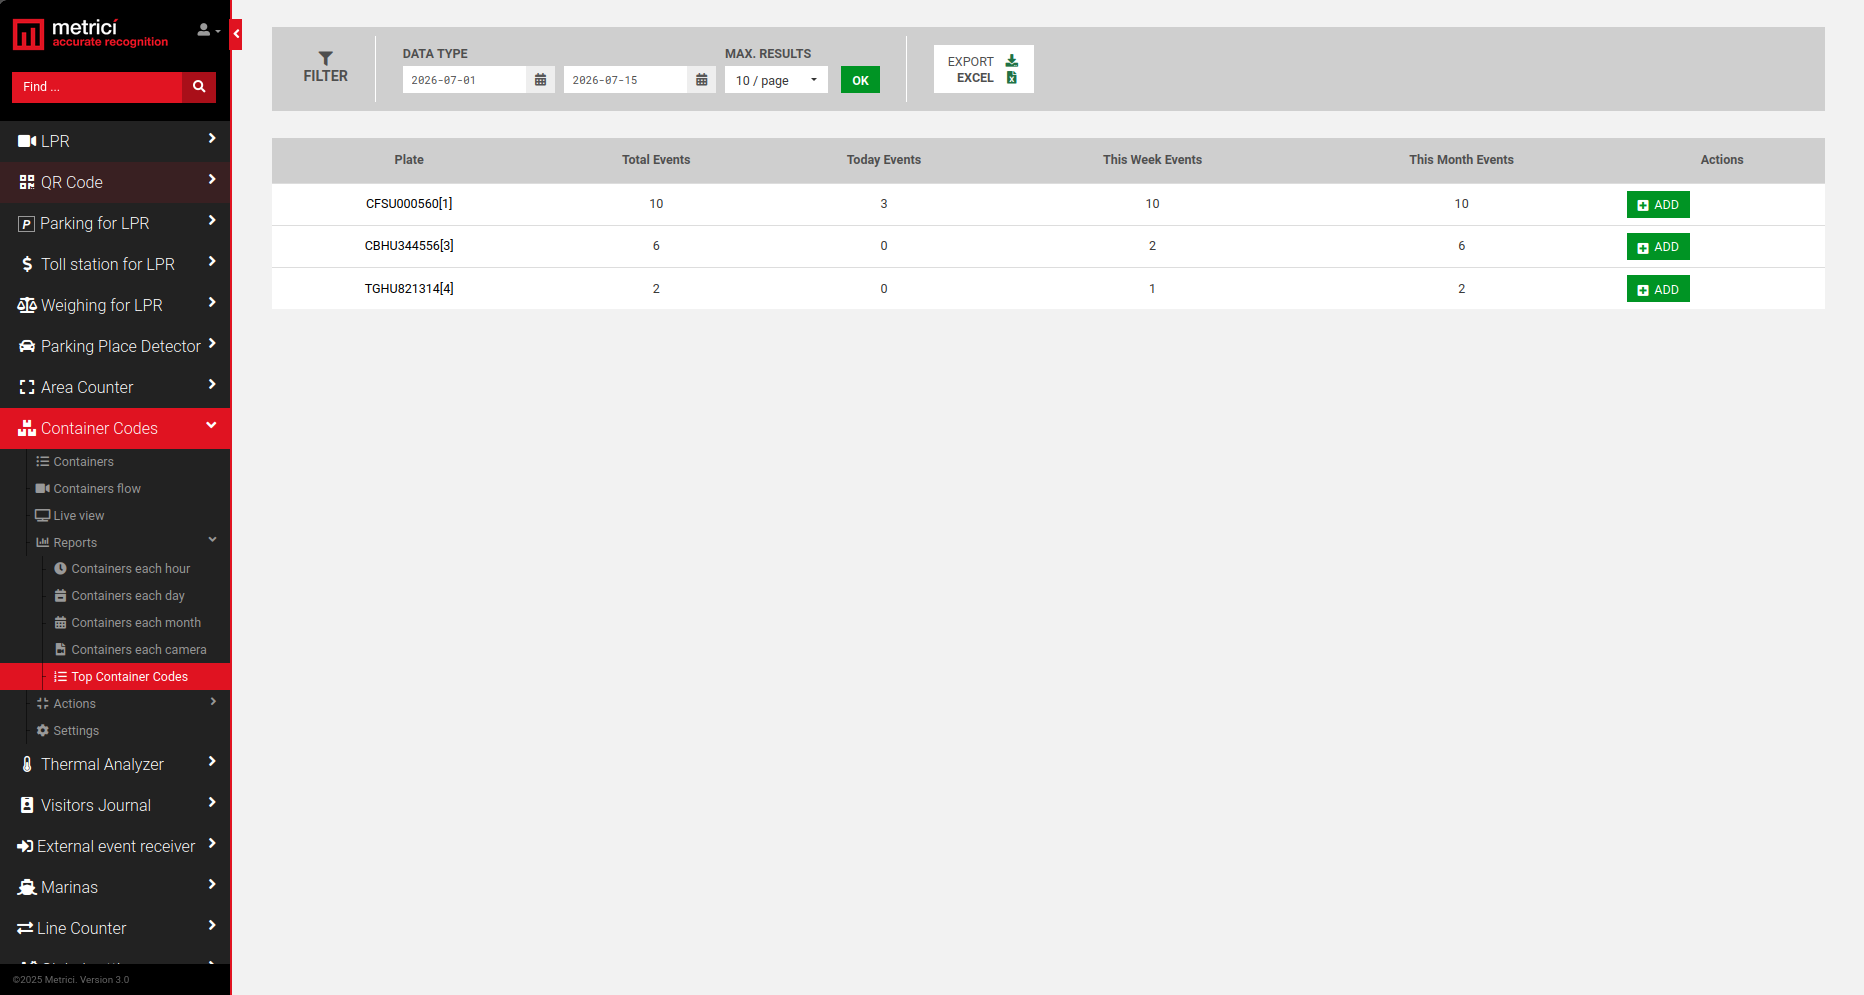
Lists the codes that were detected most often, with columns for Total, Today, This Week, and This Month events — see Fig.7 Top Container Codes. From the top bar you can set the list length from 10 per page up to 100 per page. Each row has an ADD button to add that code directly to an action list.
6. Actions
The Actions menu is where you define what the system should do when a container code is recognized — for example, opening a barrier, switching a traffic light, sending an e-mail, or displaying a pop-up. This menu has two submenus: List (individual codes) and Groups (groups of codes).
Action List
The action list displays every code entered in the database together with its settings — see Fig.8 Action List.
The columns are:
- Code Number: The container code detected by the detection engine.
- Info: Lets you associate additional information with each individual code.
- Locations & Cameras: The location and camera where the system will act when a code from the action list is detected.
- Active: Indicates whether the code is active or not.
- Open Barrier: When enabled, the system issues the barrier-opening command upon detection of the code.
- Traffic Light: When enabled, the system controls the traffic light or another hardware device - same for open barrier command upon detection of the container code.
- Send Email: Lets you send an e-mail when the container code is detected.
- Show Pop-up: When enabled, a customizable pop-up message appears on screen when the system detects the container code.
- Expires: Shows when the code expires from the database.
- Group: Shows whether the code belongs to a group.
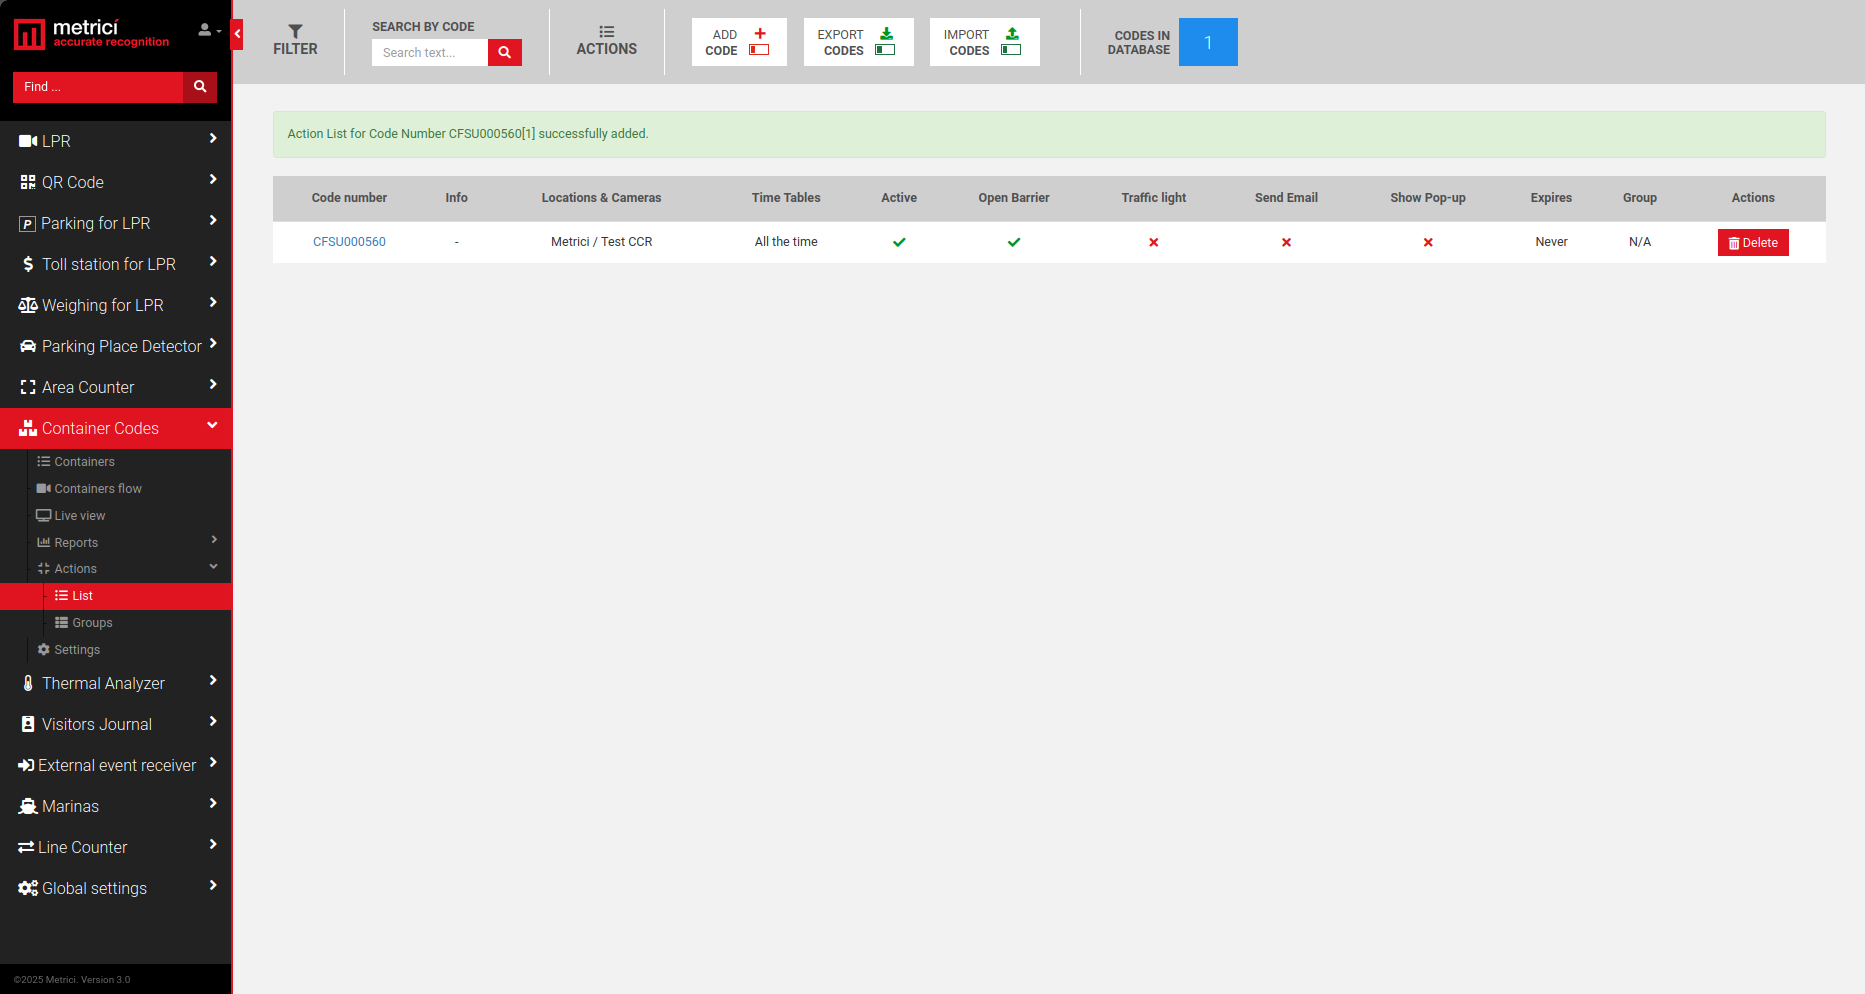
From the top bar you can use:
- Search by Code: Lets you search for a specific container code.
- Add Code: Lets you add a new code to the action list.
- Export Codes: Allows you to export codes from the Web Application.
- Import Codes: Allows you to import codes into the Web Application. This is useful when you need to enter a large number of container codes into the database.
- The blue counter shows how many codes are currently in the database.
Adding a Code to the Action List
Click Add Code to open the form — see Fig.9 Add Code to Action List. Its fields are:
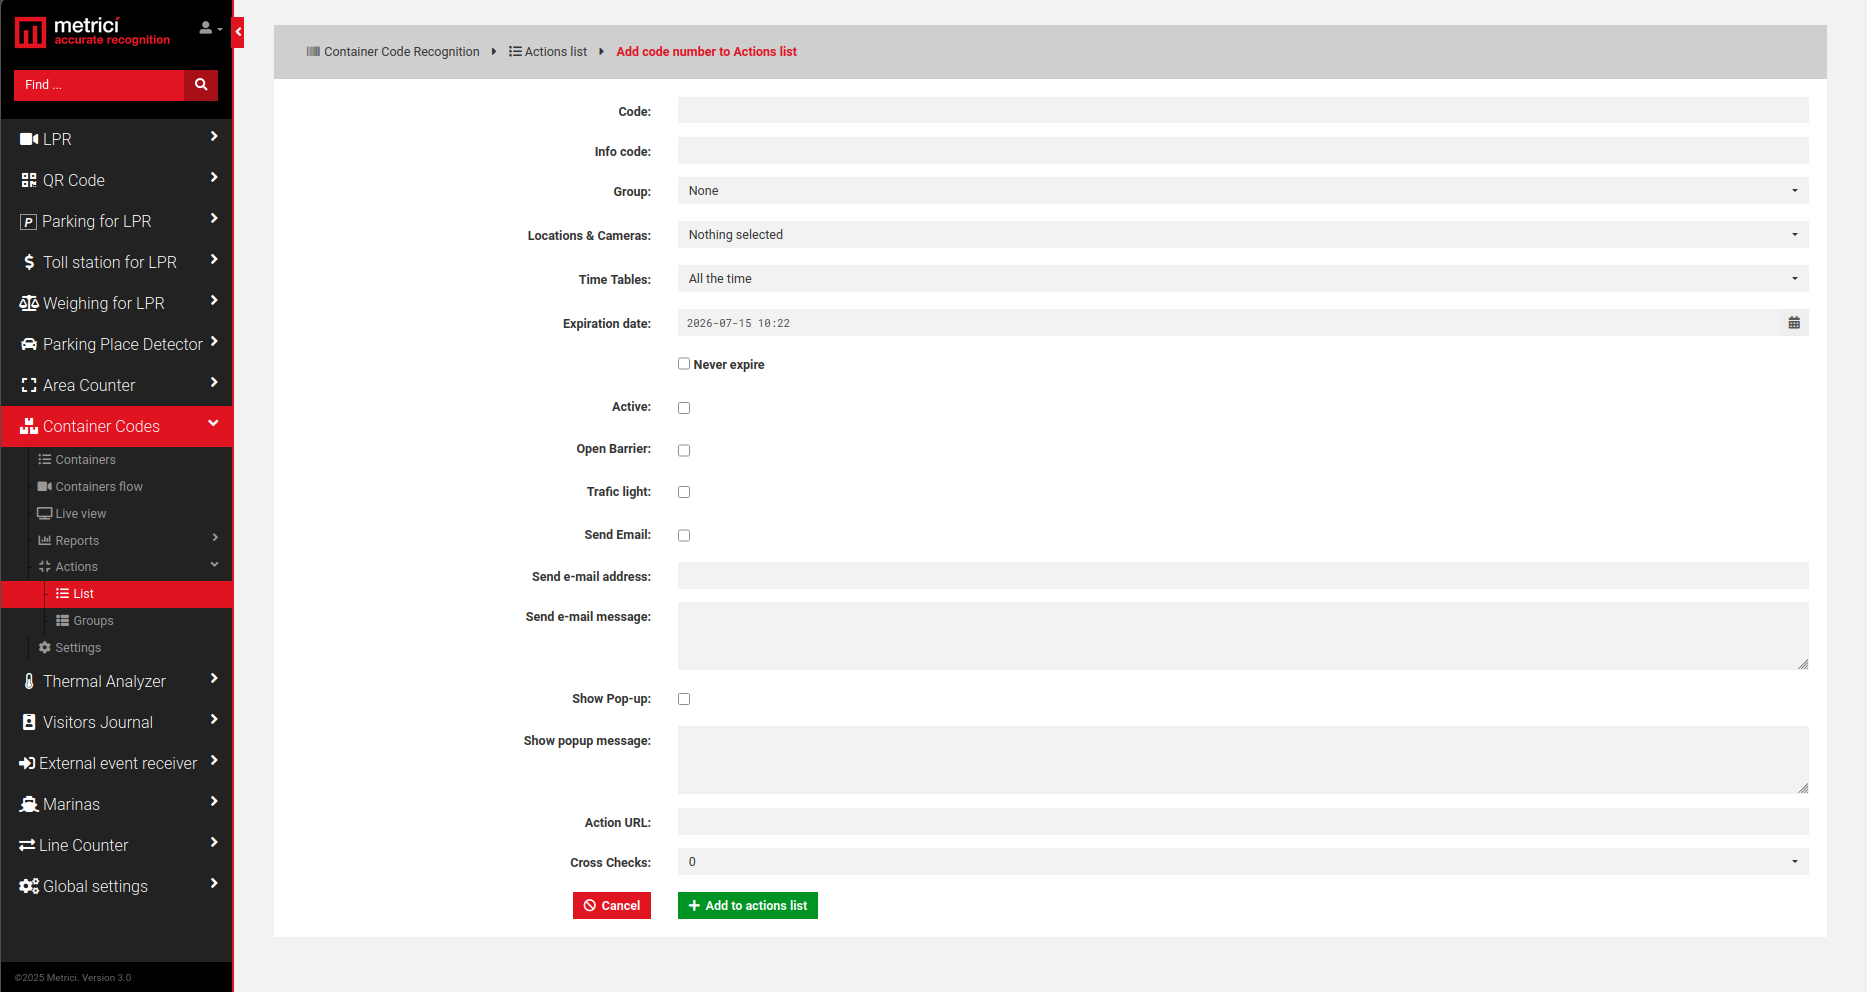
| Field | Description |
|---|---|
| Code | The container code the rule applies to. |
| Info code | Optional free text stored with the code. |
| Group | If the code belongs to a group you created, select it here. A code added to a group automatically inherits all of that group's settings. |
| Locations & Cameras | Choose for which location(s) and camera(s) this code has an action rule. A code can have rights at one barrier only, not necessarily all of them. |
| Time Tables | Restrict the actions to a schedule you created. The actions run only during that time table (for example, a barrier that opens only on a "Work Hours" table). |
| Expiration date / Never expire | When the rule should stop applying, or tick Never expire to keep it permanent. |
| Active | Enables the rule for this code. |
| Open Barrier | Open the barrier when this code is detected. |
| Trafic light | Switch the traffic light when this code is detected. |
| Send Email / address / message | Send a notification e-mail; fill in the recipient address and the message. |
| Show Pop-up / message | Show a pop-up in the interface; fill in the message text. |
| Action URL | The address of the hardware device to command (barrier, traffic light, etc.) — usually the address of the LAN controller. |
| Cross Checks | Number of extra conditions that must be met before the action runs. 0 (default) means a single condition. 1 means two conditions must be satisfied simultaneously — for example a container code and a license plate, linked in the database, before access is granted. |
_ sign replaces a single letter or number, and the % sign replaces any number of letters or numbers. For example, a rule for CFSU% applies to any code starting with CFSU followed by at least one more character and as many possible.
7. Groups
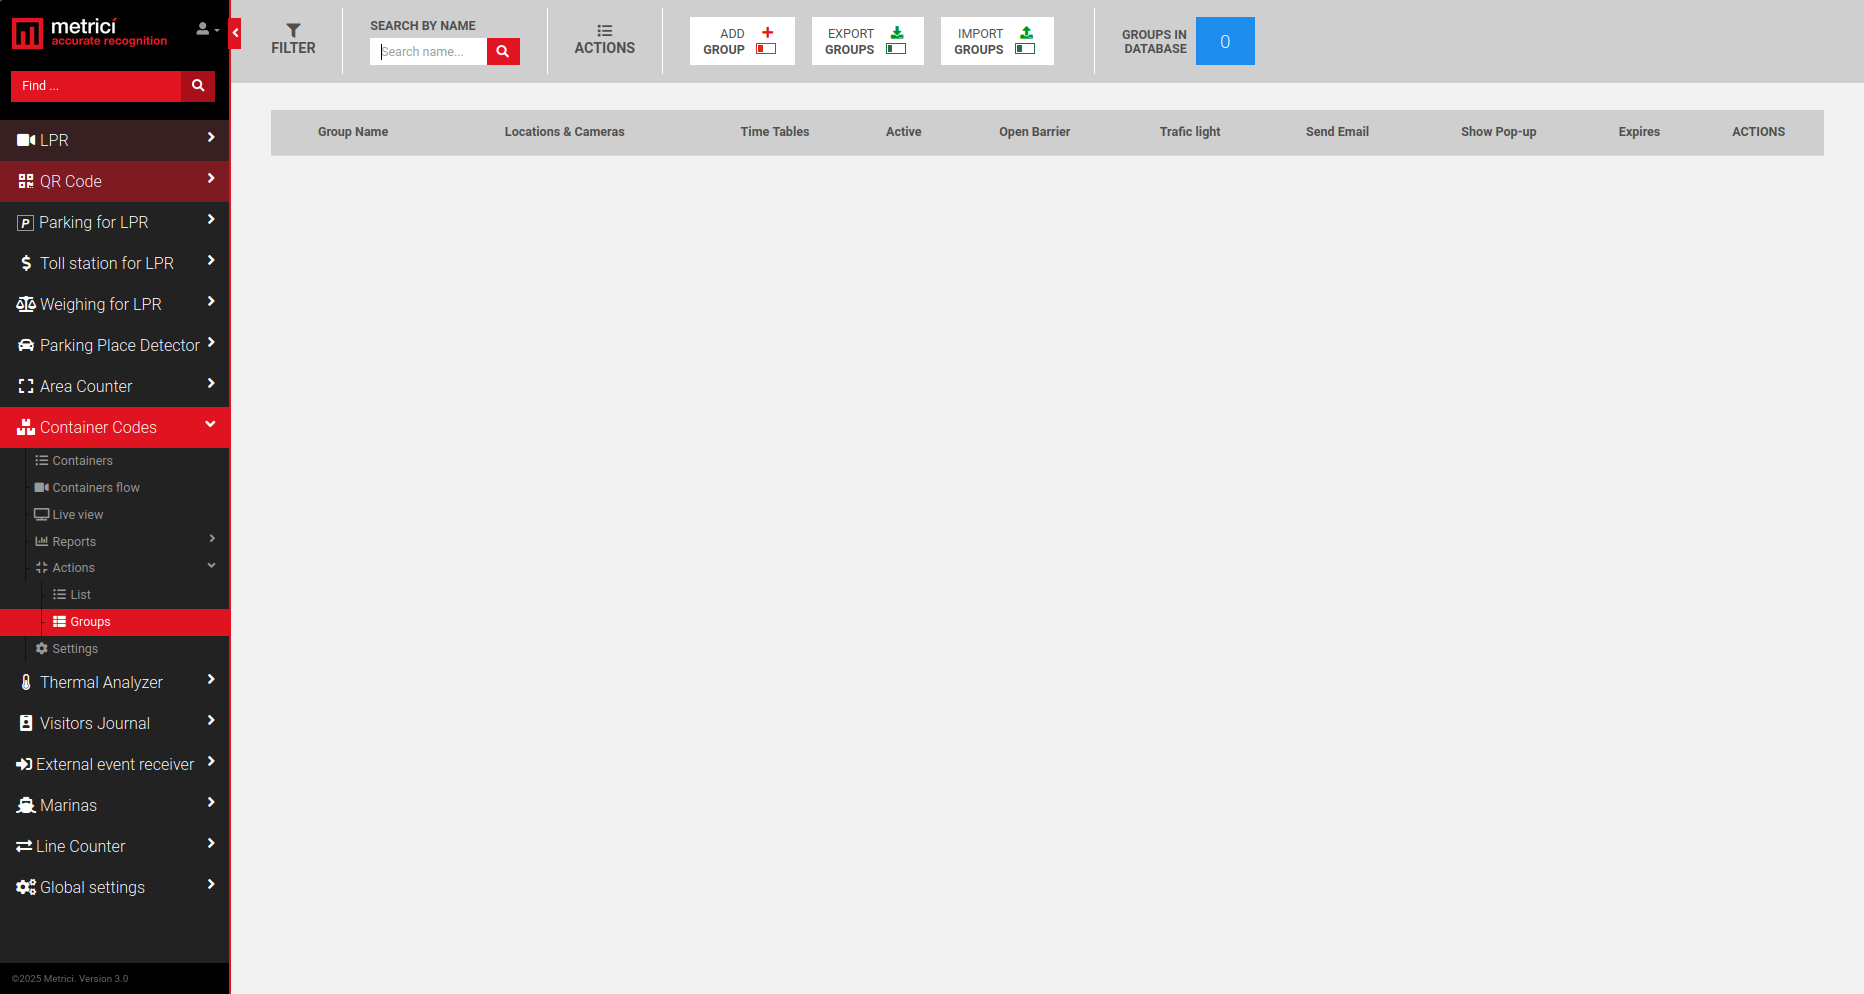
Groups make managing many codes easier: the settings defined for a group are applied to every code assigned to it, so you don't have to configure each code by hand — see Fig.10 Groups. This menu lists all the groups you have created; clicking a group name shows the codes assigned to it along with the actions, locations, and cameras where those actions are active.
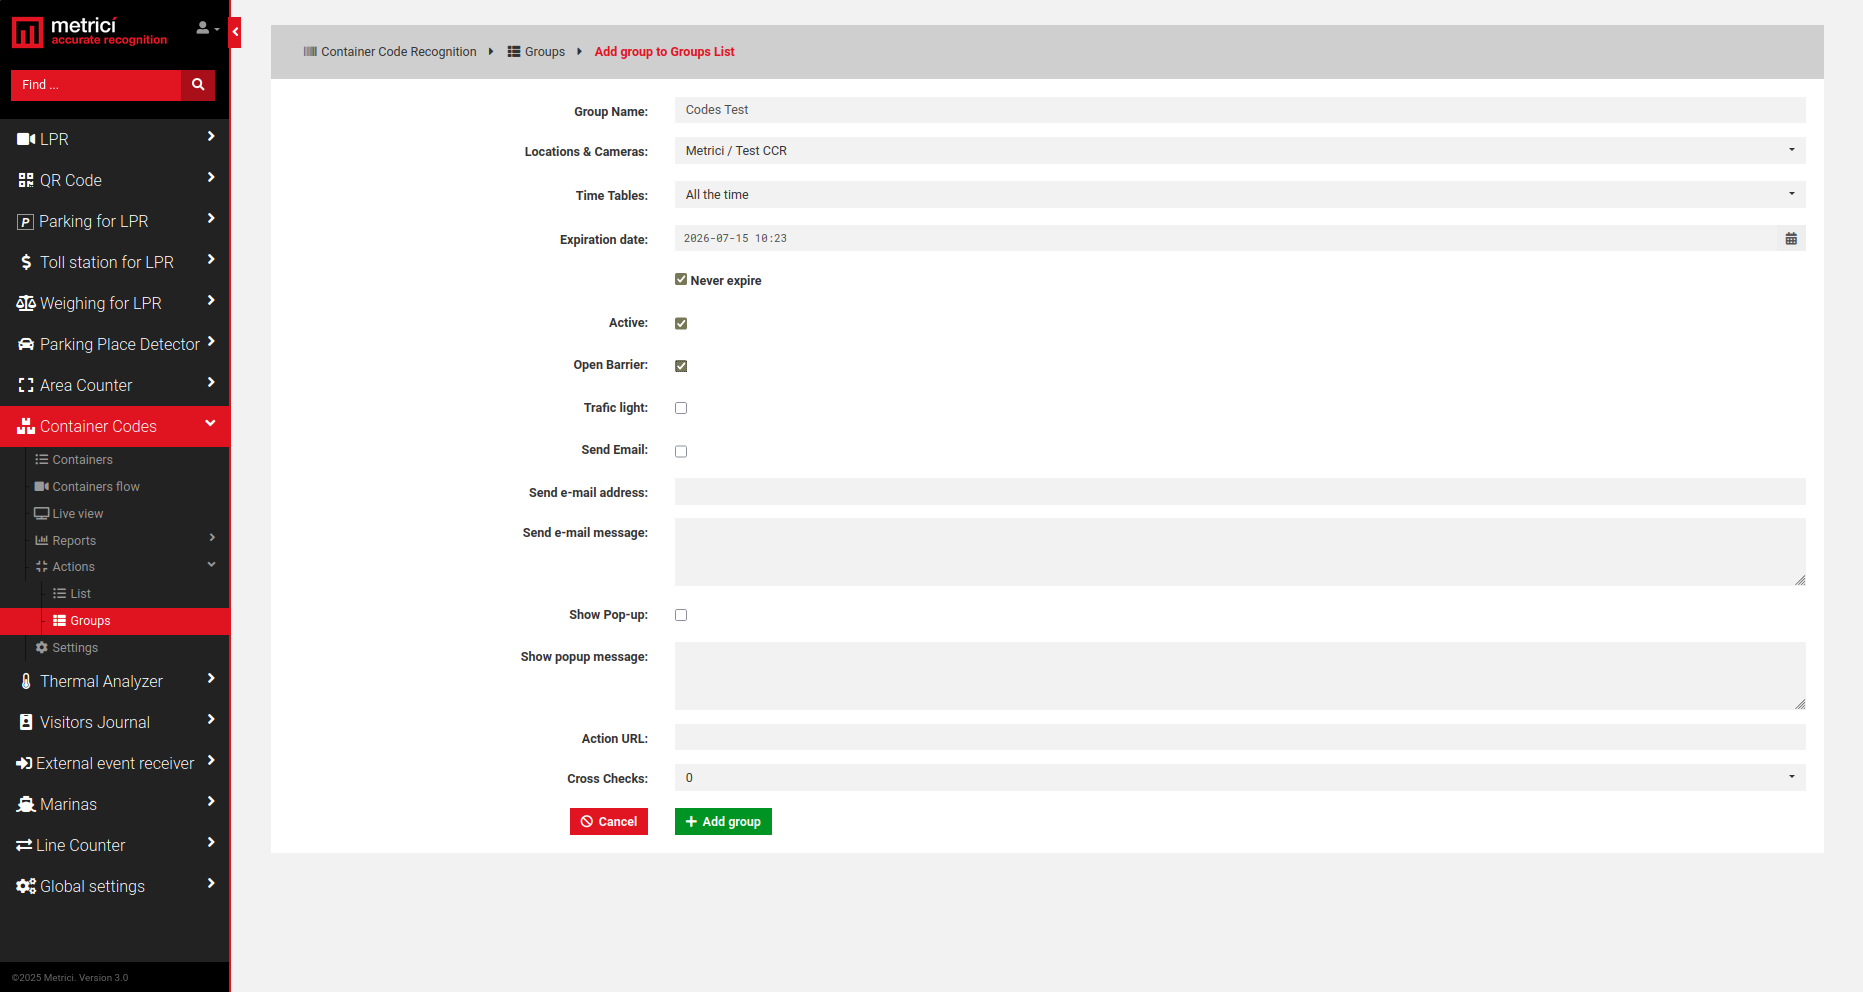
To create a group, click Add Group and fill in the form — see Fig.11 Add Group. The fields are the same as for a single code, minus the code number: a Group Name, then Locations & Cameras, Time Tables, Expiration date / Never expire, Active, Open Barrier, Trafic light, Send Email (with address and message), Show Pop-up (with message), Action URL, and Cross Checks. Set these carefully, because they are copied to every code placed in the group.
Once a group exists, you can add codes to it one by one with Add Code — enter the code (and Info if you wish) and it inherits the group's settings. You can also import a list of codes in CSV format with Import Codes.
8. Settings
The Settings menu shows housekeeping information for the CCR module — see Fig.12 Settings:
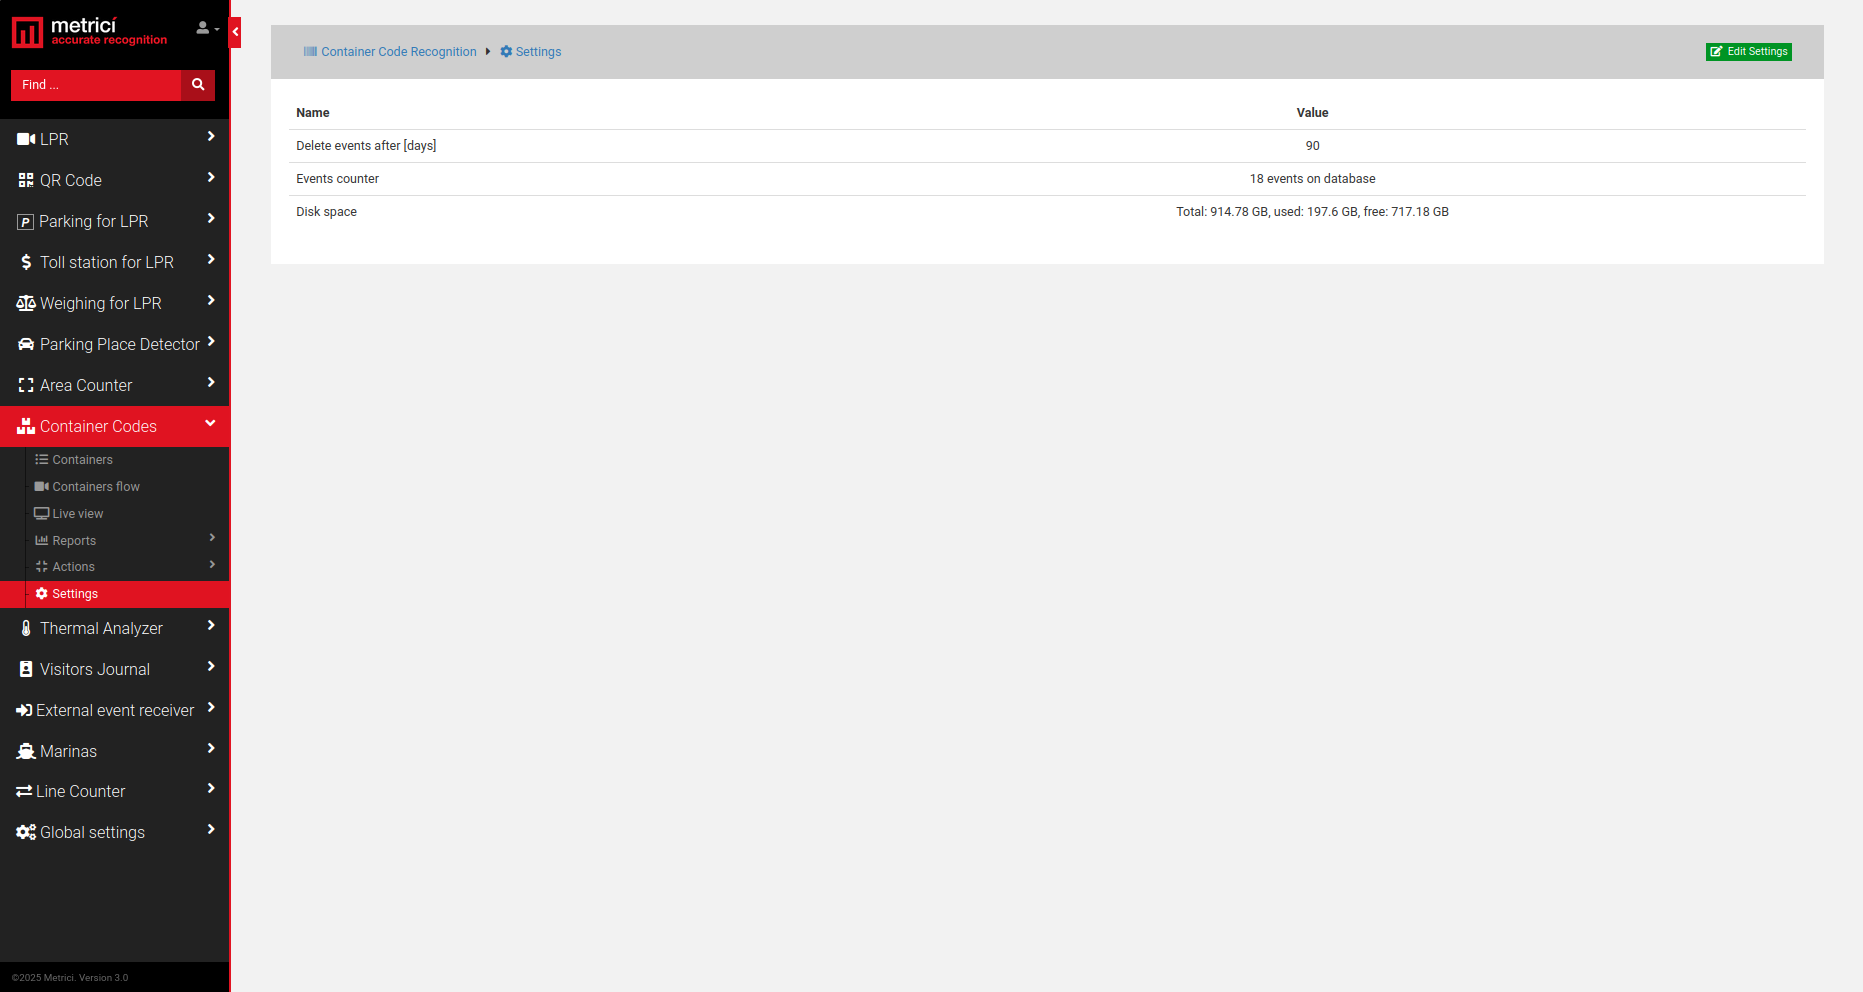
| Name | Meaning |
|---|---|
| Delete events after [days] | How long events are kept before being removed automatically (default 90 days). |
| Events counter | How many events are currently stored in the database. |
| Disk space | Total, used, and free disk space on the server. |
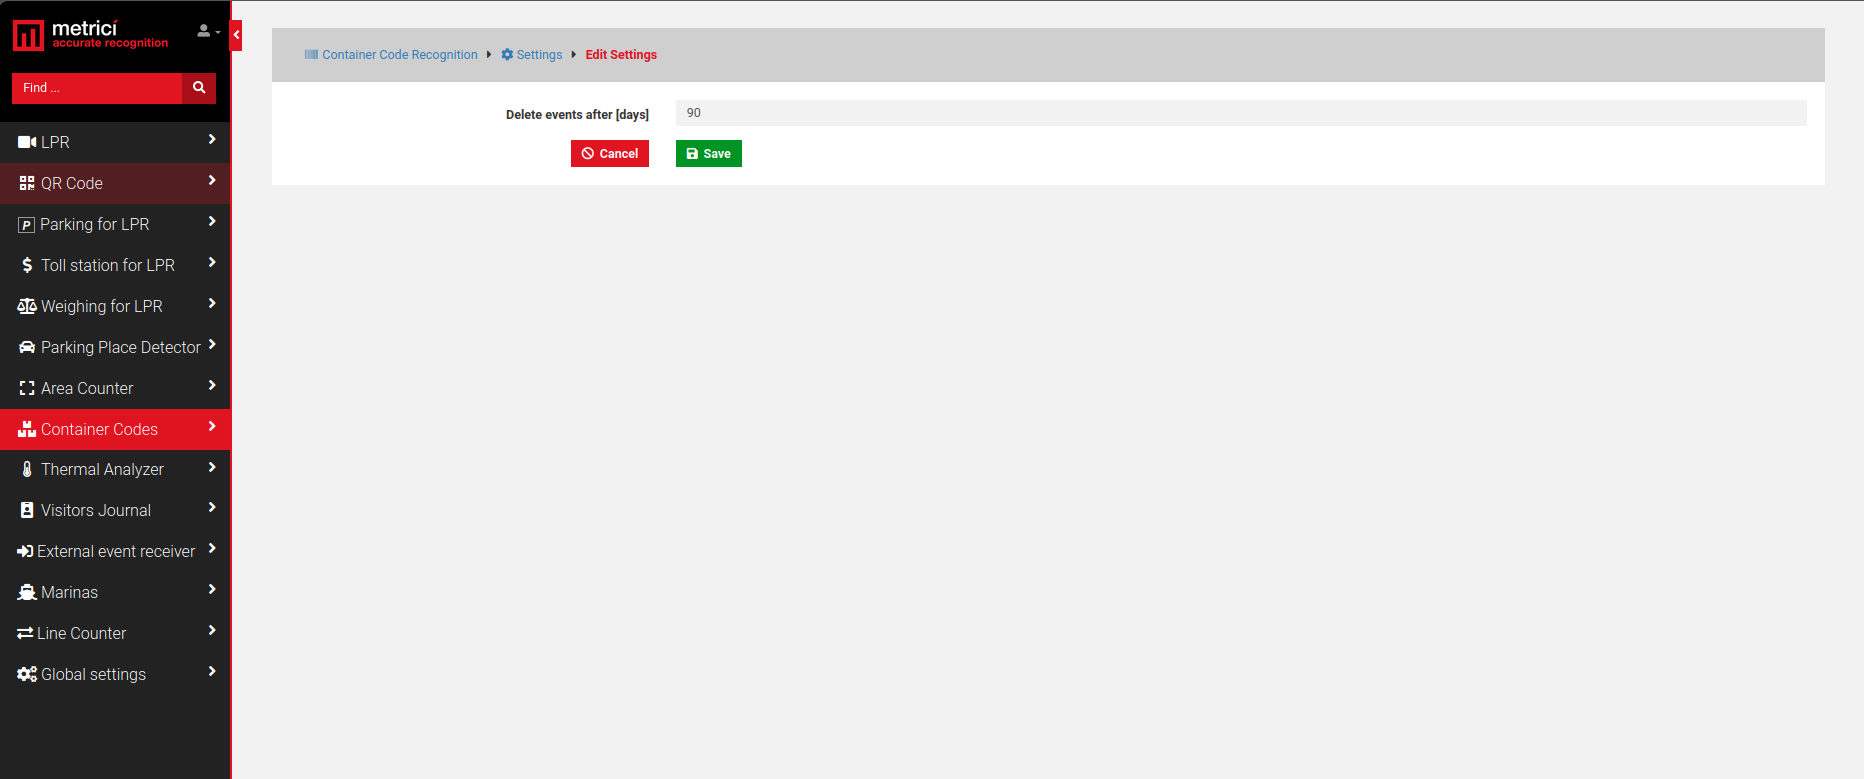
To change the retention period, click Edit Settings (upper right), set a new value for Delete events after [days], and click Save — see Fig.13 Edit Settings.