Metrici Web Interface
User Manual for End Users and System Administrators

Welcome to the Metrici Web Interface application! This comprehensive guide will help you understand and configure your Metrici Web Interface. Whether you're setting up a new installation or fine-tuning an existing one, this manual provides clear, step-by-step instructions for every feature.
Table of Contents
- Introduction
- Login and Navigation
- Global Settings
- Two-Factor Authentication
- License Plate Recognition
- Parking Module for LPR
- Container Code Recognition
- Area Counter
- Line Counter
- Parking Place Detector
1. Introduction & Product Overview
Metrici is a suite of intelligent video analytics software and hardware products. All software modules share a common Web Interface for administration, monitoring, reporting, and configuration. This document covers exclusively the Web Interface side of every Metrici product.
All Metrici software is based on analyzing video streams from IP cameras and recognizing objects in the frames. The architecture is split into two main components:
- Metrici Control Panel — the detection engine manager (server-side, handles cameras and real-time analysis).
- Metrici Web Interface — the browser-based application for dashboards, events, reports, actions, and settings.
| Product | Version | Purpose |
|---|---|---|
| LPR | v7.1 | License plate recognition for access control, parking, tolling, traffic monitoring |
| CCR | v1.0 | Container code recognition for logistics, ports, industrial tracking |
| Area Counter | v2.0 | Count objects present in defined zones of a video stream |
| Line Counter | v1.4 | Count objects crossing a virtual gate/line in a video stream |
| PPD | v2.0 | Monitor individual parking spaces for occupancy (busy/free) |
| Thermal Analyzer | v1.0 | Temperature detection and measurement from thermal cameras |
2. First Login & Navigation
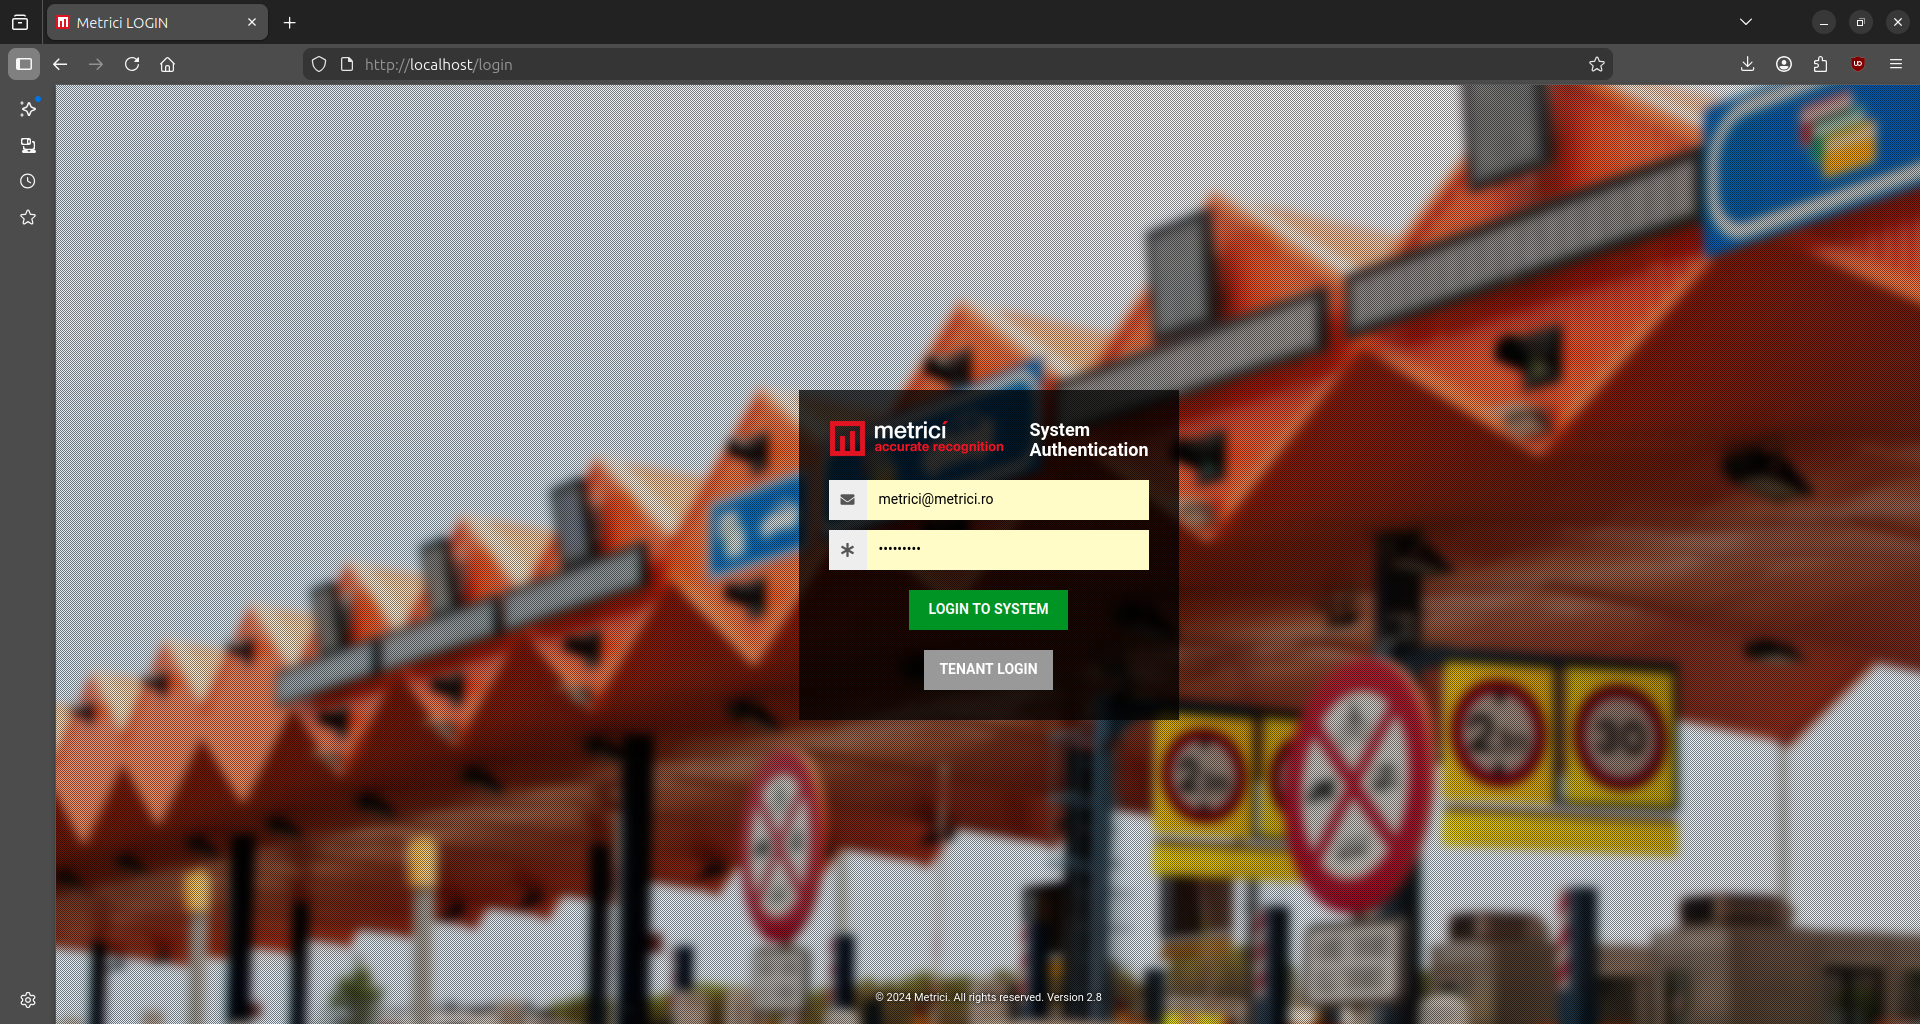
Access the Metrici Web Interface by opening a browser and navigating to the server's IP address. On first access, use the default credentials — see Fig.1 Login:
| Field | Value |
|---|---|
| User | metrici@metrici.ro |
| Password | metriciadmin |
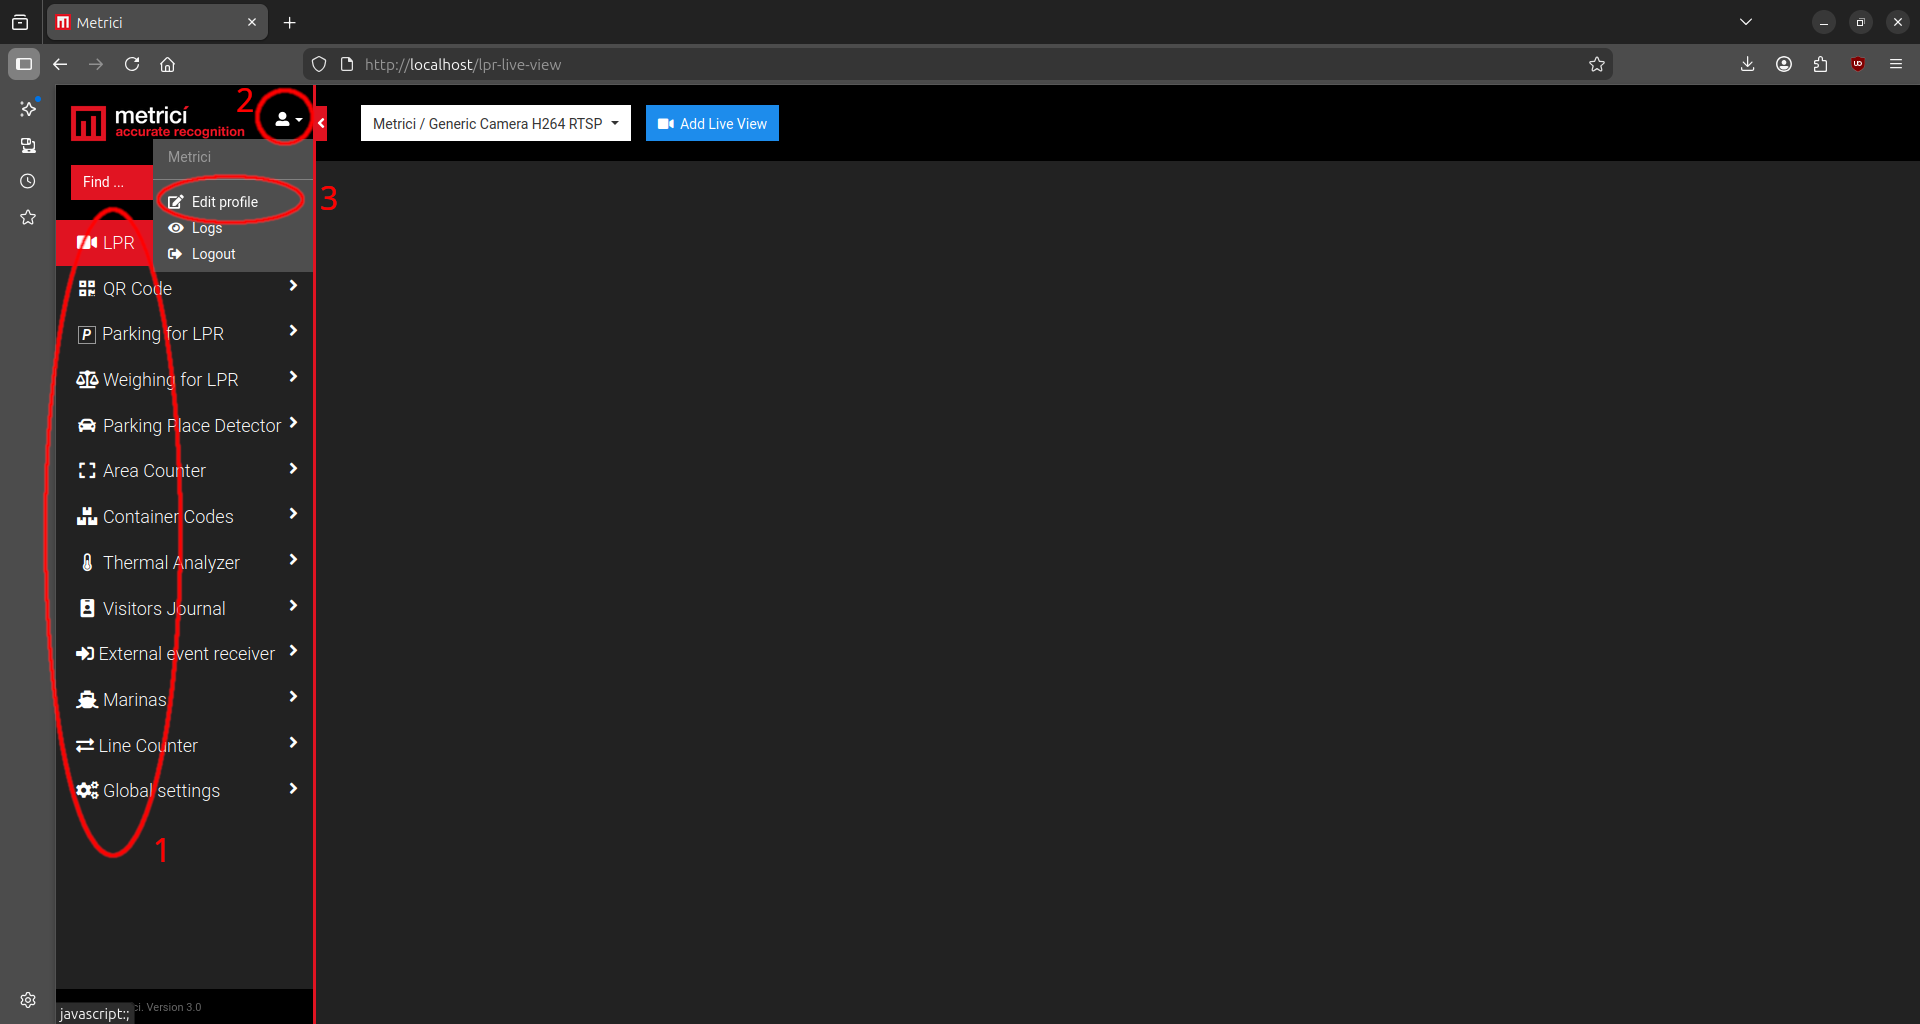
After login, the left sidebar displays all licensed Metrici modules. You will only have access to the modules you have purchased licenses for; others will appear locked — see Fig.2 Profile (1). The sidebar typically shows:
- Module menus (LPR, CCR, Area Counter, Line Counter, PPD, Thermal Analyzer, etc.)
- Global Settings — always at the bottom of the sidebar
To edit your profile or change your password at any time, click the user icon in the upper-left corner and select Edit Profile — see Fig.2 Profile (2 and 3).
3. Global Settings
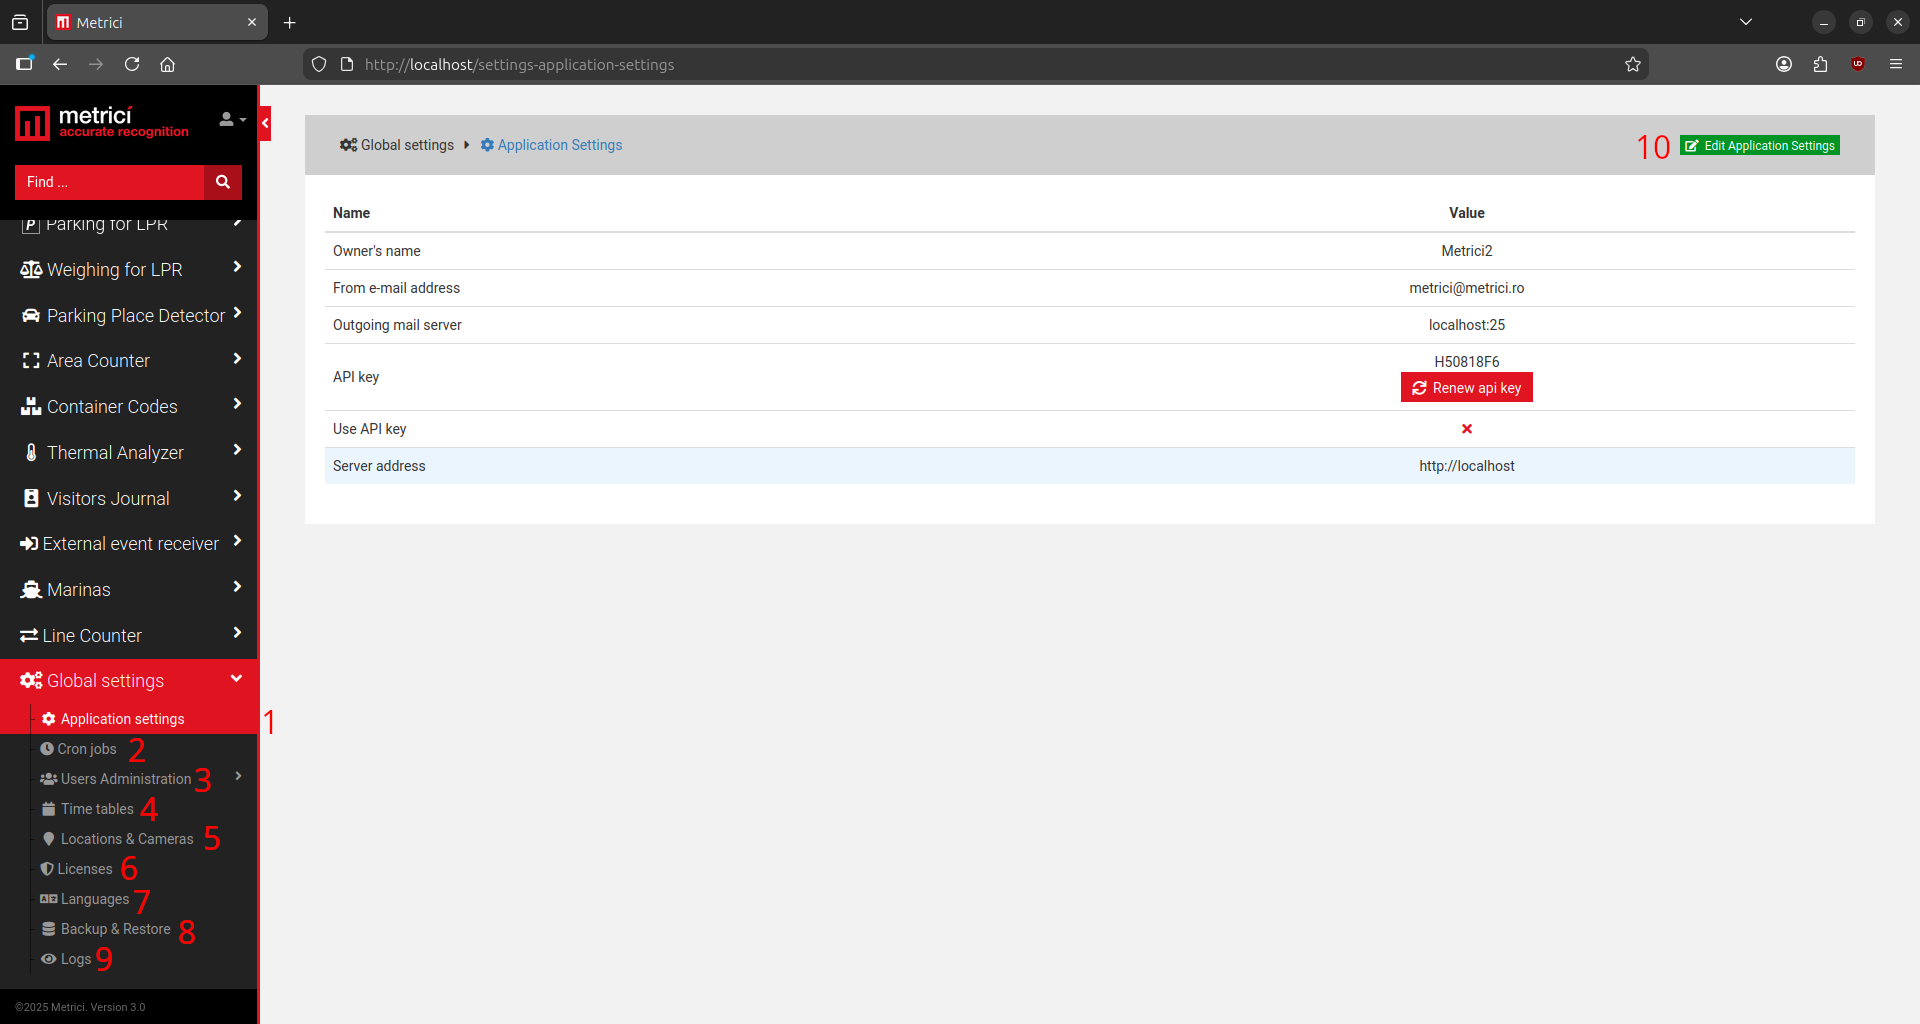
Global Settings contains configuration options shared across every Metrici software module. These must be set up first. Access them via Global Settings in the left sidebar — see Fig.3 Global Settings.
Application Settings
To access the settings menu click on the green rectangle — see Fig.3 Global Settings (10). A new menu will appear — see Fig.4 Application settings.
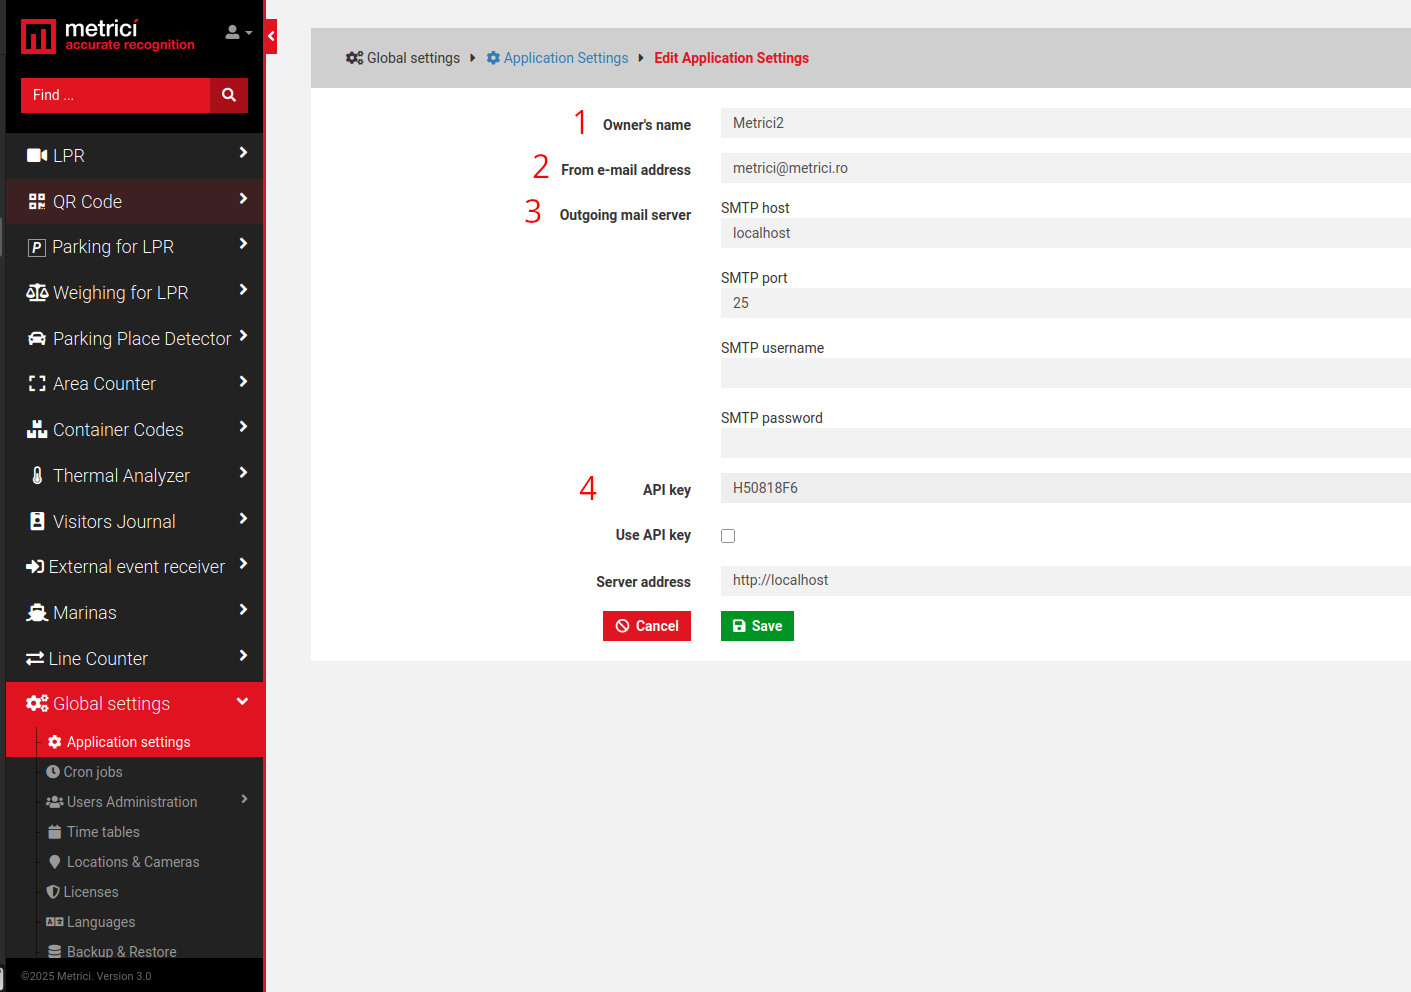
Owner's name is the name of the company or individual who owns the Metrici system and holds administration rights — see Fig.4 Application Settings (1).
From e-mail address is the address used as the sender when the system sends notification or alarm emails. This must be a valid e-mail address — see Fig.4 Application Settings (2).
Outgoing mail server defines the mail server used for sending emails. The default value is localhost with the SMTP port set to 25. Metrici can send emails natively from localhost, however some receiving servers require authentication and will reject unauthenticated messages. In that case, configure the system to send emails through an external SMTP server by filling in the following fields: SMTP host, SMTP port, SMTP username, and SMTP password, using the credentials provided by your mail server administrator — see Fig.4 Application Settings (3).
API Key is an auto-generated authentication key. This key is required when integrating Metrici with third-party applications or external services — see Fig.4 Application Settings (4).
Users Administration
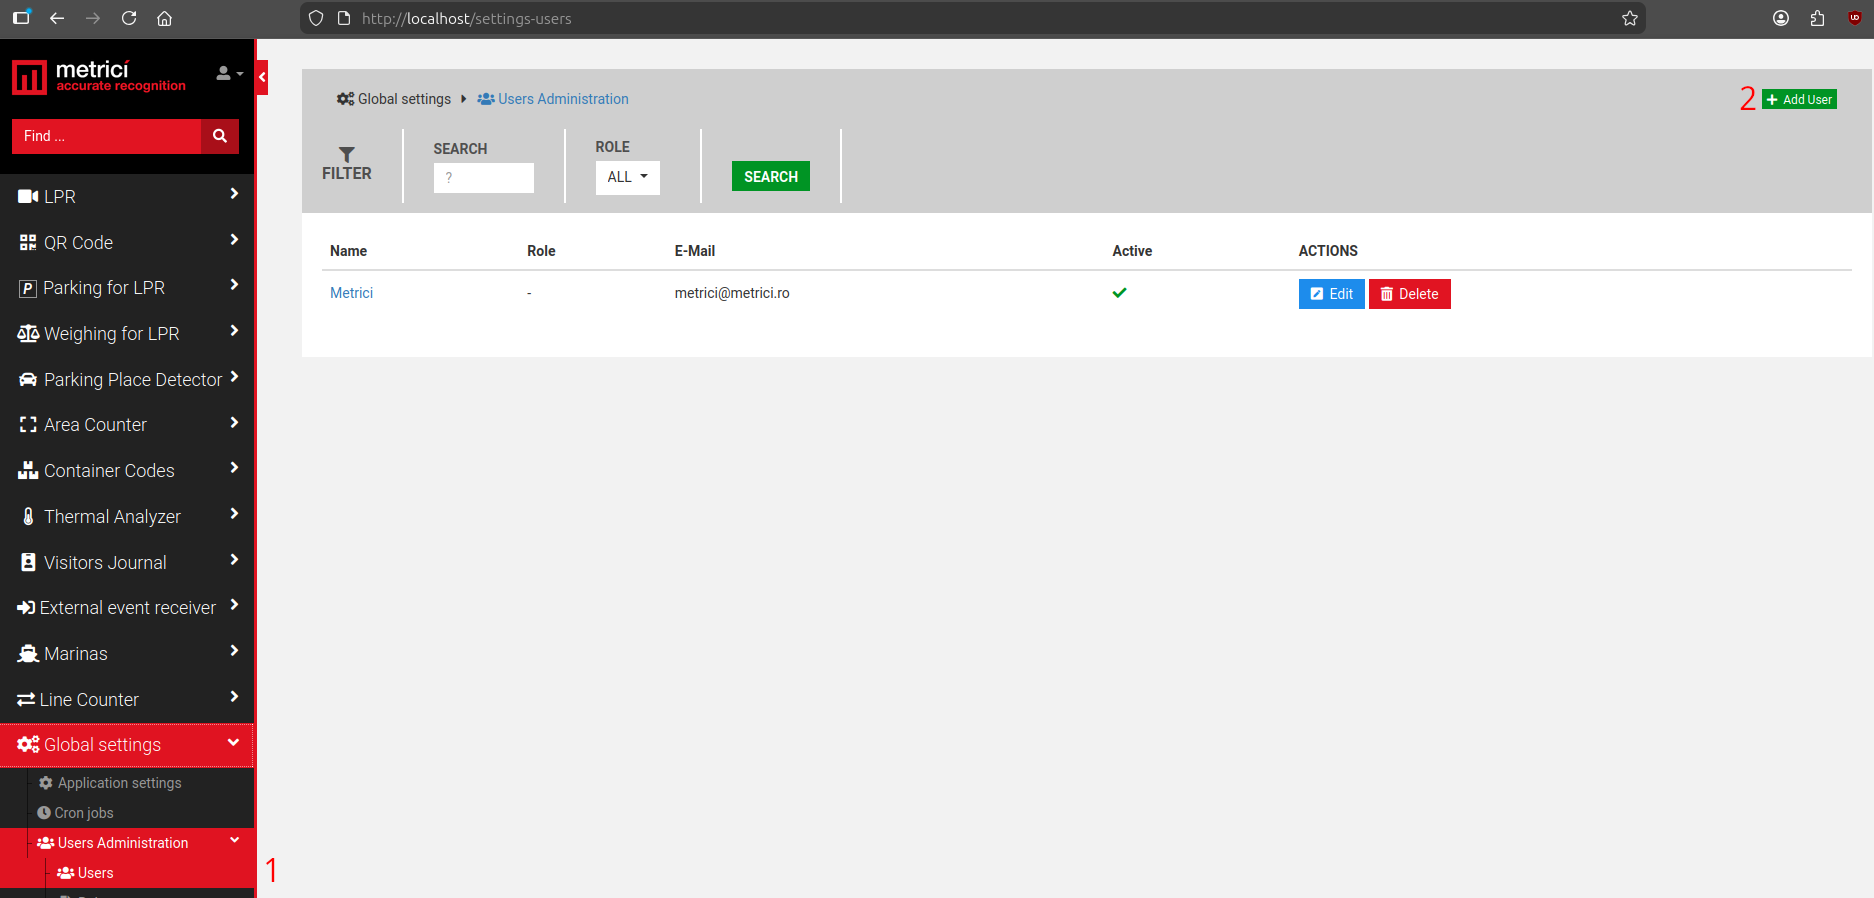
Metrici supports multi-user access with role-based permissions. Administrators can create, edit, and remove user accounts. To access the menu click on Users — see Fig.5 Add Users (1) and then on the green button Add User — see Fig.5 Add User (2).
When adding a new user:
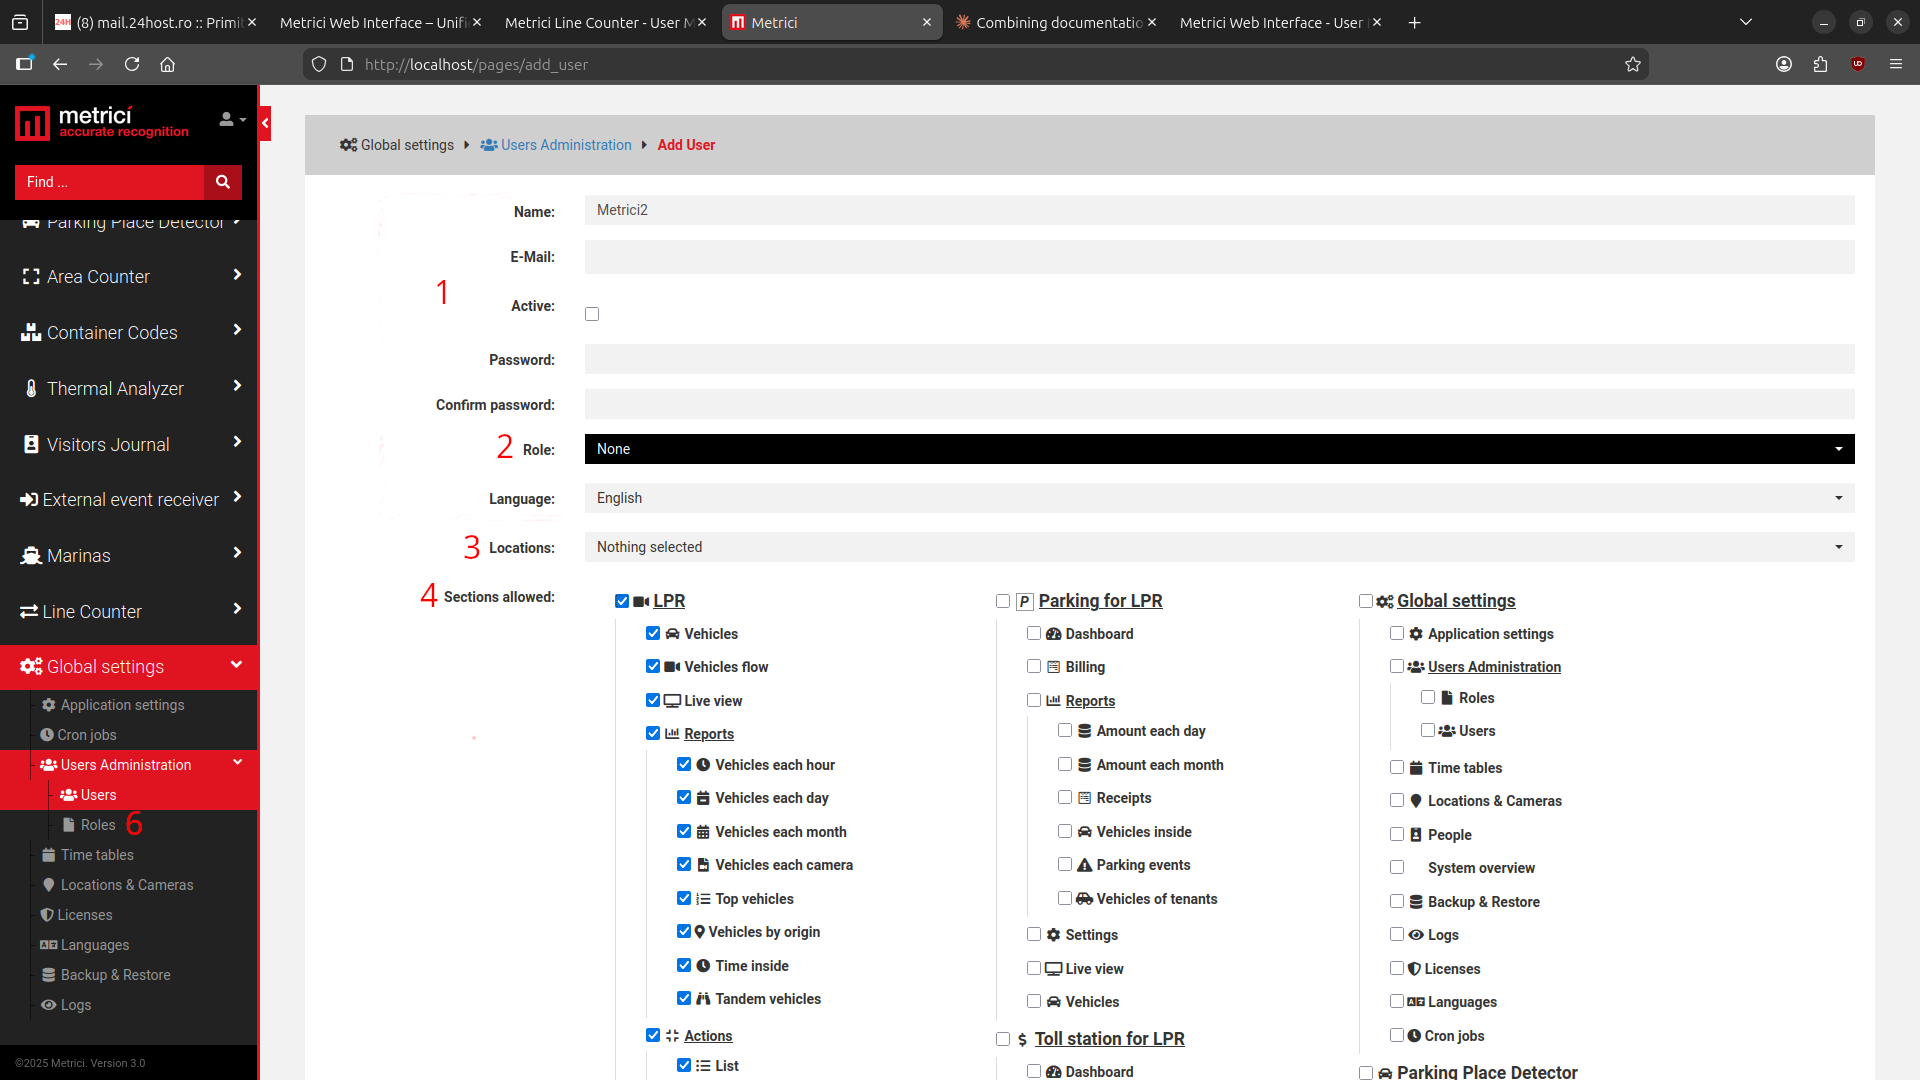
- Choose a name, assign an email address, select the language for the interface, and set a password — see Fig.6 Users Menu (1).
- Assign administration or viewing rights for each module section — see Fig.6 Users Menu (2). The Roles can be set by clicking on "Roles" menu — see Fig.6 Users Menu (6).
- Set the default landing page — which menu or sub-menu appears when the user logs in.
- Define which locations, cameras, and menus the user can access. First of all these have to be created — see Fig.6 Users Menu (4).
- Click Save after you're done.
An administrator of the system can also change the password for a different user in the same way — see Fig.2 Profile (3).
Time Tables
Time Tables allow you to apply rules, actions, or alarm settings on a specific hourly, daily, or weekly schedule. This feature provides flexibility by enabling actions to be triggered only when defined time conditions are met. For example, a user can configure the system to send an alert email only during specific hours or on certain days of the week. Time Tables are commonly used in the Parking LPR and Toll Station modules. Note that this feature is not available across all Metrici modules.
Location & Cameras
This is the most critical section of Global Settings. Every module requires at least one location with at least one camera assigned to it.
Creating a Location
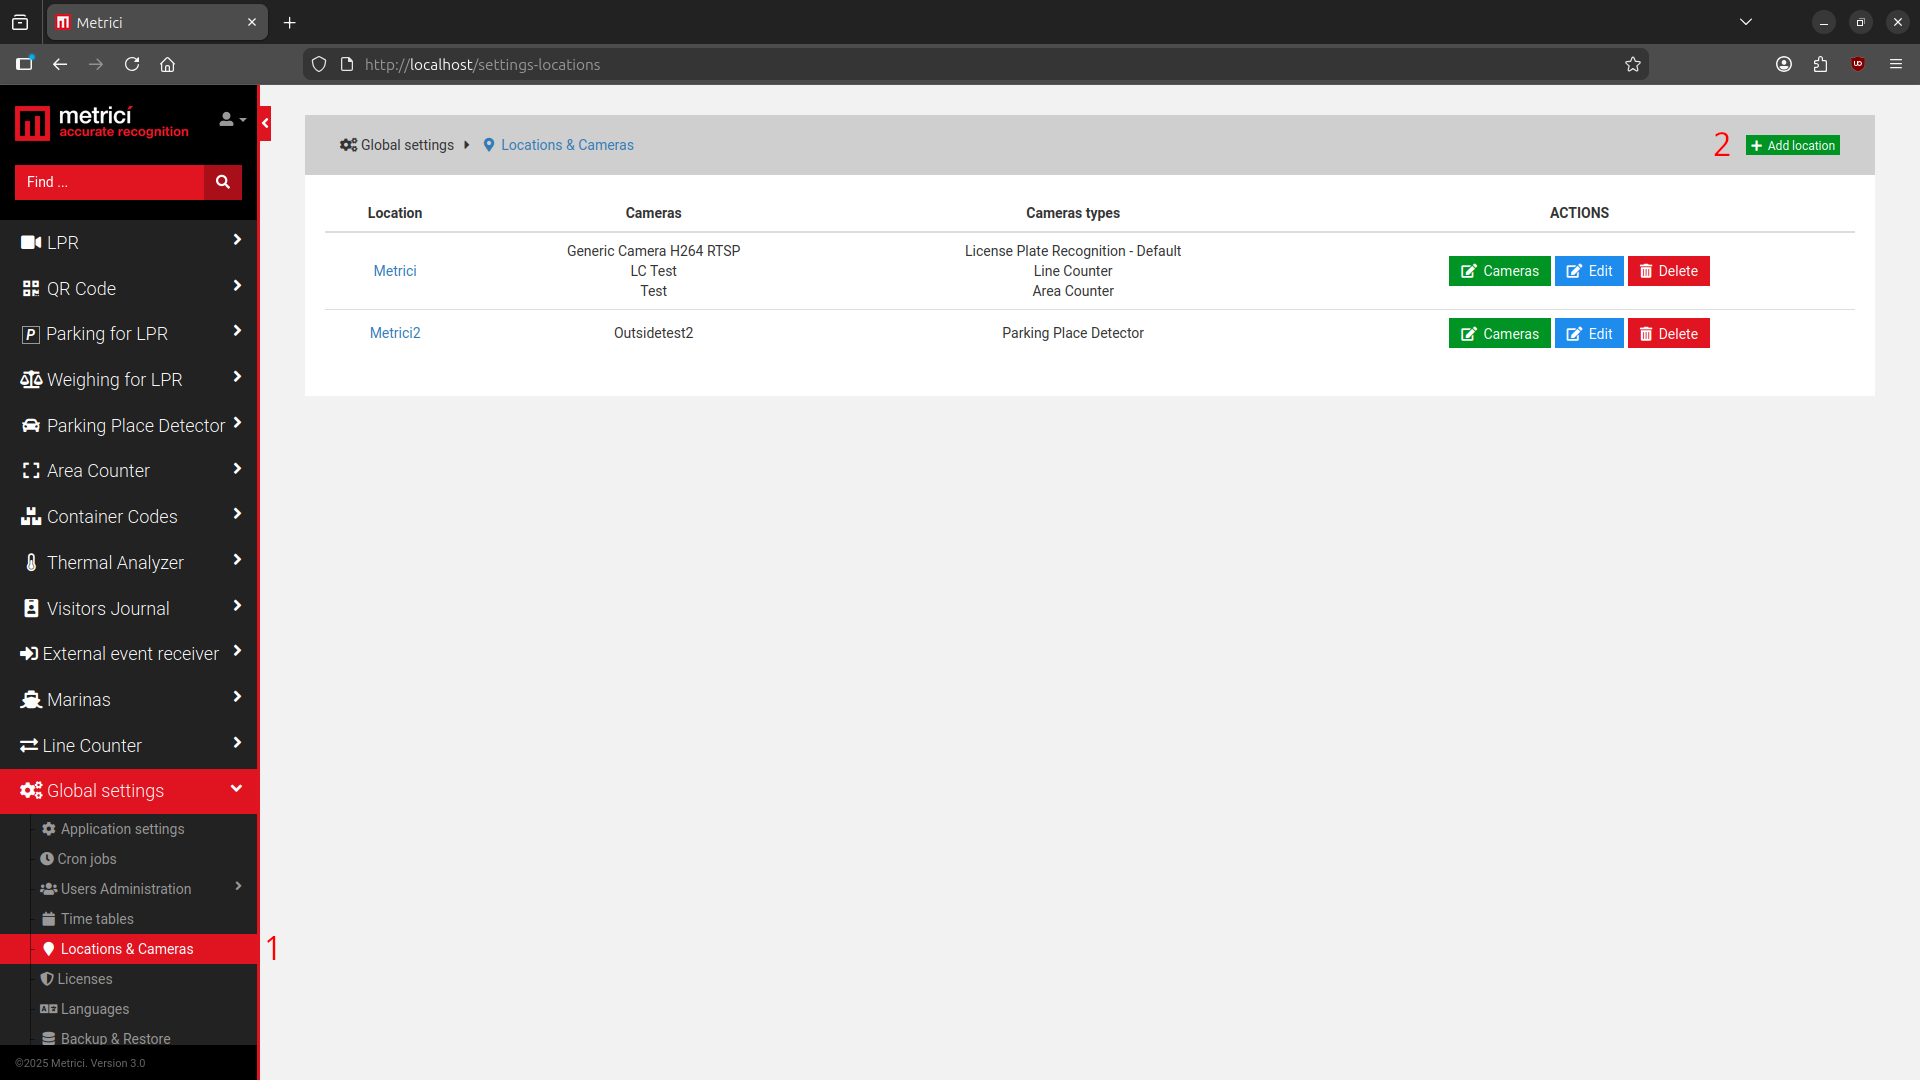
Navigate to Global Settings → Locations & Cameras. Click the green Add Location button (upper right). Enter a name and click Save — see Fig.7 Locations and Cameras (1,2).
Adding Cameras to a Location
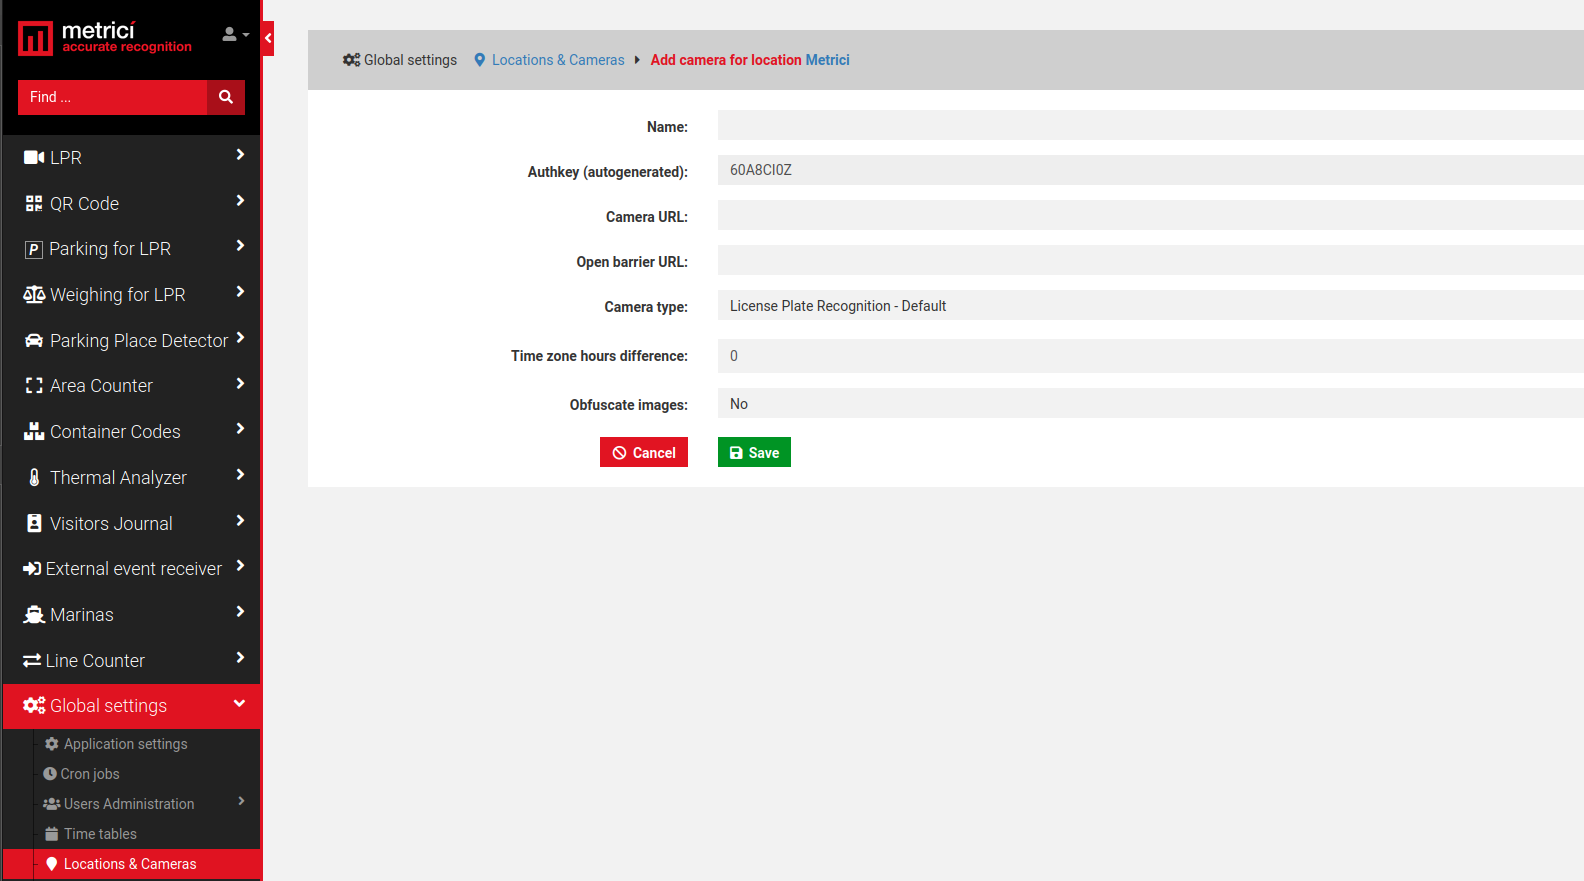
Click on a location name, then click Add Camera. Each camera has the following fields:
| Field | Description |
|---|---|
| Name | A descriptive name to easily identify and locate this camera. |
| Authkey | Auto-generated by Metrici when a camera is added. Required in the Control Panel to link the engine with the Web Interface. |
| Camera URL | The IP address of the camera from which the video stream is received. |
| Open barrier URL | IP address of the barrier connected to this camera. One camera can command one barrier. Used to open the barrier from Live View. |
| Camera Type | Select the Metrici application for this camera: LPR, CCR, Area Counter, Line Counter, PPD, QR Code, Thermal Analyzer, etc. |
| Time zone hour difference | Used when the server and camera are in different time zones. |
| Obfuscate images | GDPR compliance feature — blurs event photos. Once enabled, all future photos for that camera are blurred. Can be disabled, but already-blurred images remain as they are. |
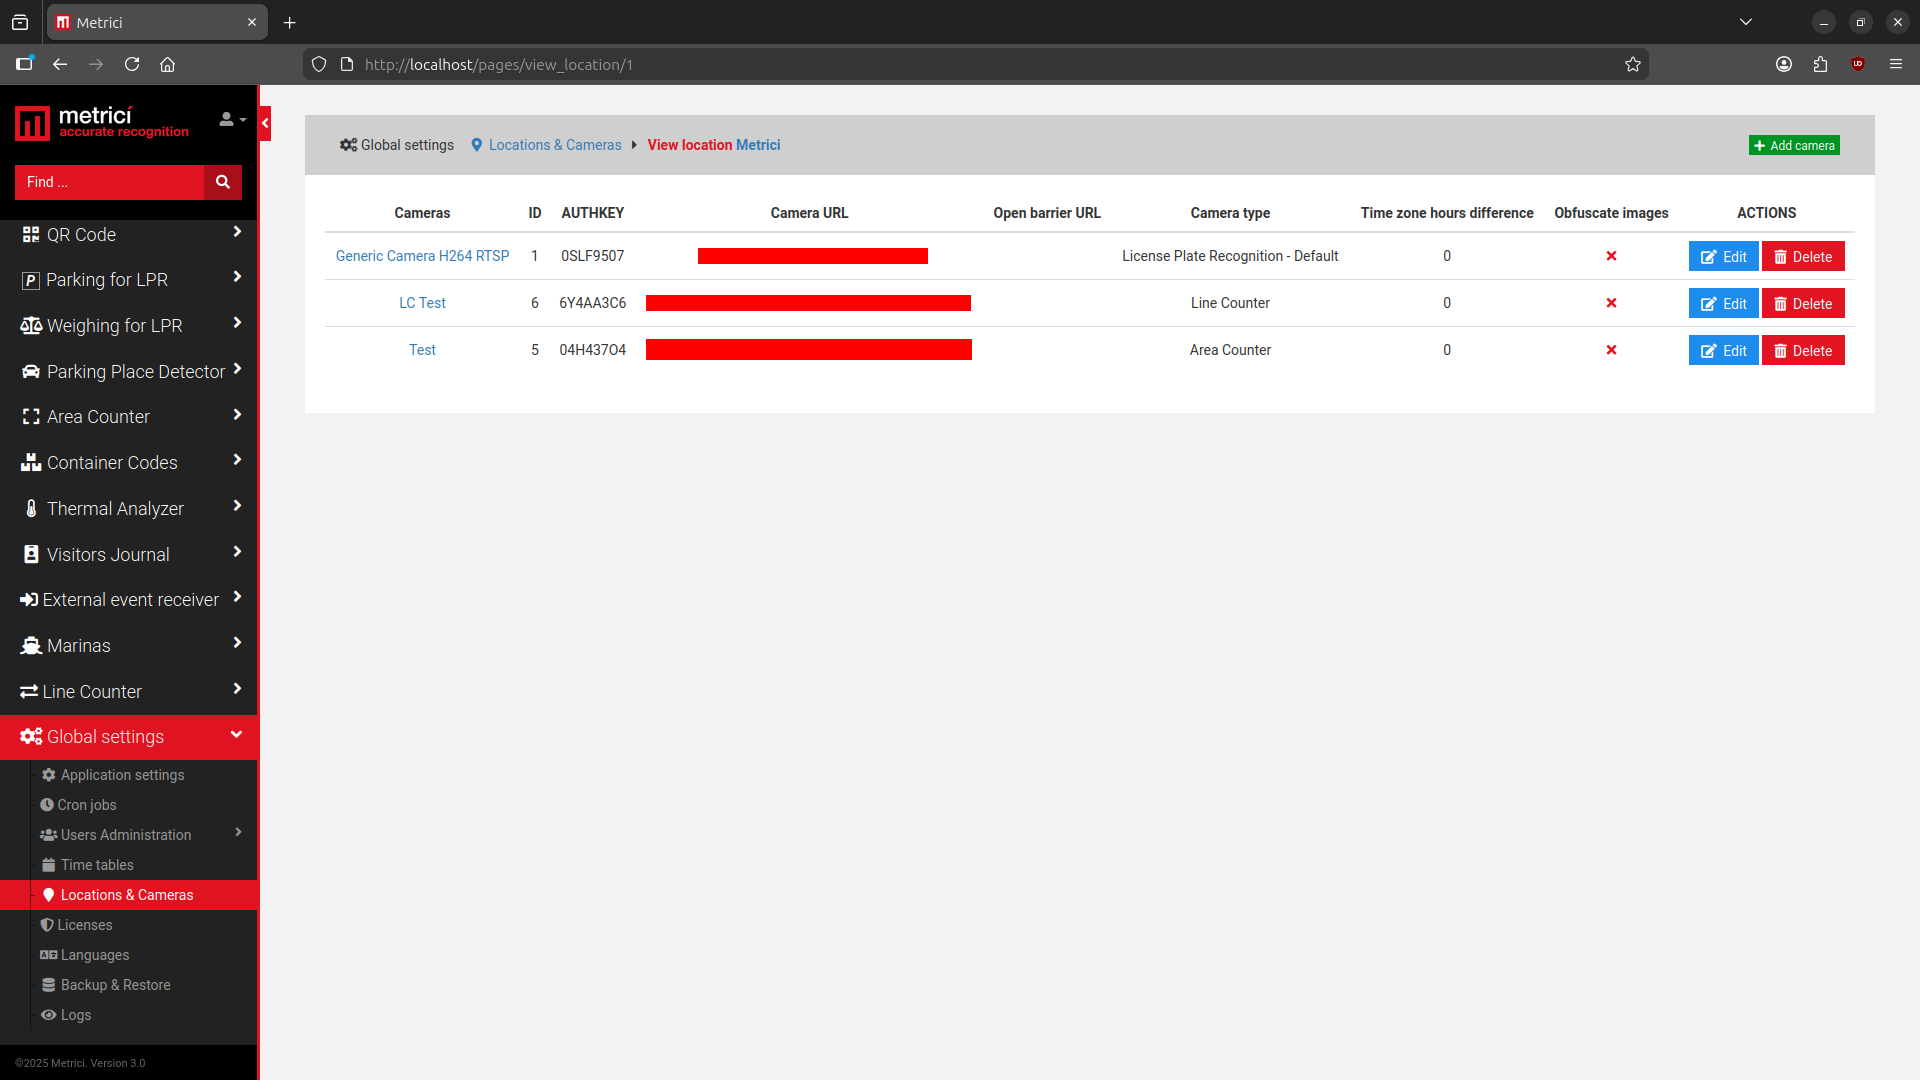
After adding all the cameras to the system you can see a list — Fig.9 Cameras. The ID and the authkey for each camera are mandatory to be added to the Metrici Control Panel where the detection engines are located, on the server which runs the Metrici software. This can be on the same machine or another one. When the ID and the authkey of the cameras are added to the Metrici engines, this will facilitate the communication between the engines and the Web Interface. If this step is omitted, no data will be recorded in database and the system will not work. In fact it will detect the cars/ people/ objects etc., but no data will be sent to database and web interface.
Licenses
You can see here what type of licenses you have activated on your interface. The ones you don't have access to are crossed out. You can update your license anytime with new modules and engines — see Fig.3 Global Settings (6).
Languages
Change the menu language of the interface.
Backup & Restore
Two backup options are available:
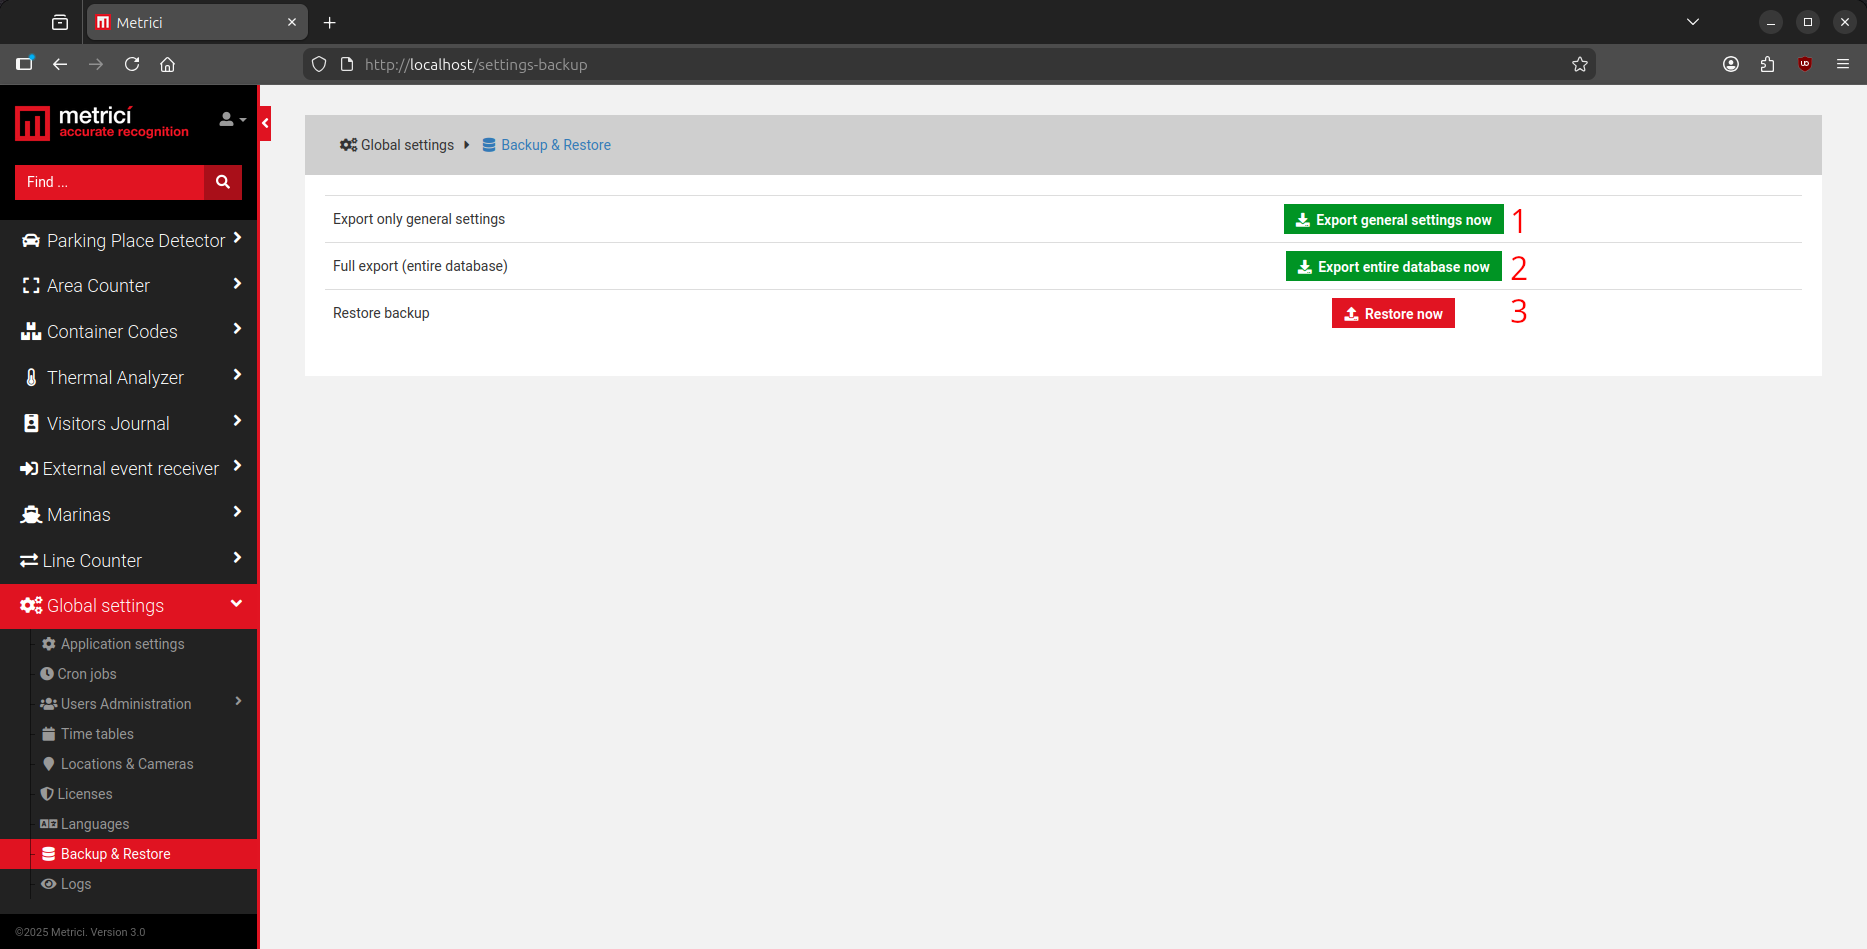
- Export general settings — Saves all interface configuration data (users, administration rights, location names, camera settings, etc.) but without event data — see Fig.10 Backup & Restore (1).
- Full export (entire database) — Saves an SQL file with all data including the events list, but without the photo captures from detections — see Fig.10 Backup & Restore (2).
To restore, click the Restore button, browse to the saved SQL file, and click Save — see Fig.10 Backup & Restore (3).
Logs
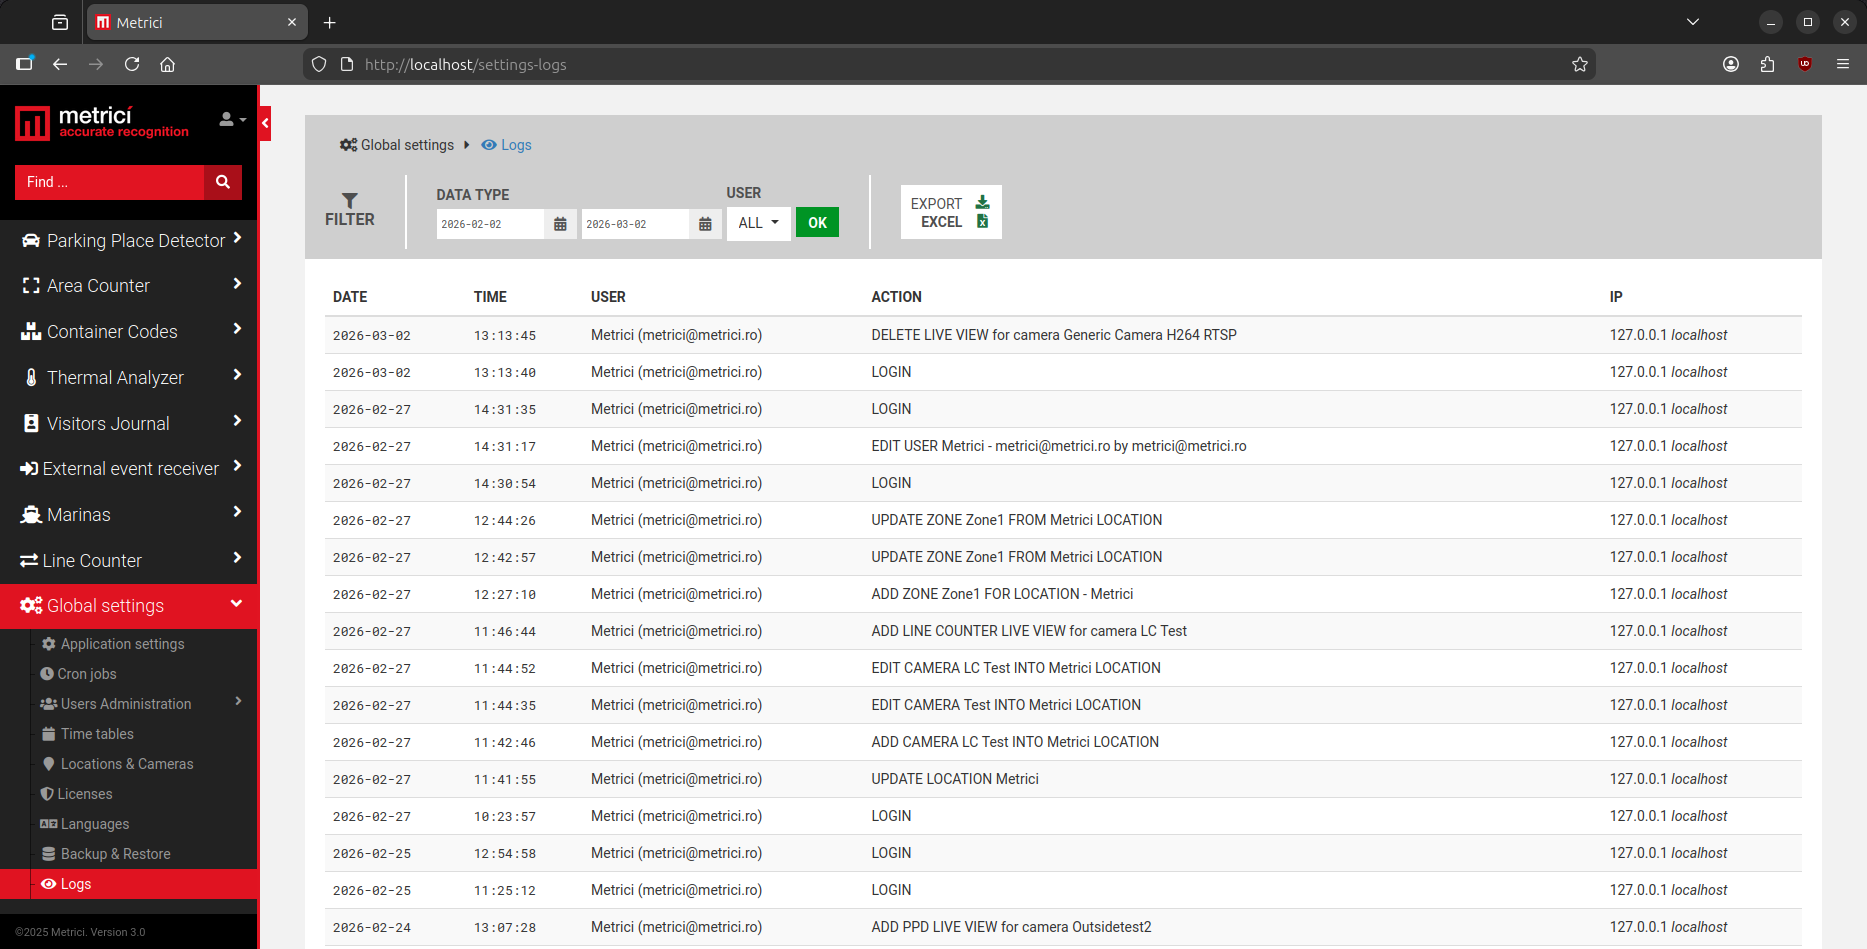
Users with administration rights can view all login records and changes made within the system. You can search logs by date, user, or time interval. Results can be exported in Excel format — see Fig.11 Logs.
Cron Jobs
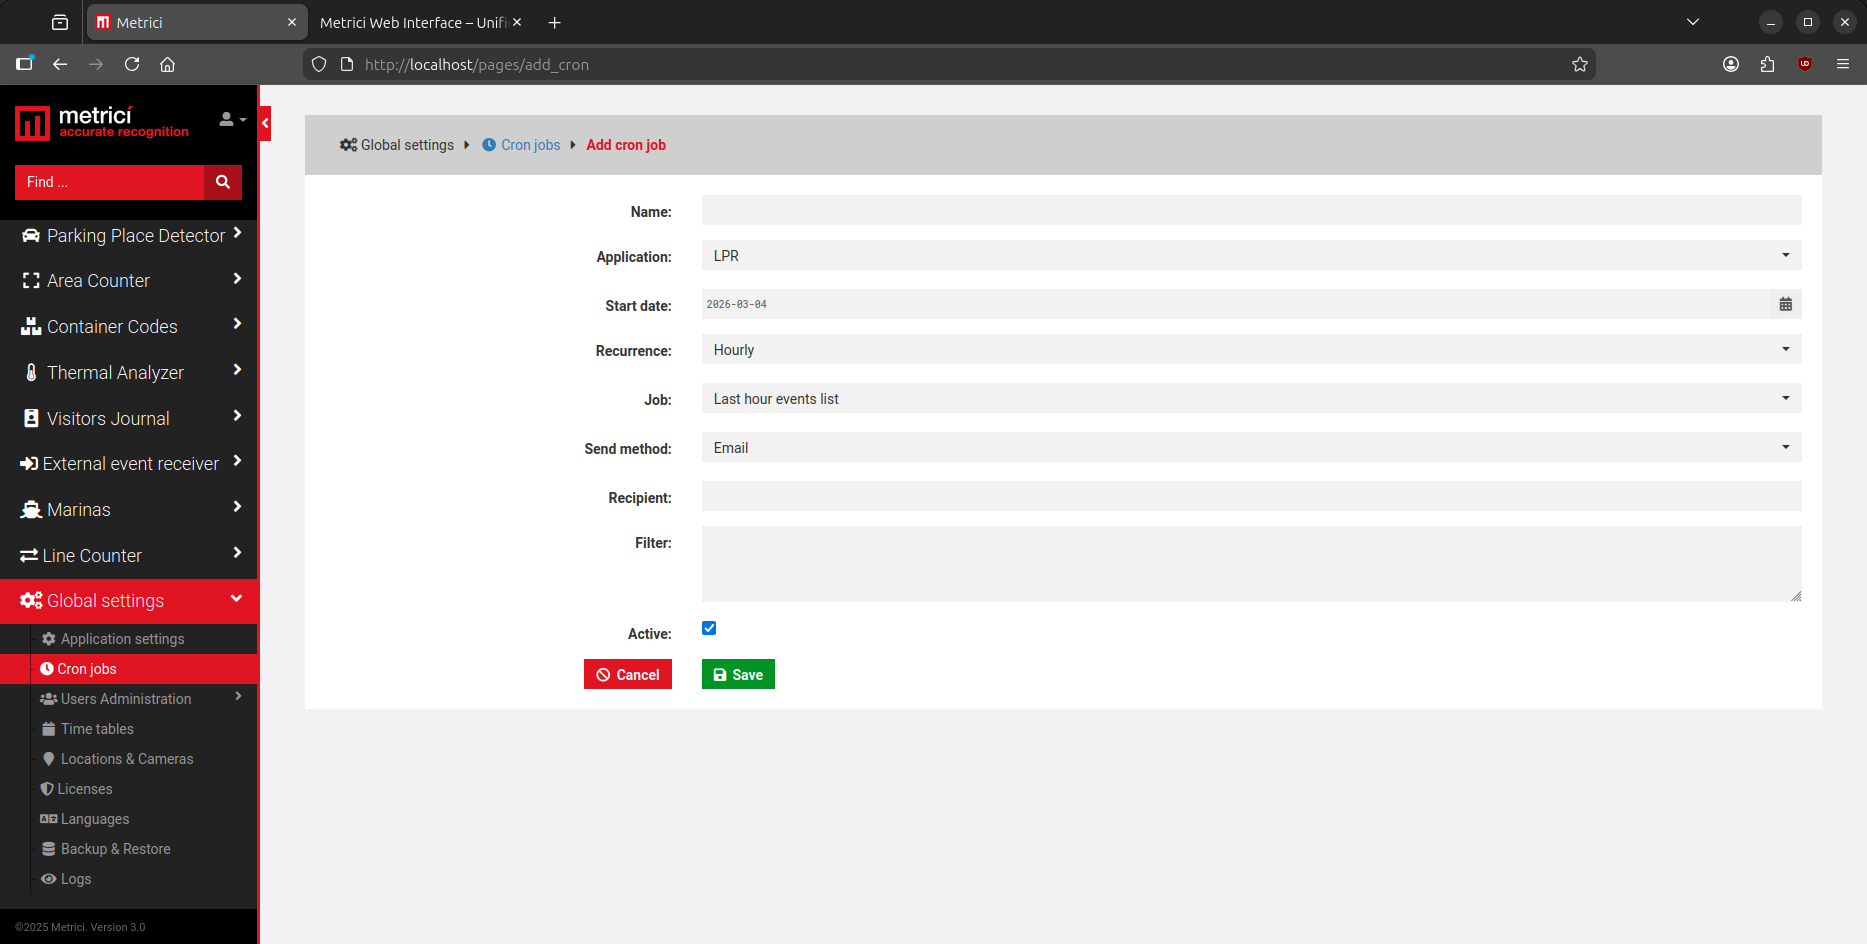
A user can set to receive reports by mail at an established time interval. You can select here what type of report to receive, where to send it, on what time interval: hourly, daily, weekly, monthly or once a year — see Fig.12 Cron Jobs.
4. Two-Factor Authentication
Two-factor authentication (2FA) adds a second lock to your Metrici account. Besides your password, you also enter a 6-digit code generated by an application installed on your phone. The code changes every 30 seconds and is never sent by e-mail or SMS, so a person who learns your password still cannot sign in without having your phone.
Two-factor authentication is configured per user, from your own profile. Enabling it for your account does not affect the other users of the installation.
Enabling Two-Factor Authentication
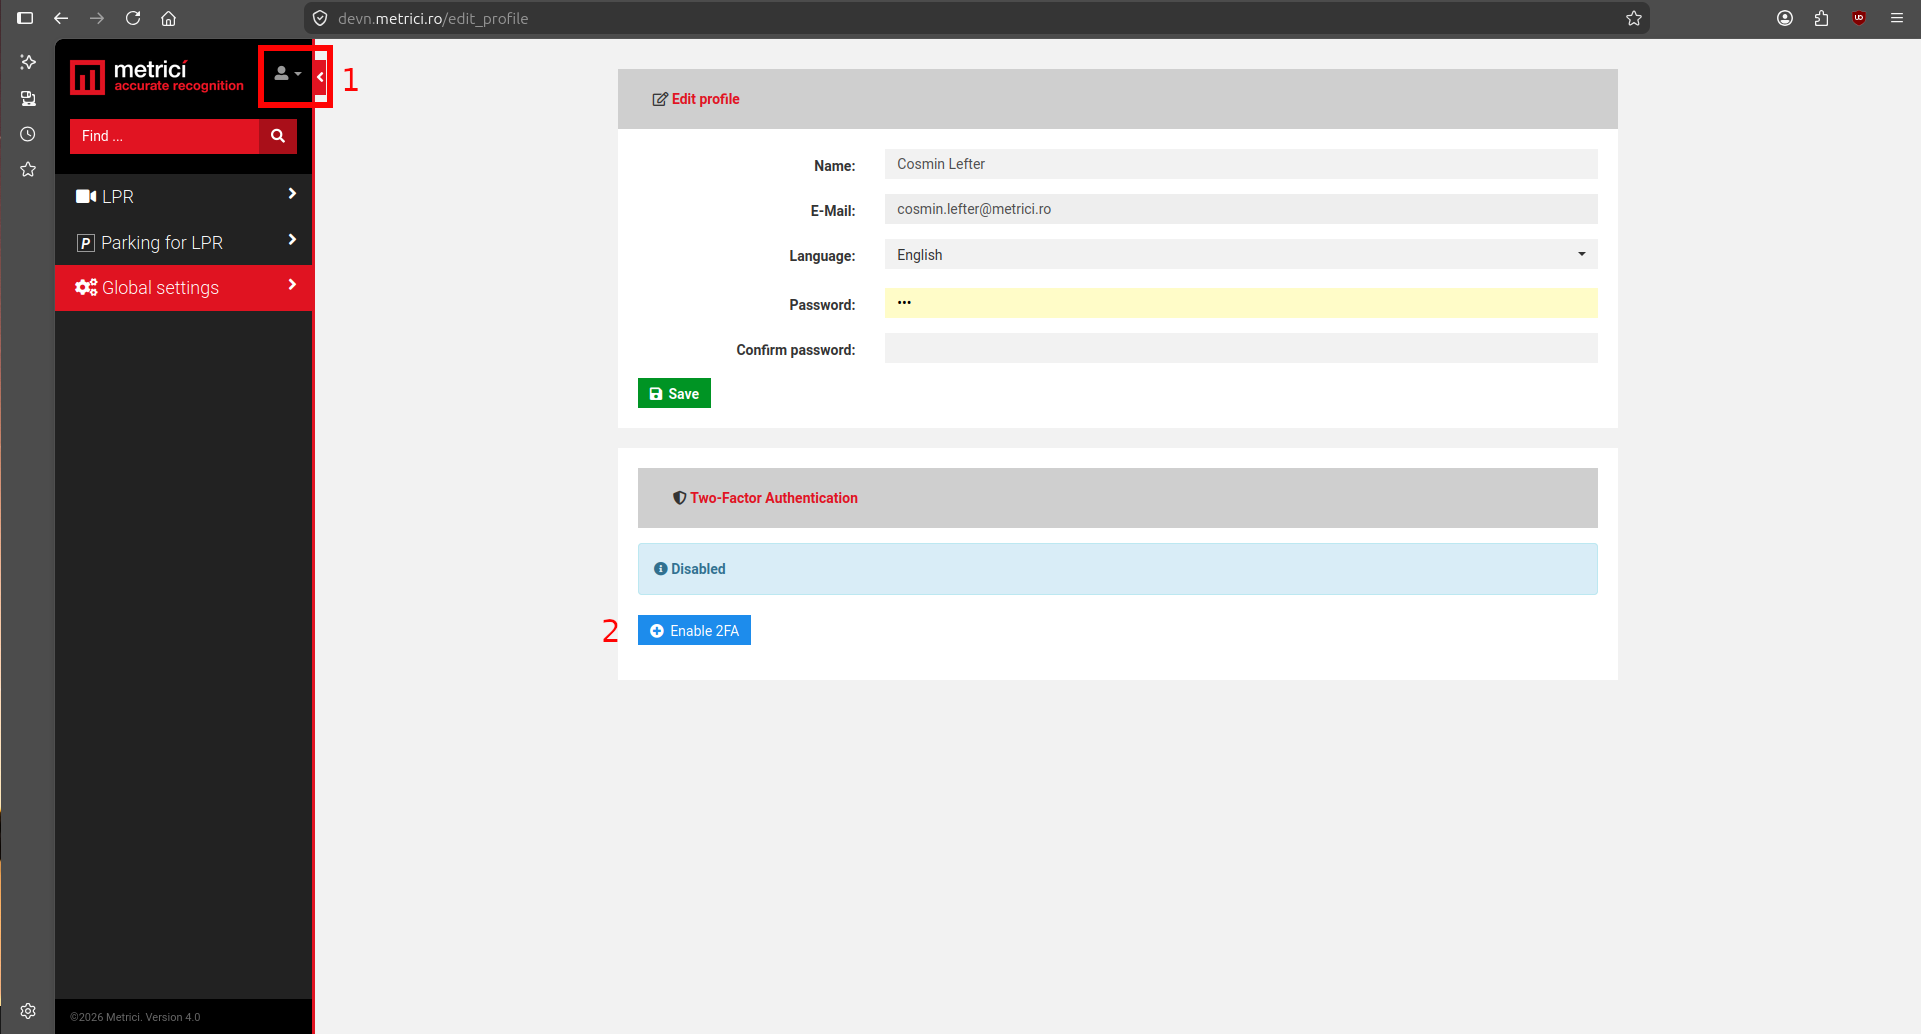
Click the user icon in the upper-left corner of the sidebar and select Edit Profile — see Fig.13 Enable 2FA (1). Scroll down to the Two-Factor Authentication panel. As long as it has never been activated, the status reads Disabled. Click the Enable 2FA button — see Fig.13 Enable 2FA (2).
Pairing the Authenticator Application
Before you continue, install an authenticator application on your phone. Any application that generates standard TOTP codes works with Metrici. The most used ones are:
| Application | Platform |
|---|---|
| Google Authenticator | Android, iOS |
| Microsoft Authenticator | Android, iOS |
| Ente Auth | Android, iOS, Windows, macOS, Linux |
| 2FAS Auth | Android, iOS, browser extension |
| FreeOTP | Android, iOS |
Authenticator applications occasionally change owner, lose features, or stop being updated, so it is worth spending a minute on the one you choose. Before installing, check that:
- The last update shown on Google Play or the App Store is recent. An application left without updates for a long time is a poor place to keep your codes.
- The publisher is the company that actually owns the application. App stores also contain copies with similar names and icons.
- The application explains how its backups are protected, and lets you export your codes if you later decide to move to a different application.
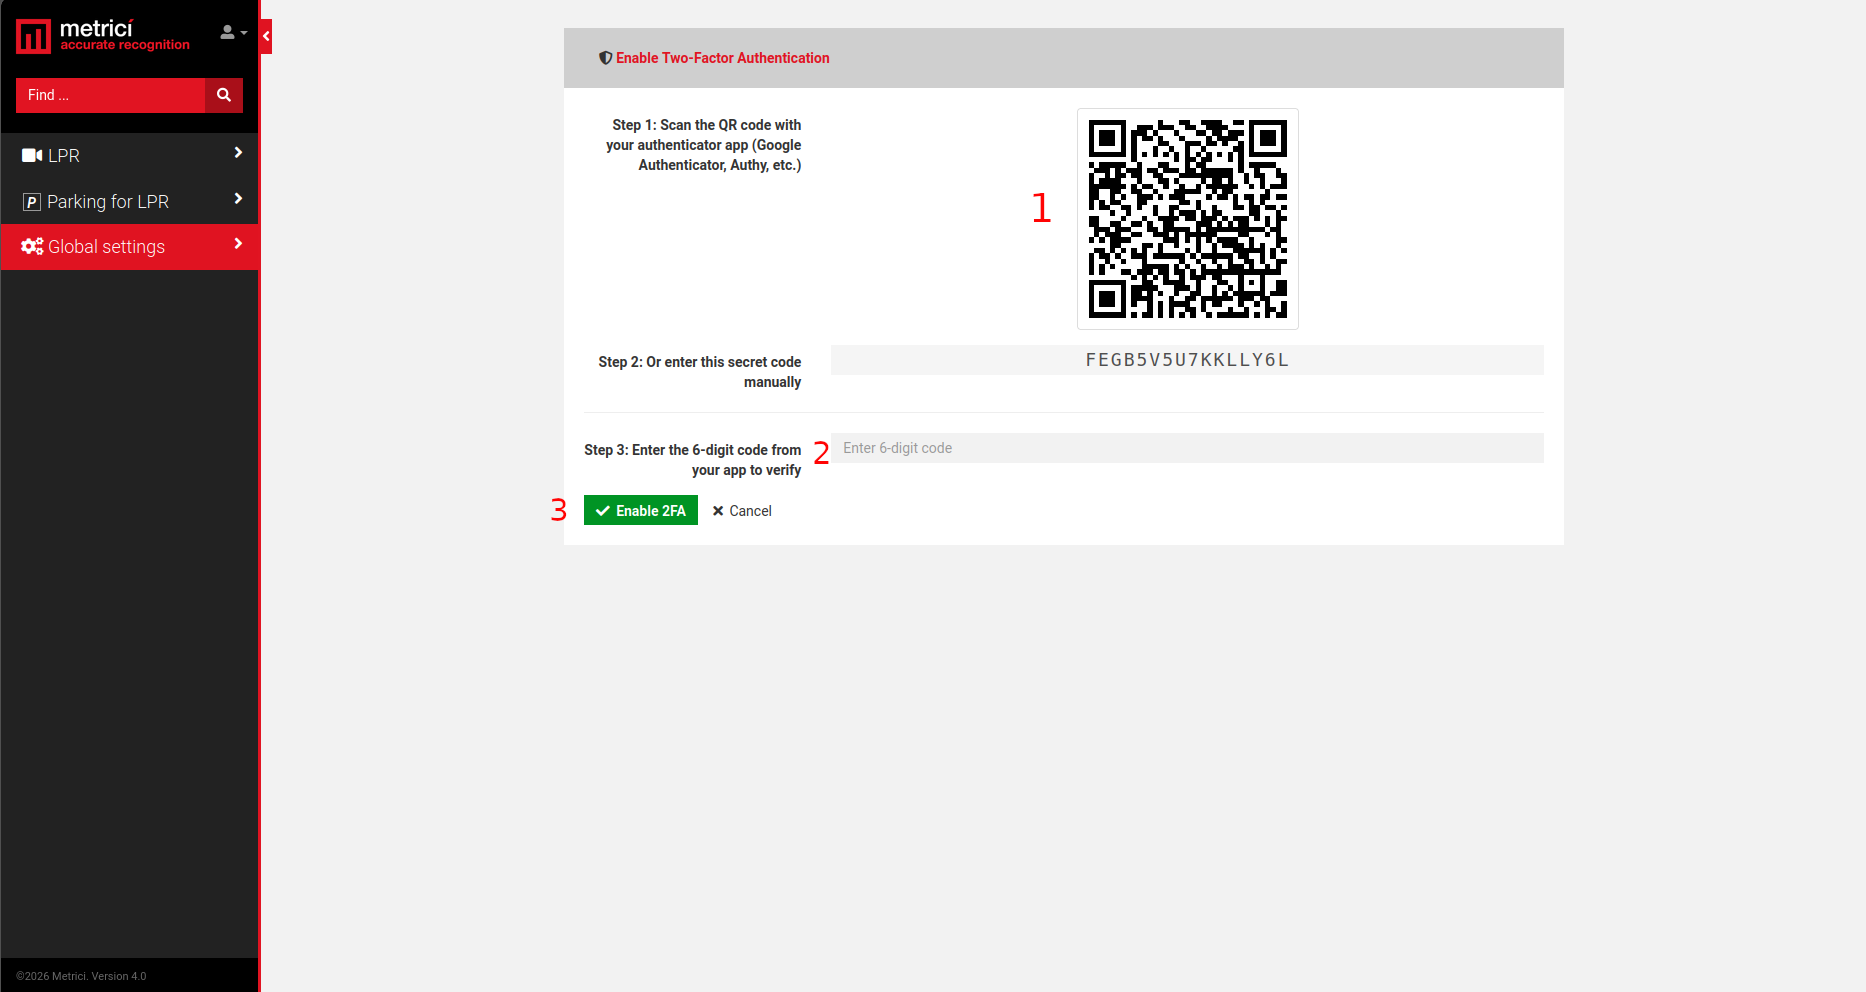
After clicking Enable 2FA, the pairing screen is displayed — see Fig.14 Two-Factor Authentication Setup. Follow these steps:
- Open the authenticator application on your phone, add a new account (usually a + button) and choose to scan a QR code. Point the camera at the QR code displayed on the screen — see Fig.14 Two-Factor Authentication Setup (1). The application adds a Metrici entry and immediately starts generating a 6-digit code for it.
- Type the 6-digit code shown by the application in the field at Step 3 — see Fig.14 Two-Factor Authentication Setup (2).
- Click Enable 2FA — see Fig.14 Two-Factor Authentication Setup (3).
Confirmation and Backup Secret Code
When the code is accepted, the interface returns to the Edit Profile page and confirms that two-factor authentication has been enabled successfully. The Two-Factor Authentication panel now reads Enabled and displays the Backup Secret Code — see Fig.15 Two-Factor Authentication Enabled.
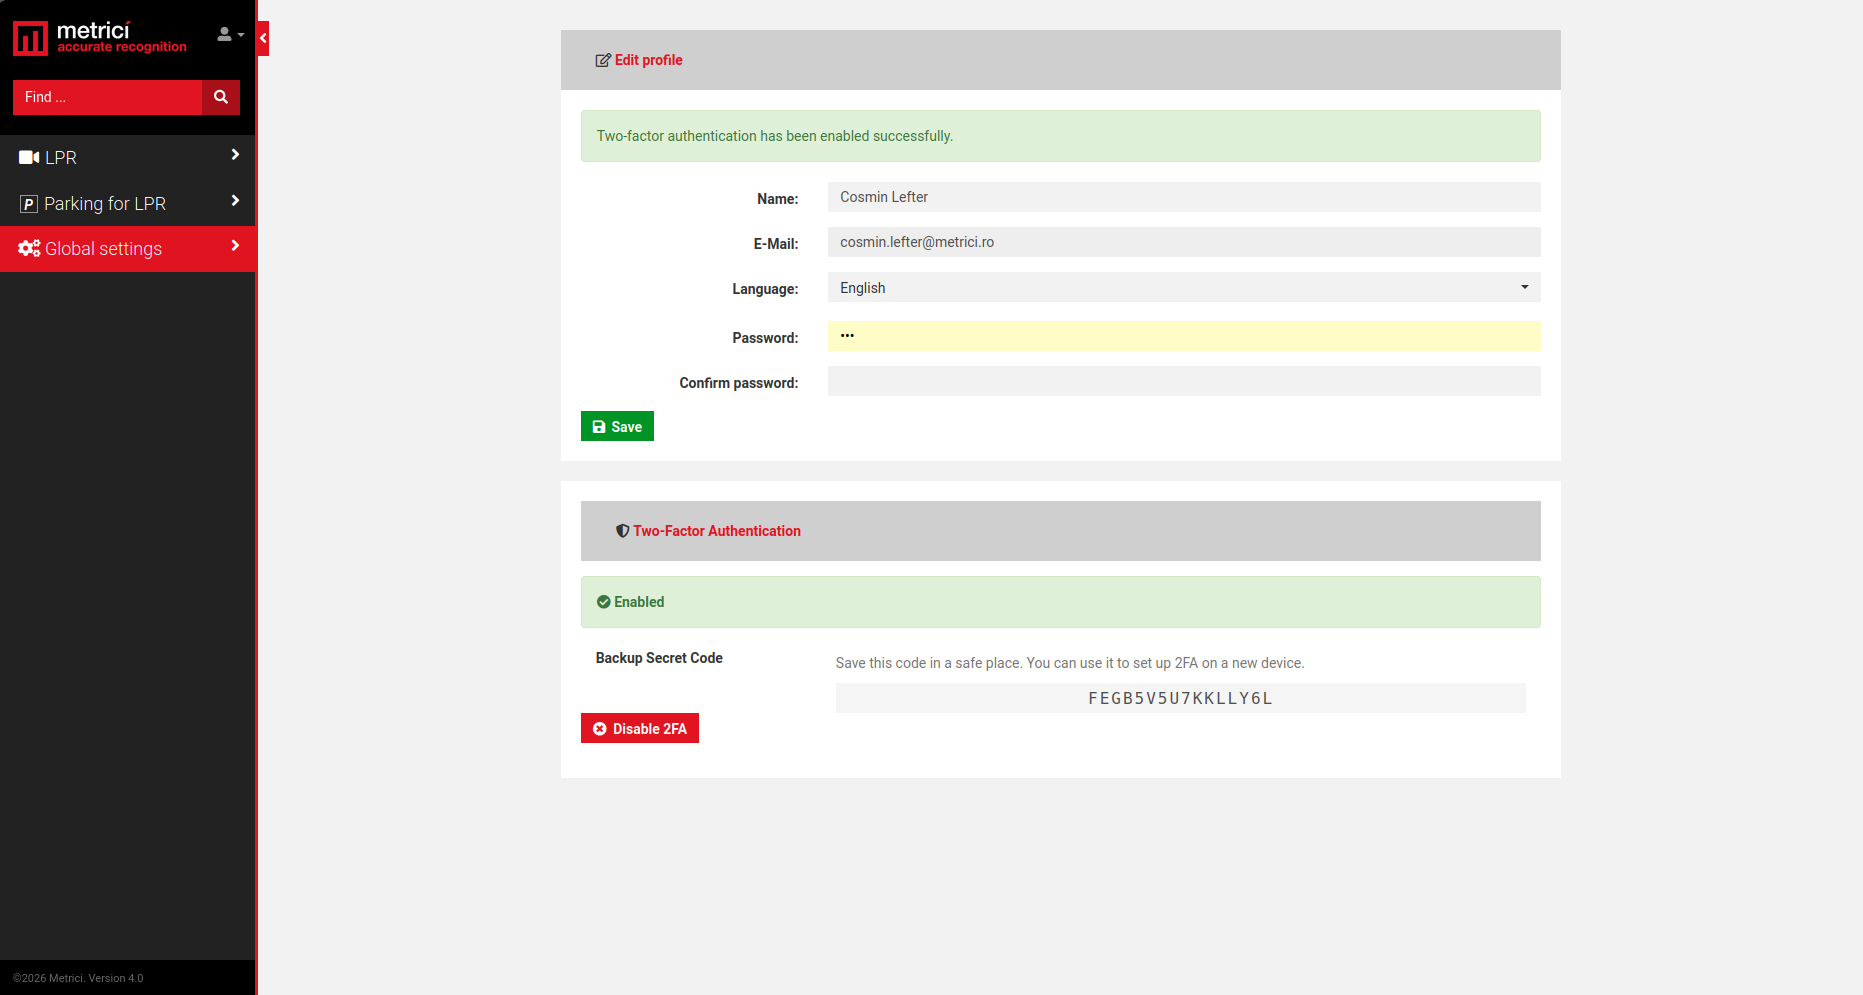
Save the backup secret code in a safe place, for example in a password manager or printed and locked away. With it you can set up two-factor authentication on a new phone without needing the old one. The same panel contains the Disable 2FA button, which turns two-factor authentication back off for your account.
Signing In with Two-Factor Authentication
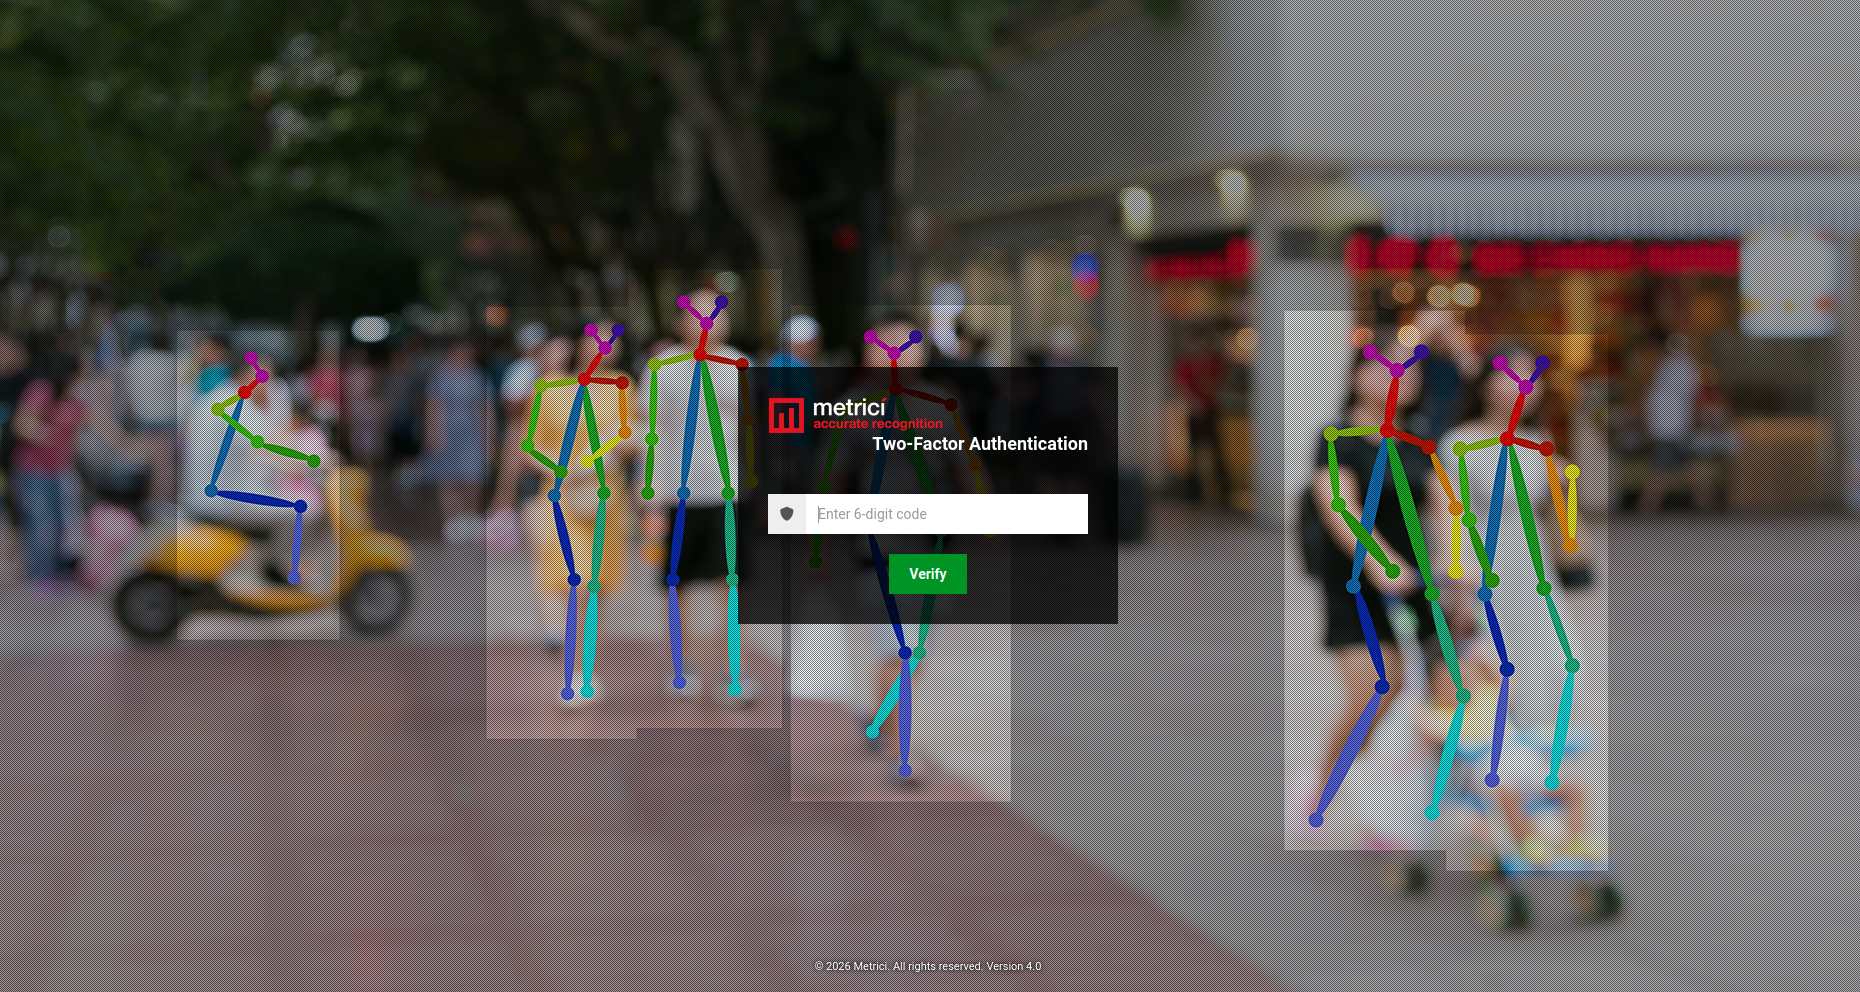
From the next login on, signing in takes one extra step. After the user name and password are accepted, the interface asks for the code generated on your phone — see Fig.16 Two-Factor Authentication at Login.
- Open the authenticator application on your phone.
- Read the 6-digit code displayed for the Metrici entry.
- Type it in the field and click Verify.
If the Code Is Not Accepted
| Situation | Solution |
|---|---|
| The code is rejected every time | The clock of the phone must be accurate, because the code is calculated from the current time. Turn on automatic date and time on the phone and try again. |
| The code expired while you were typing it | Wait for the application to display the next code and enter that one. |
| You changed your phone | Install the authenticator application on the new phone, add an account manually and enter the backup secret code saved from your profile page. |
| Both the phone and the backup secret code were lost | Ask an administrator to disable two-factor authentication on your account, then set it up again. |