LPR - License Plate Recognition
User Manual for End Users and System Administrators

The LPR module provides the most feature-rich interface, including dedicated sub-modules for parking, toll stations, and weighing stations.
Vehicles
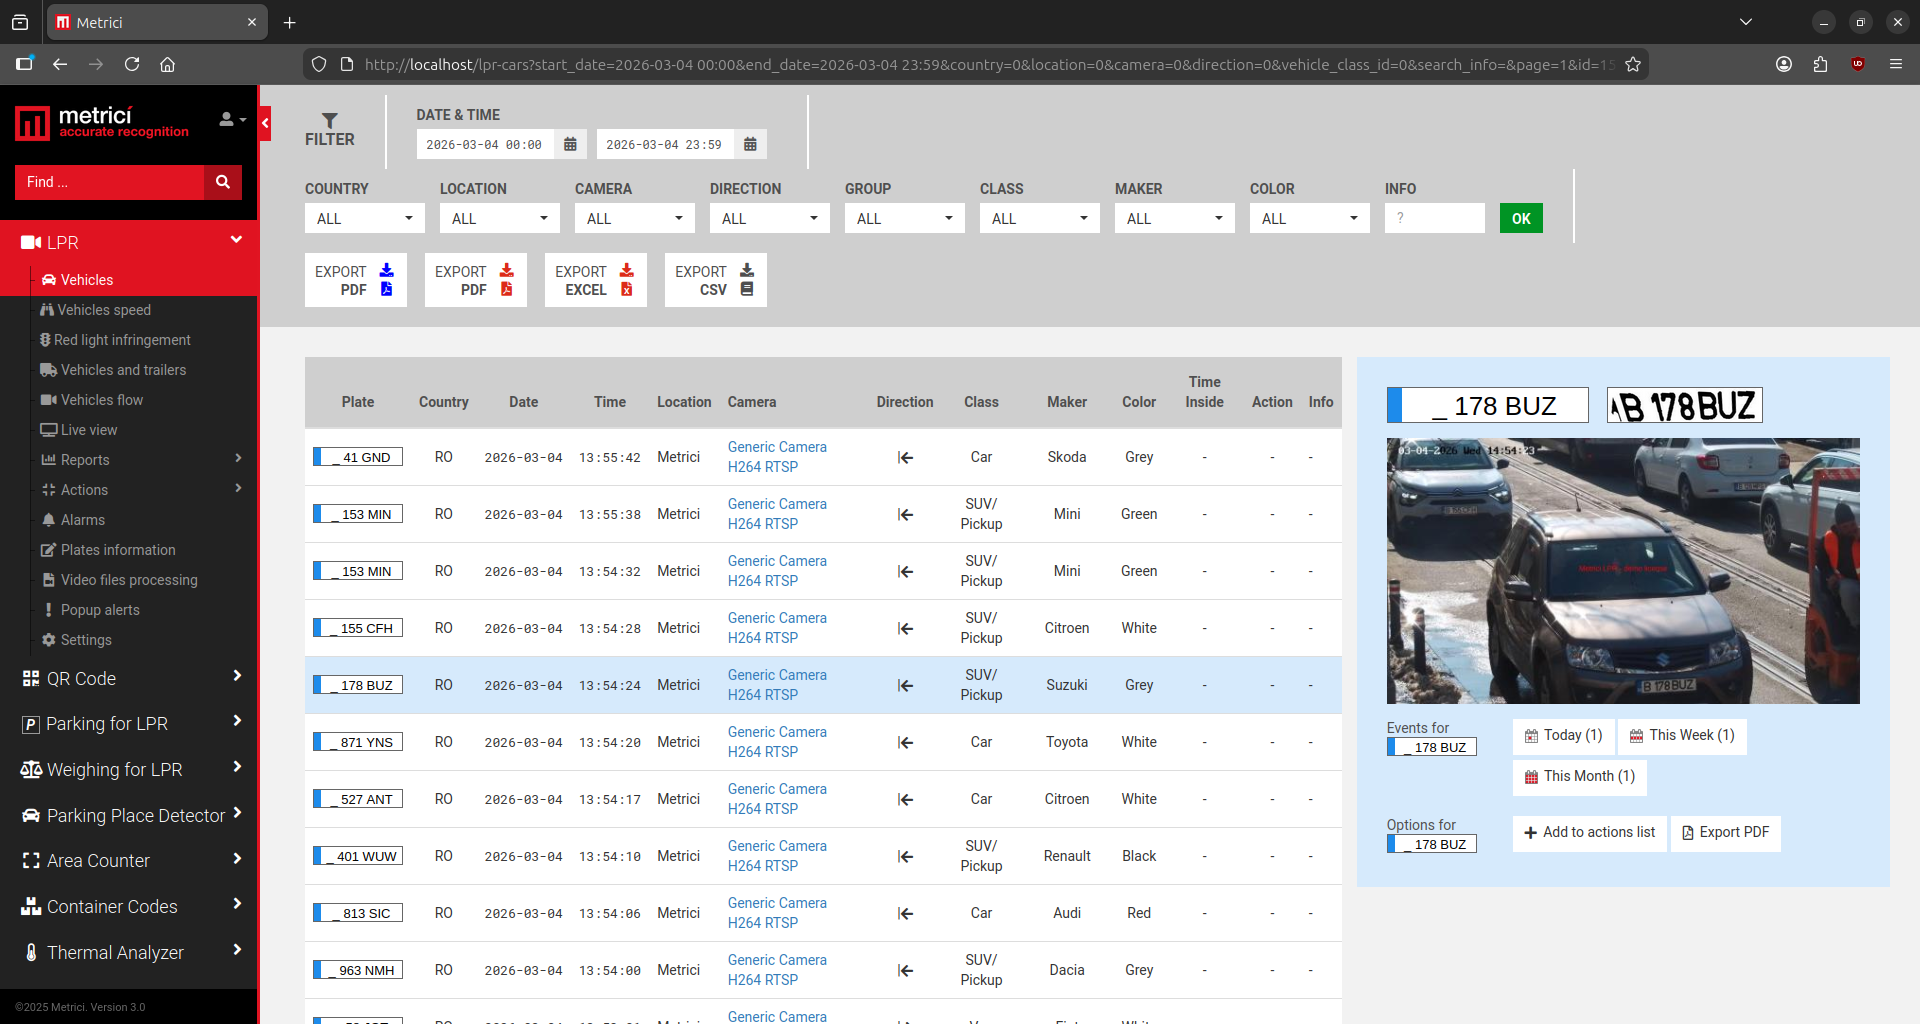
The events page — see Fig.13 LPR Vehicles displays a list of all detections, with a filter bar at the top that allows you to narrow your search. Available filter options include date and time, country, location, camera, direction, info (a custom field where additional notes can be stored for any license plate in the database), speed, and red light. You can also filter vehicles by the group they belong to.
Each entry in the events list includes the detected plate number, the country where the license plate is registered, the timestamp, the location where the plate was seen, the camera that captured it, the direction of movement (as configured in Metrici Control Panel), time spent inside the location (useful for parking applications, among others), whether an action is assigned to that particular plate, and any associated info.
On the right side of the screen, additional information is displayed for the selected license plate from the list. The photo from the moment of detection is shown alongside data about the number of events recorded for that plate on the current day, week, and month.
Two buttons are also available: one to add the plate directly to an action list (see the Actions chapter) and one to export that event in PDF format.
The Web application offers another 2 options to filter cars for speed and red light infringement.
Vehicles Flow
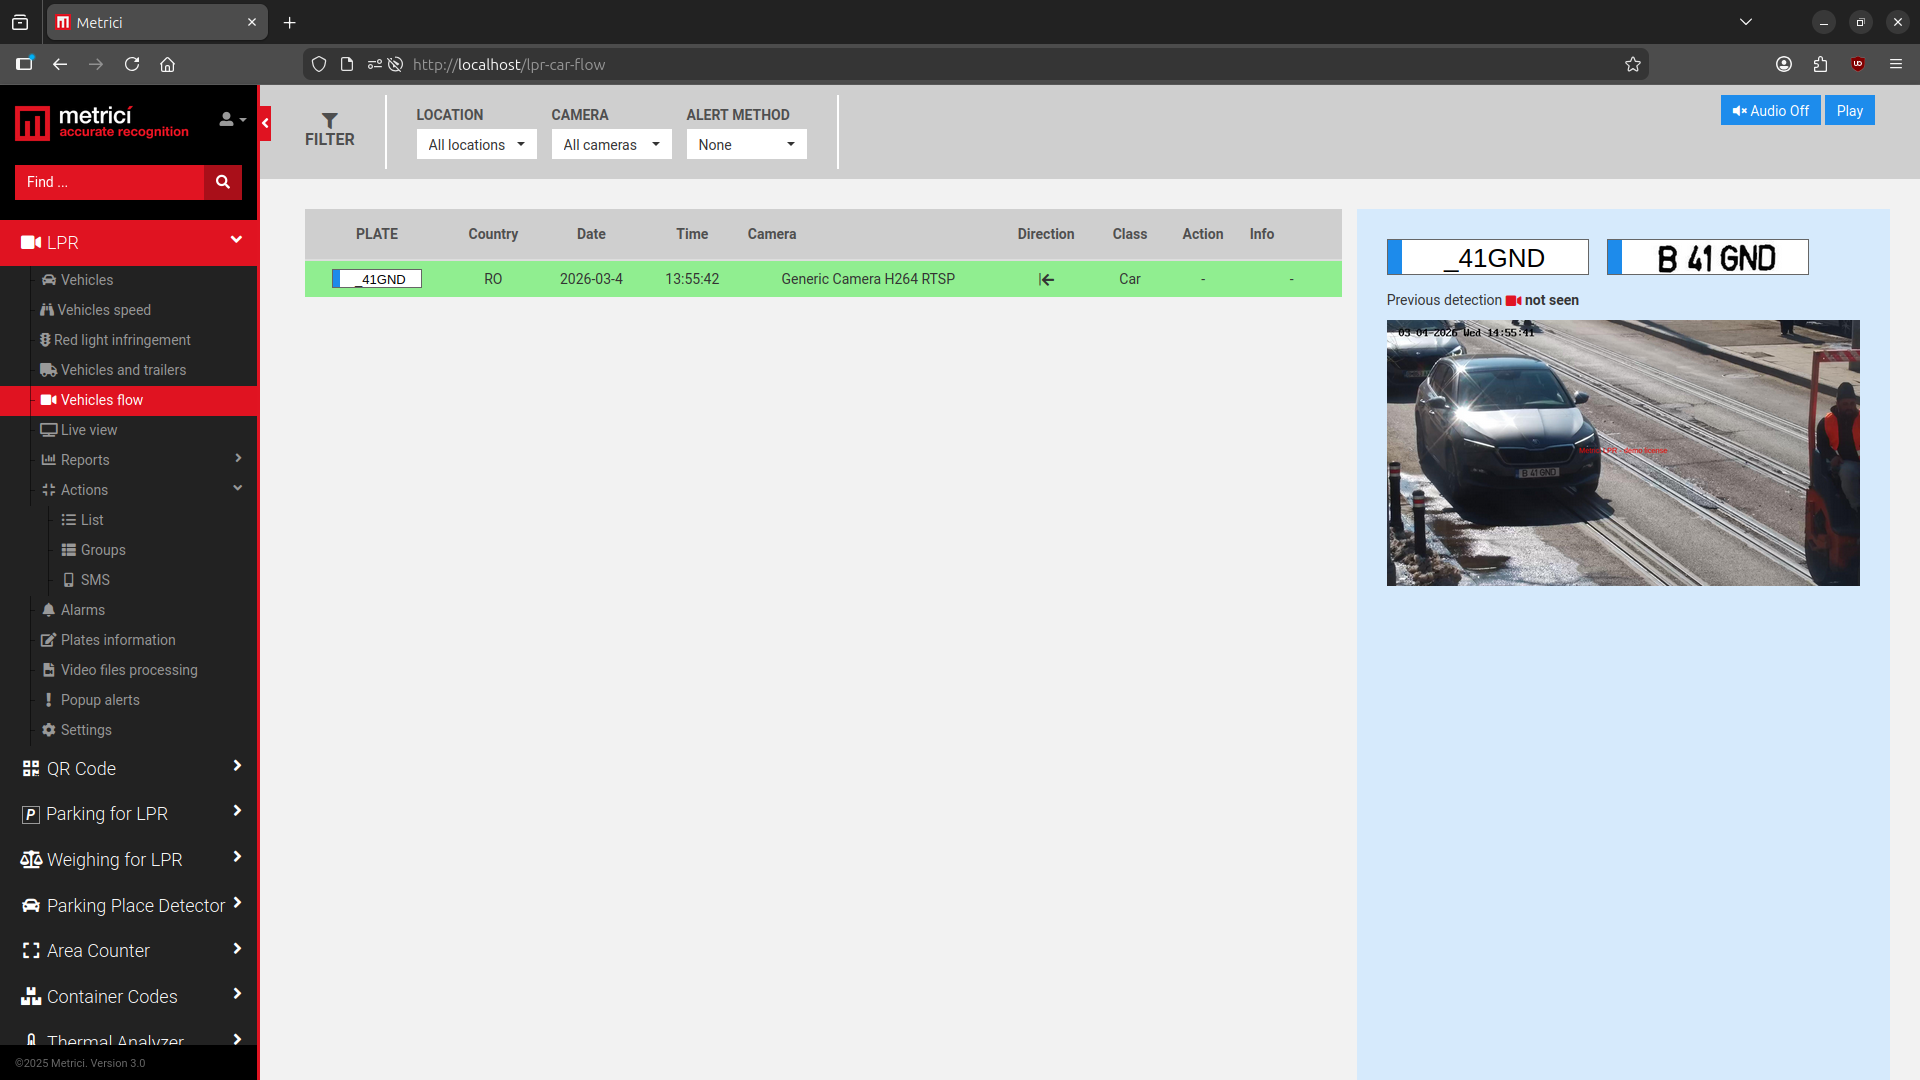
This feature provides a method for generating real-time alerts for specific events within the Metrici Interface. The alert is delivered as a beep sound when a detection occurs. The format is similar to Live View, but instead of displaying the full video stream, only the most recent detection is shown — see Fig.14 Vehicles Flow. Two alert options are available:
- Alert Filtering
- The available options allow you to receive alerts for vehicles on the action list (those already registered in the Metrici database as whitelist or blacklist entries) or for vehicles not on the list. When you select an alert method, the list will populate only with detections matching your selection. If "None" is selected, all detections are listed as they occur in real time.
- Location & Camera Selection
- A user can also choose which locations and which cameras to monitor. If you manage multiple locations and select only one, the alerts will display detections exclusively from the selected location.
- Image Preview
- Clicking on a detected license plate or on its accompanying photo will enlarge the image captured at the moment of detection.
Live View
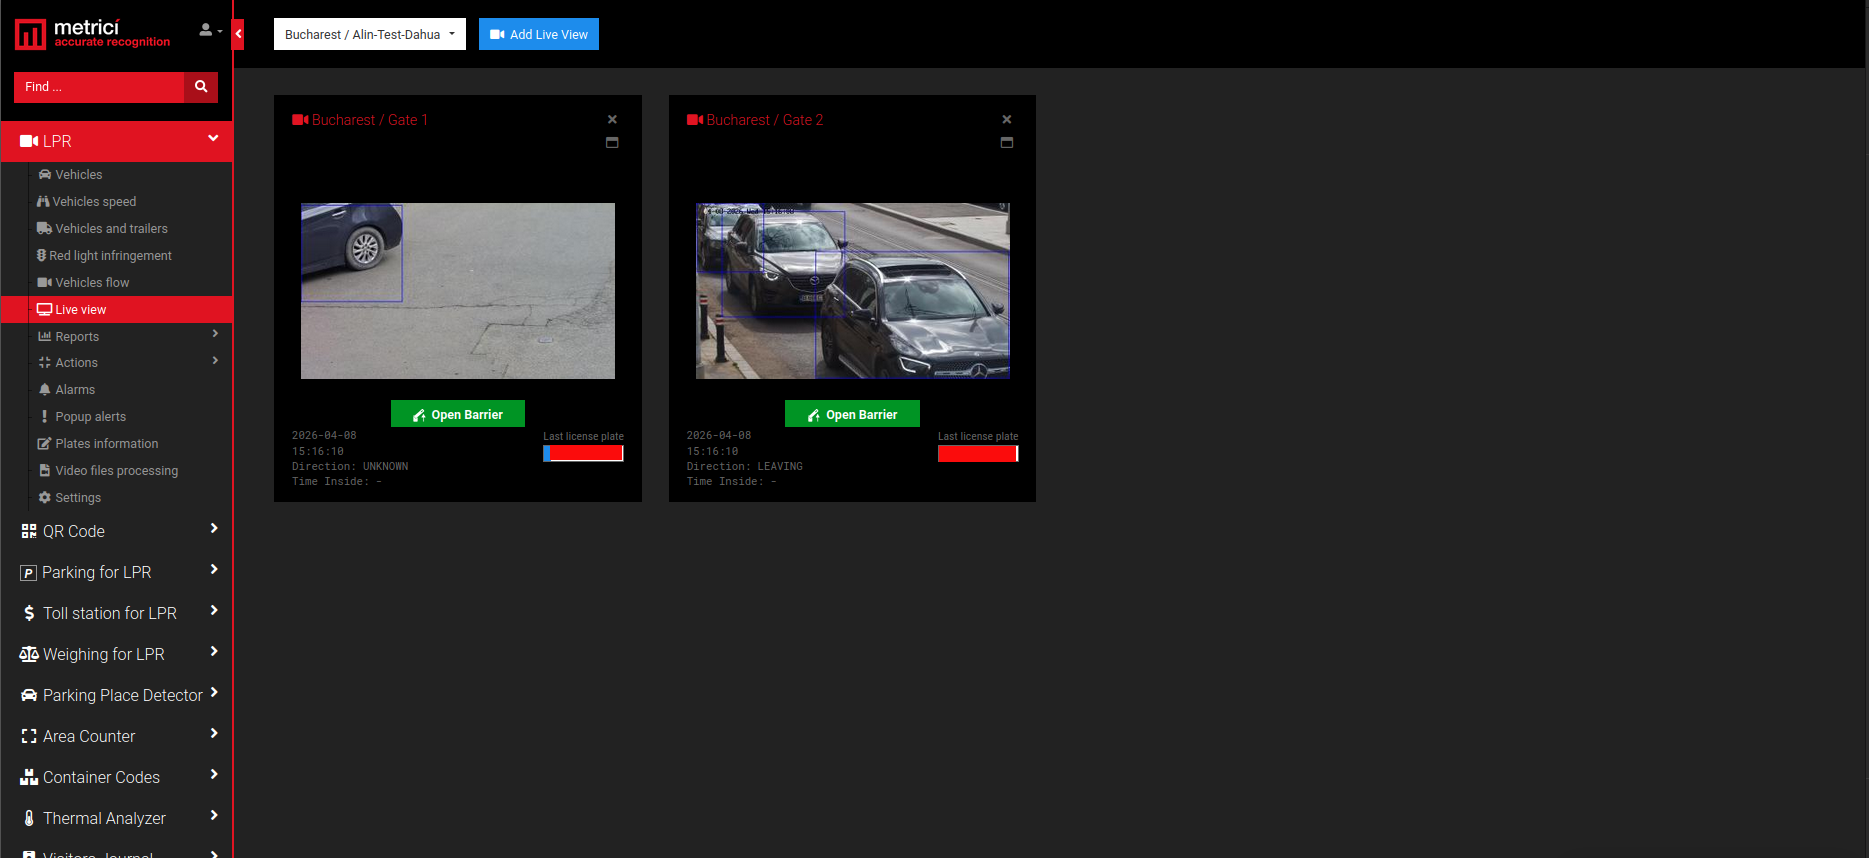
From the dropdown list of available cameras, select the ones you want to monitor one by one and click the blue "Add Live View" button for each. A camera feed can be expanded to full screen by clicking the monitor icon. To remove a camera from the live view, click the "x" button. After viewing a camera in full screen, click the "−" sign to return to the multi-camera layout. If a barrier is connected to a camera, a green button will appear allowing you to open the barrier with a single click directly from the live view. This is useful in situations where the license plate is not visible, is missing, or the action cannot be executed automatically by Metrici.
Reports
Several reports are automatically generated by Metrici, and each report can be exported in XLS format.
Vehicles Each Hour
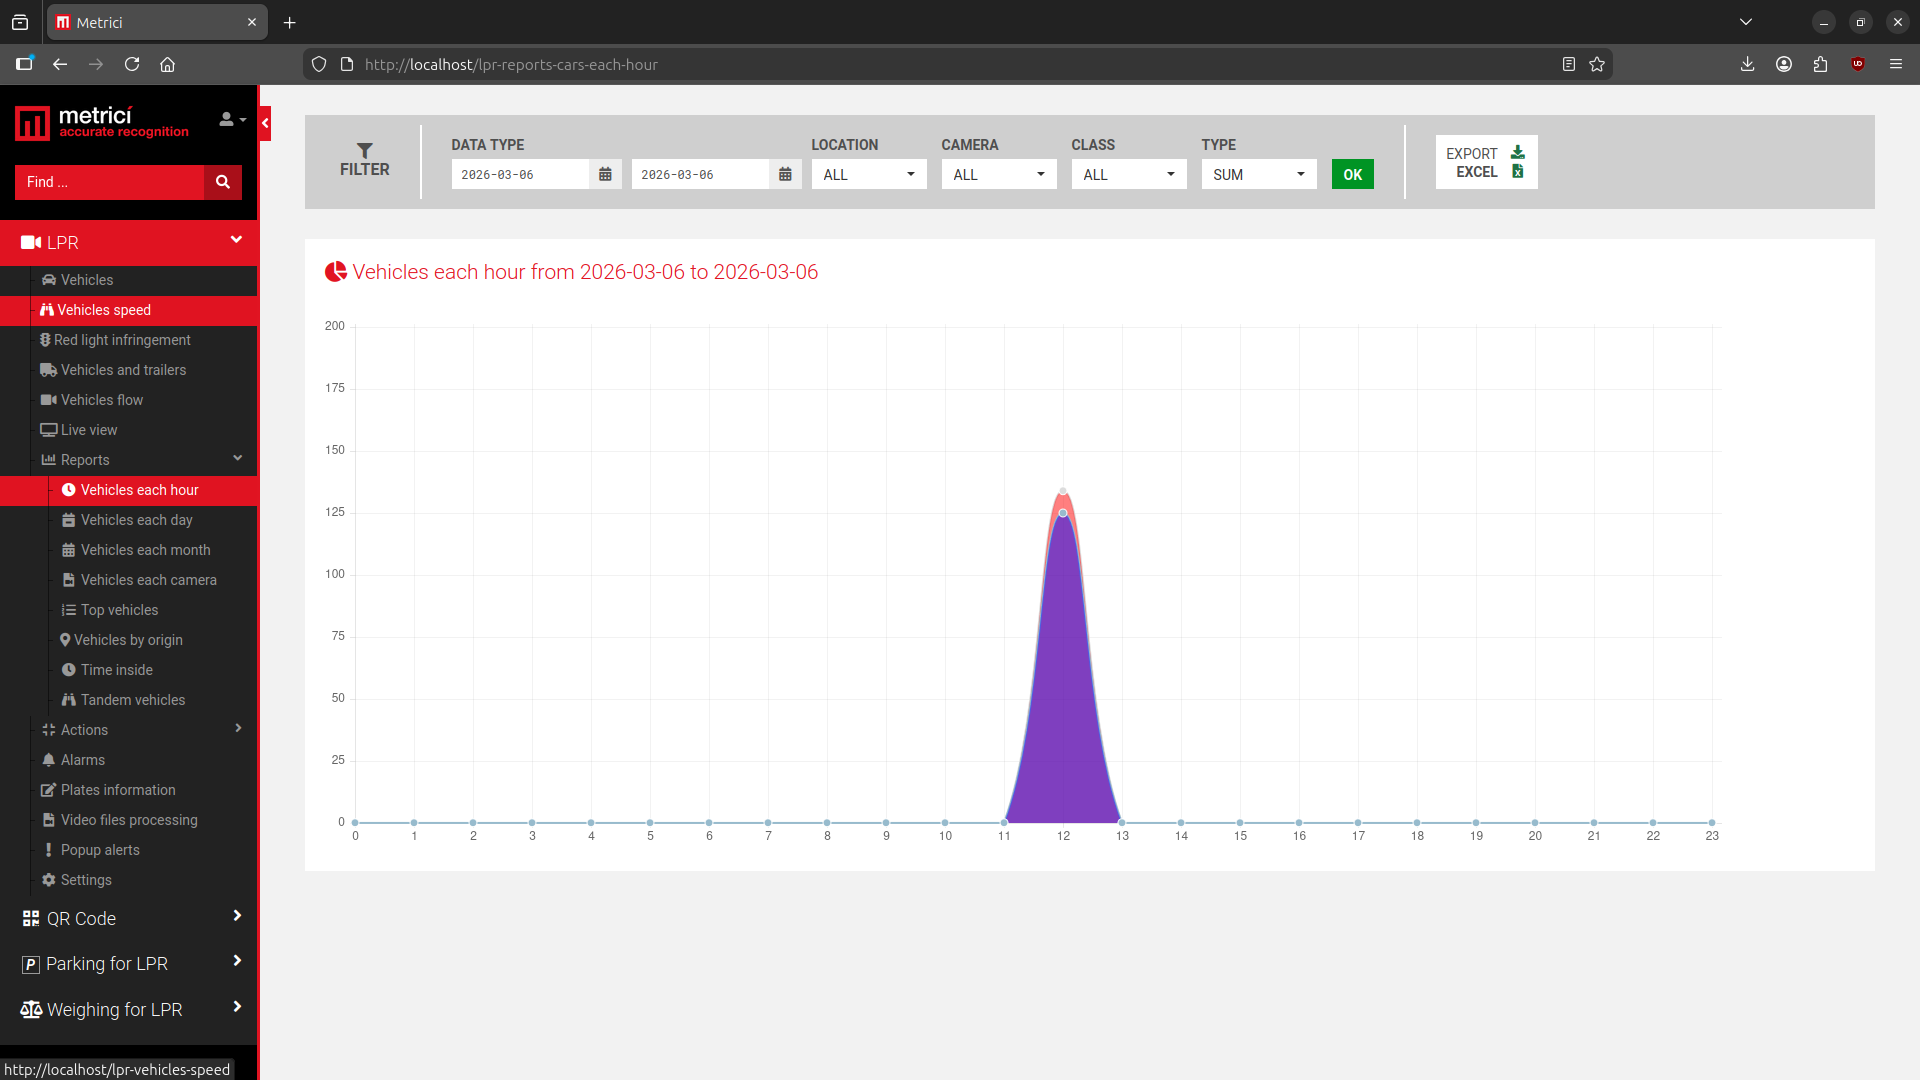
Displays the number of recognized license plates (detections) and the number of unique vehicles. A license plate may be detected multiple times if the same vehicle passes repeatedly in front of a camera or travels several times through the monitored location — see Fig.16 Reports.
Vehicles Each Month
Generates a report for all months of the current year by default. Additional months can be selected to create a custom report.
Vehicles Each Camera
Displays all detections recorded by each camera within a selected location.
Top Vehicles
Lists the most frequently detected license plates. The top bar menu allows selecting the number of results displayed per page (10–100). Clicking a license plate shows all detections associated with that plate for the current month.
Vehicles by Origin
Displays the countries of origin of detected vehicles and the number of detections for each country. For Romanian vehicles, the report also includes a breakdown by county.
Time Inside
Displays how long vehicles typically remain inside a parking facility or monitored location, providing insight into client parking habits.
Actions
In this menu, you can add vehicles to action lists or remove existing ones. You can also create groups to better organize the license plates stored in the database. The Action List displays all license plates entered in the database, together with their associated settings. From the top menu bar, you can search for a specific license plate in the database or you can also add new plates — see Fig.17 List (1).
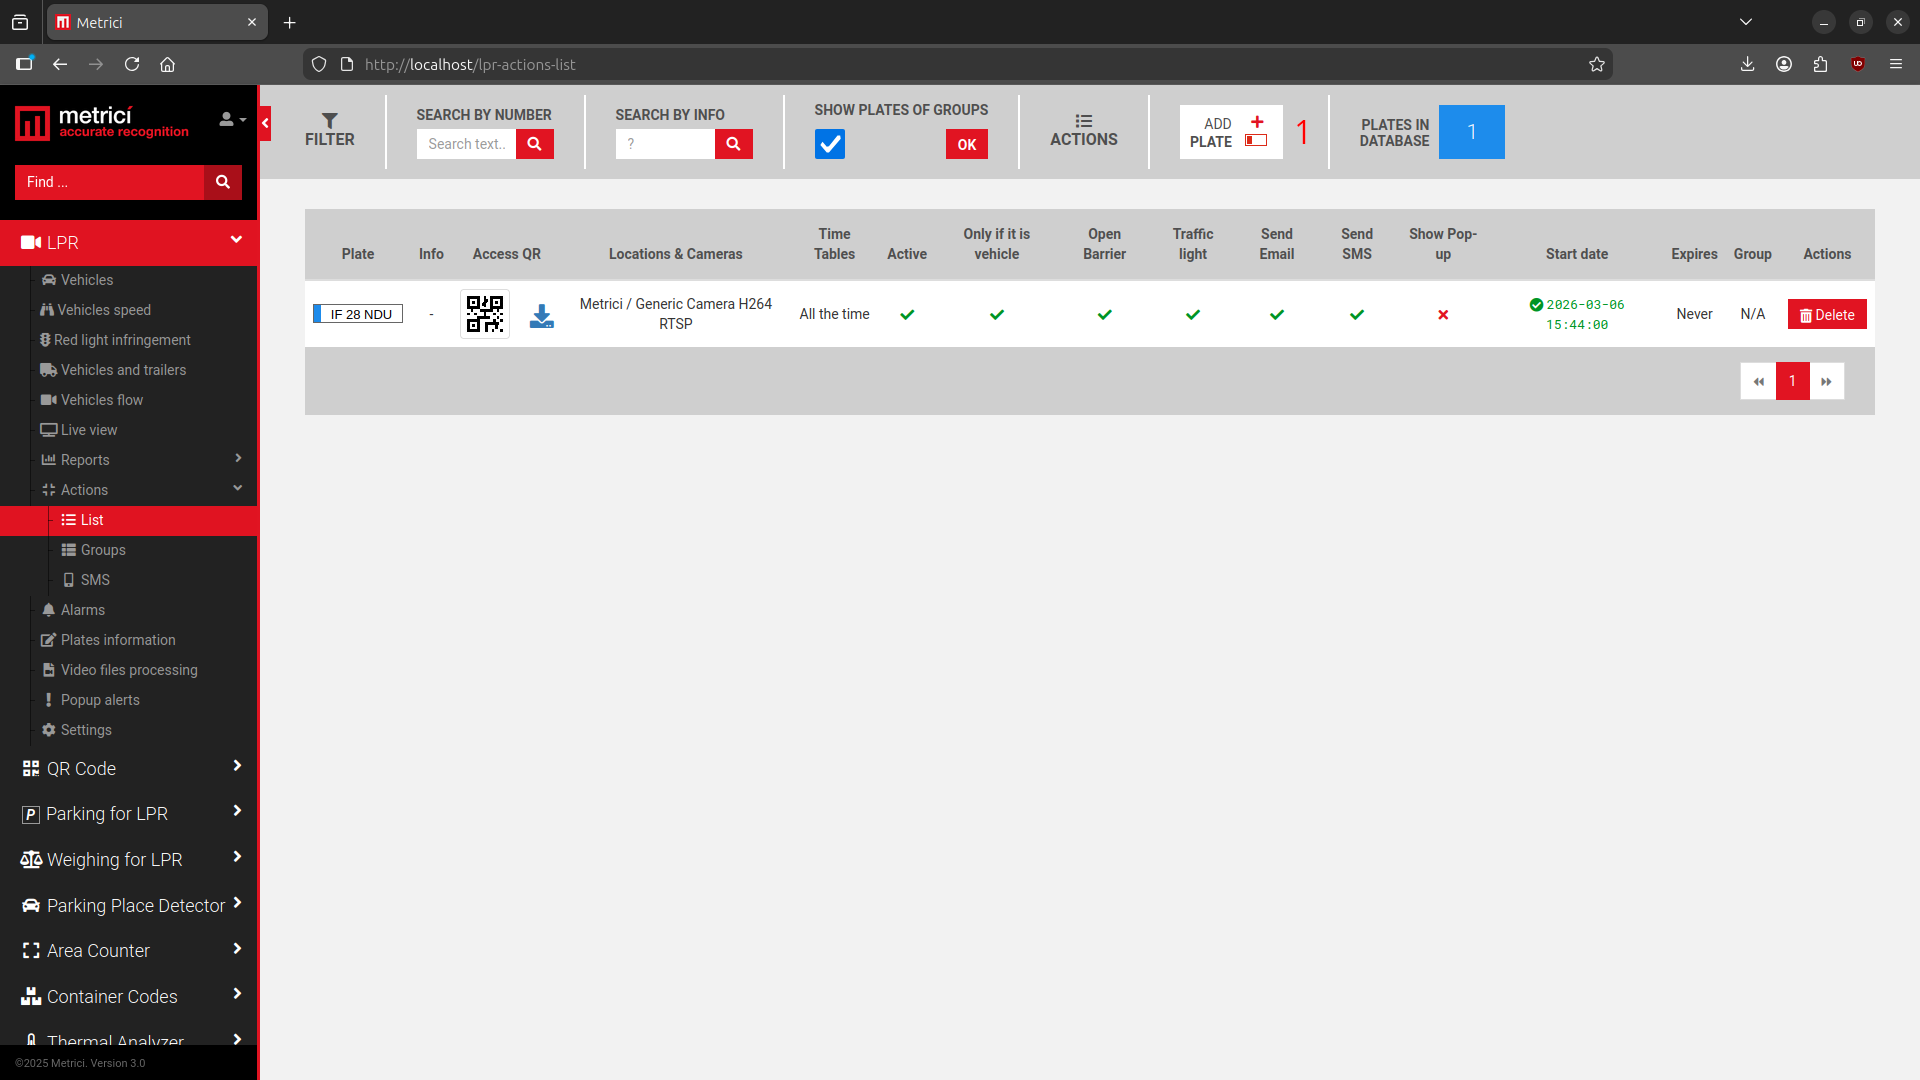
The cars list will include plate number, info, QR Code access, Locations and Cameras for which that number has some settings set, time tables, whether this is active or not, open a barrier for that plate, whether to send email or SMS, show popup, if it expires, if it belongs to a group or not.
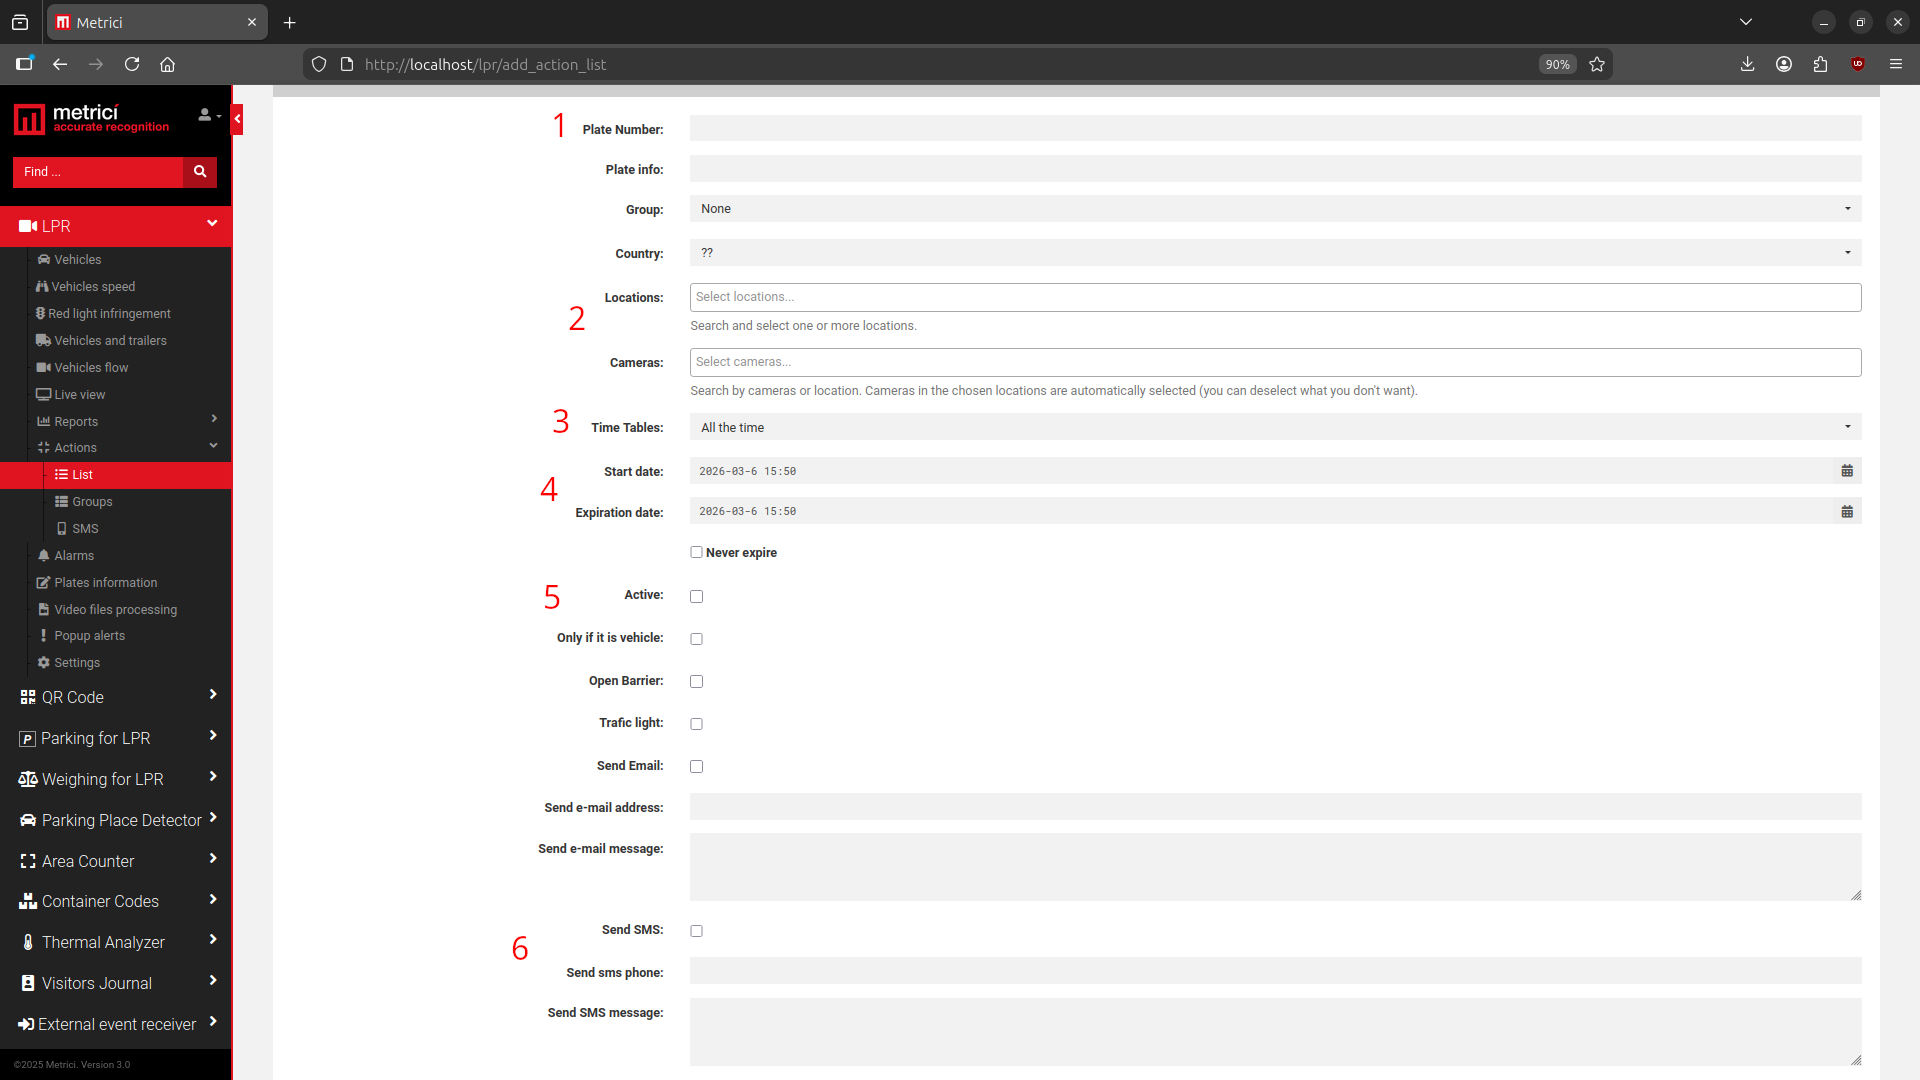
Plate Number
First, enter the number plate and any relevant details. If this number plate belongs to a group you have already created, select that group. Note that a number plate added to a group will automatically inherit all of the group's settings, including actions, timetables, and locations — see Fig.18 Add Plate (1).
Locations and Camera
Choose the location and camera for which this number plate's action rule will apply. You can configure a number plate to have access rights for only a specific barrier at a location, rather than all barriers — see Fig.18 Add Plate (2).
Timetable
Select a timetable you have previously created if you want to assign this number plate to one. The actions configured in this menu will only be active during the defined timetable period. For example, if you have created a timetable called "Work Hours" (Monday to Friday, 8 AM to 8 PM), a barrier will only open within that time interval — see Fig.18 Add Plate (4).
Start and Expiration date
If this number plate's action rules have an expiration date, set one here; otherwise, check "Never Expire" — see Fig.18 Add Plate (4).
Actions
Enable the Active toggle and choose what action should be triggered when this number plate is detected: open a barrier, control a traffic light, send an email or SMS, display a pop-up. For the email and SMS options, specify the recipient's address or phone number and compose the message. Select only if it is vehicle if you want the action to be triggered only when the number plate is detected on an actual vehicle, and not when it is printed on paper or held up manually. For this to function correctly, you must also enable the Vehicle Classification option in the Control Panel — see Fig.18 Add Plate (5 and 6).
Action URL
This is the address of the hardware device — such as a barrier or traffic light — that will be triggered when the number plate is detected — see Fig.19 URL & Cross Check (1).
Cross Check
Cross Check is a special Metrici feature that triggers an action only when a defined set of conditions are simultaneously met. Metrici checks its entire database and all connected Metrici engines for a matching unique key. The default value is zero, meaning only one condition needs to be met. If Cross Check is set to 1, two conditions must be met at the same time. For example, in an access control scenario using both LPR and QR code verification, you can configure a rule so that access is granted only when both a valid number plate and a valid QR code are detected and linked in the database. One Metrici engine detects the QR code and triggers an LPR detection. If both conditions are satisfied and the number plate is linked to that QR code in the database, access is granted. Each event must have its own rule established in the database, and detection must be triggered via a unique verification key. This is typically initiated through the Metrici Virtual Trigger in the Control Panel settings. Cross Check interconnections can also be established between LPR and vehicle classification, or any other supported combination — see Fig.19 URL & Cross Check (2).

Groups
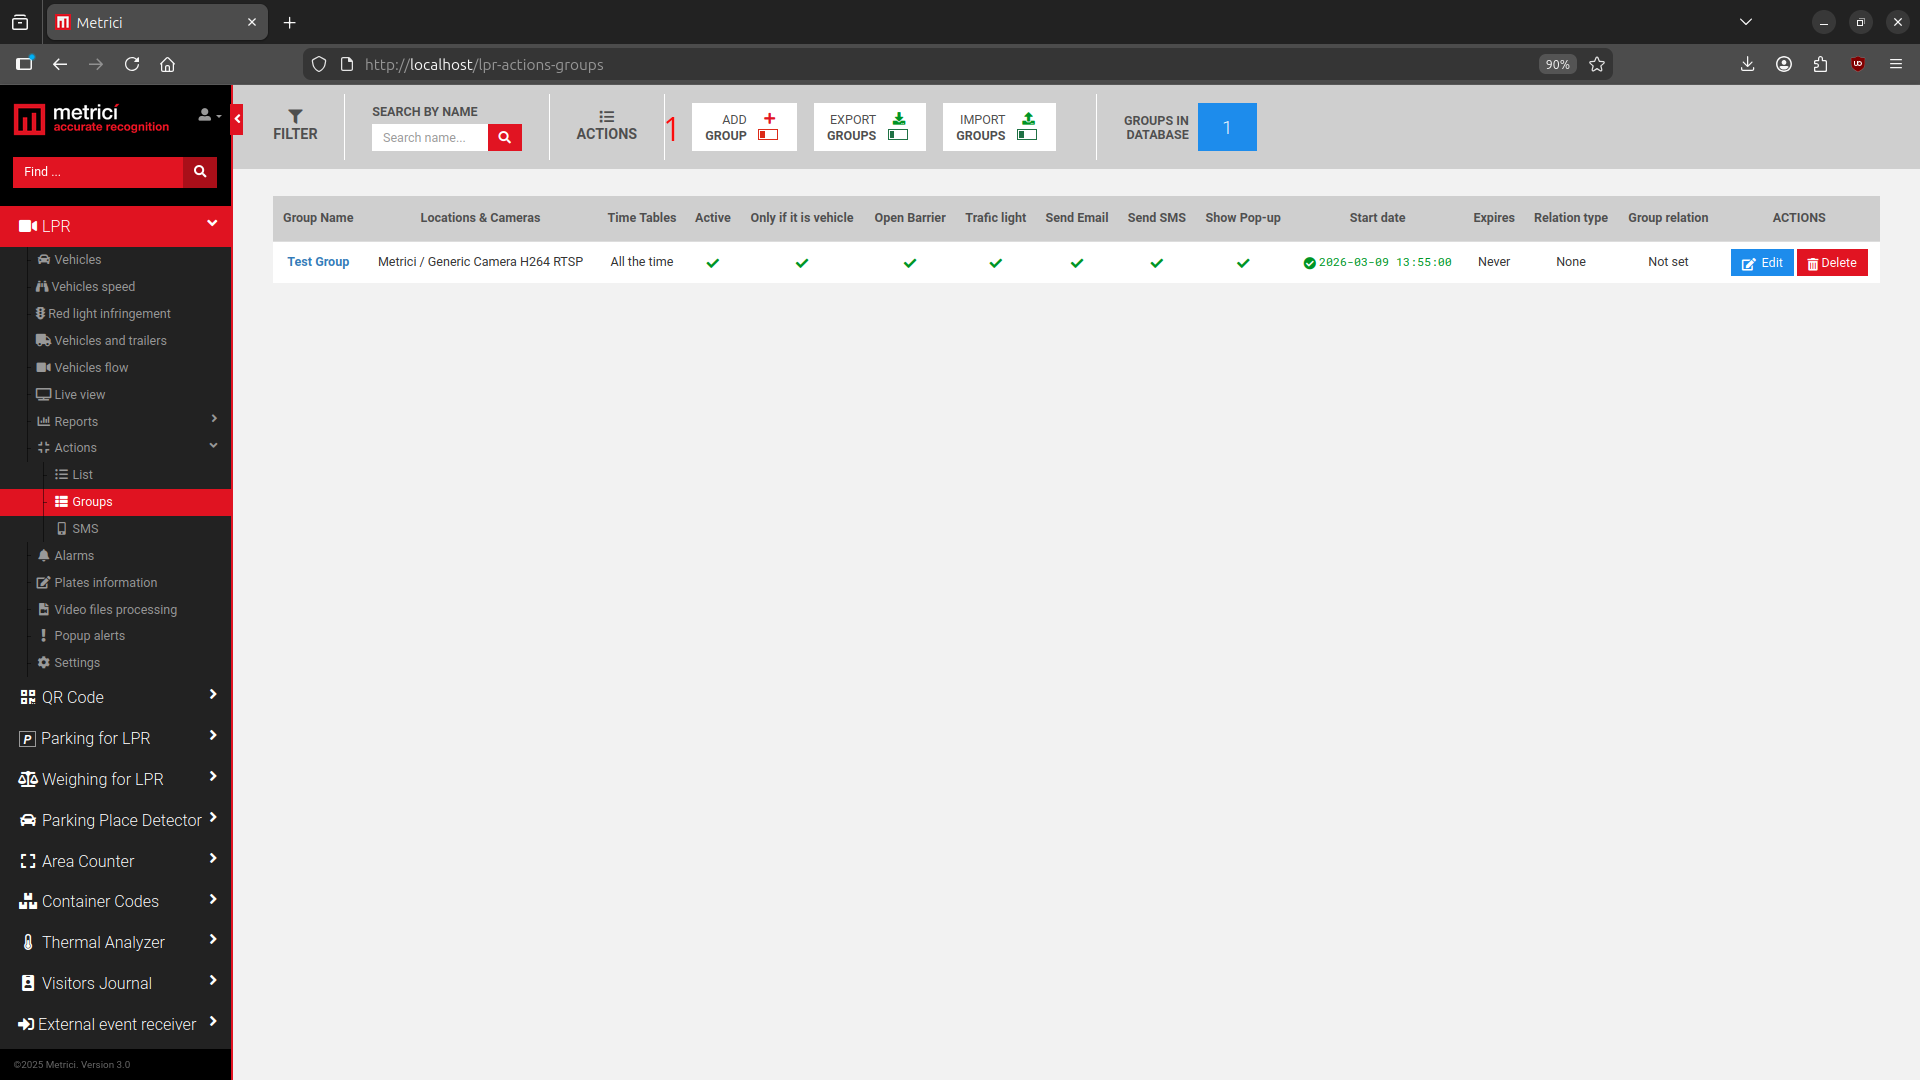
The groups options are introduced to make things easier for users. When creating a group, keep in mind that all the settings set for it will be assigned to the cars that are added, so users don't have to manually configure actions for each number plate. When a group is formed, be sure to correctly set the rules for that group, the locations and the camera where the action takes place, the time table, and whether it has an expiration date. All these settings will be transferred to a number plate if it is allocated to the group. When introducing a new number in the action list, you just fill in the Plate number and choose what group it belongs to, leaving the other fields as they are. The license plate will copy the group's settings. In this menu you will see a list of all the groups you have created — see Fig.20 Groups.
When a name is clicked you will see a list with all the plate numbers assigned to that group and the actions to be made as well as the locations and cameras where these actions are active. You have the option to import lists in CSV format. For this click the IMPORT PLATES button on the upper menu. If you use a third party management program or an external file that is always updated, keep in mind to check the option EMPTY GROUP BEFORE IMPORT so as not to double the plate numbers in your list every time you import. If a new import does not contain old plate numbers, but only new ones, this option should NOT be checked.
At any time after groups were created, you can export their settings as a CSV file or import one. For an export with the number plates belonging to a group, click on its name and choose the export option.
SMS
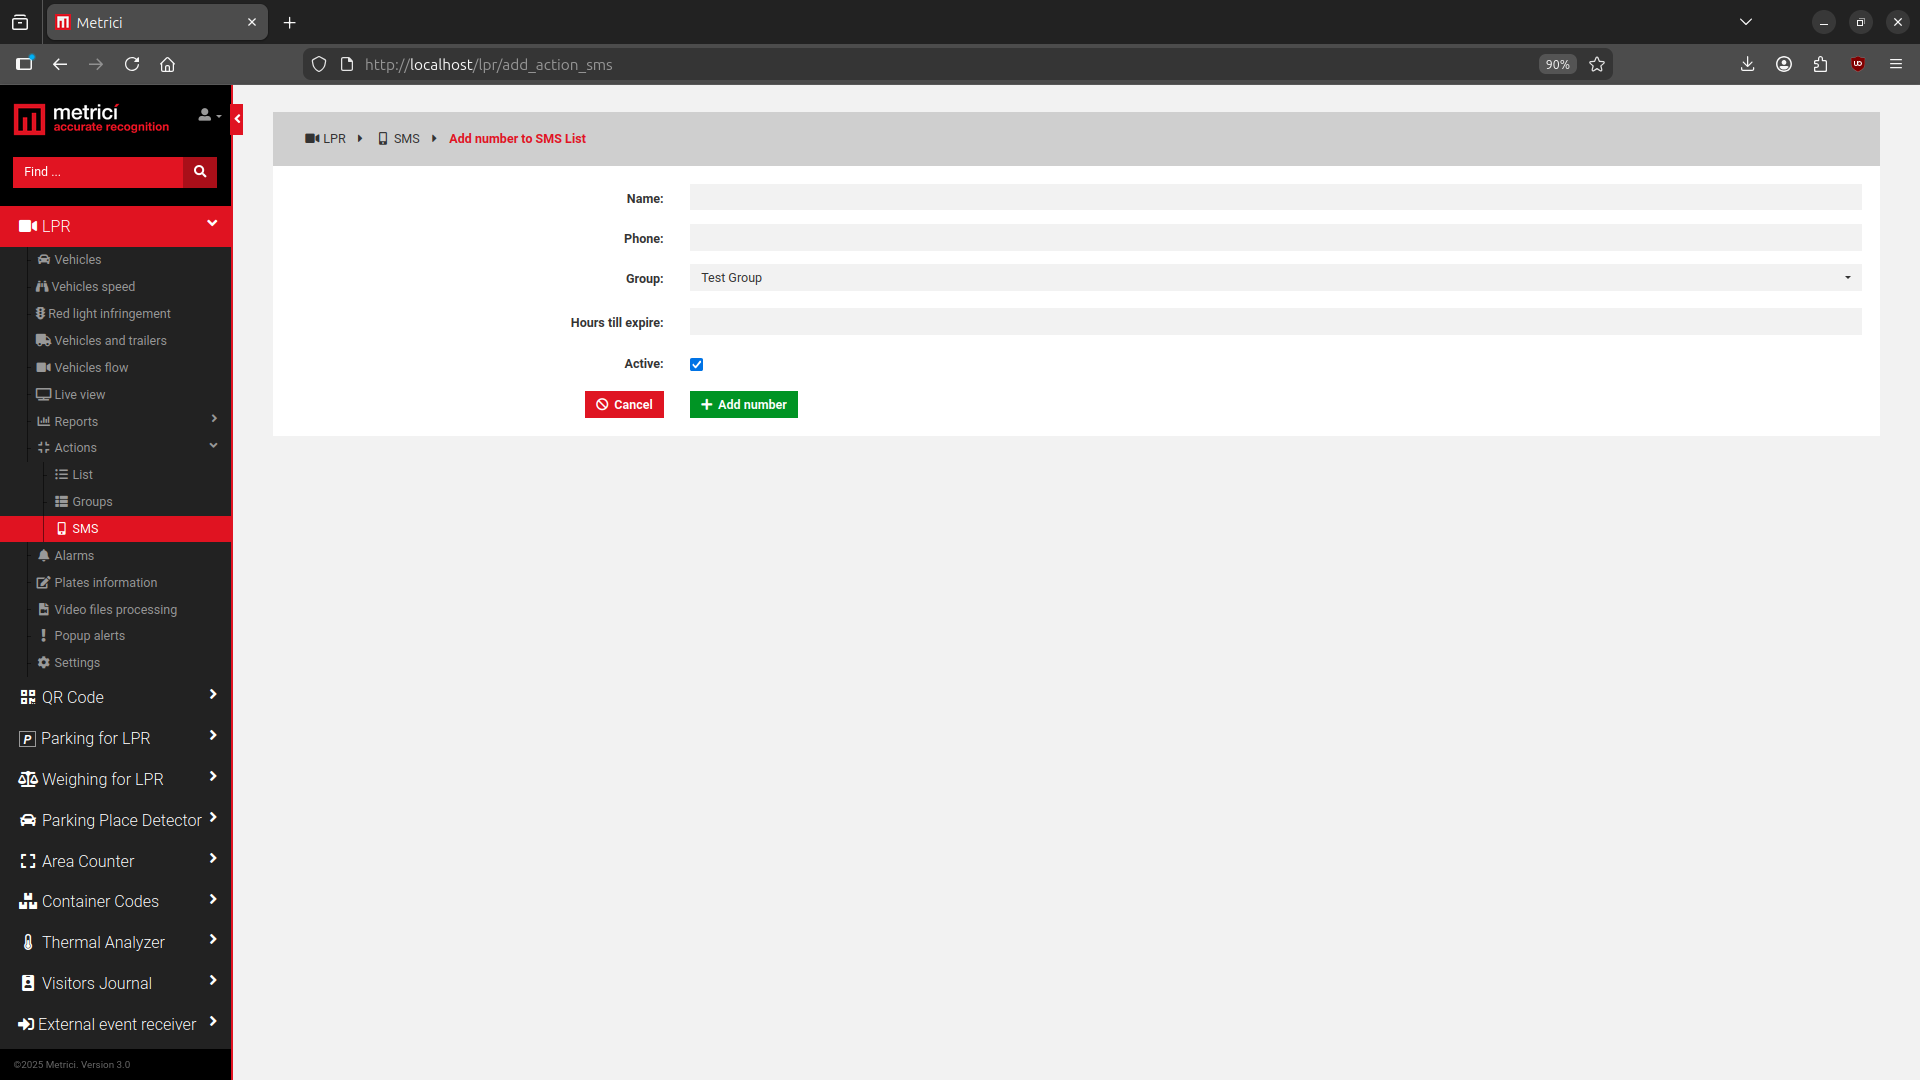
In this menu, you can add phone numbers that have administration rights for the interface. When the SMS module integration is enabled, phone numbers added to this list can send plate numbers via SMS, which will then be automatically added to the actions list. Fill in the name, phone number, and the group it belongs to. The Hours Till Expire field defines the time interval during which a plate number — submitted via SMS by this phone — will have active access rights. This grants temporary access, and once the time expires, the associated actions will no longer be executed. Click the Add Number button when ready — see Fig.21 SMS.
Alarms
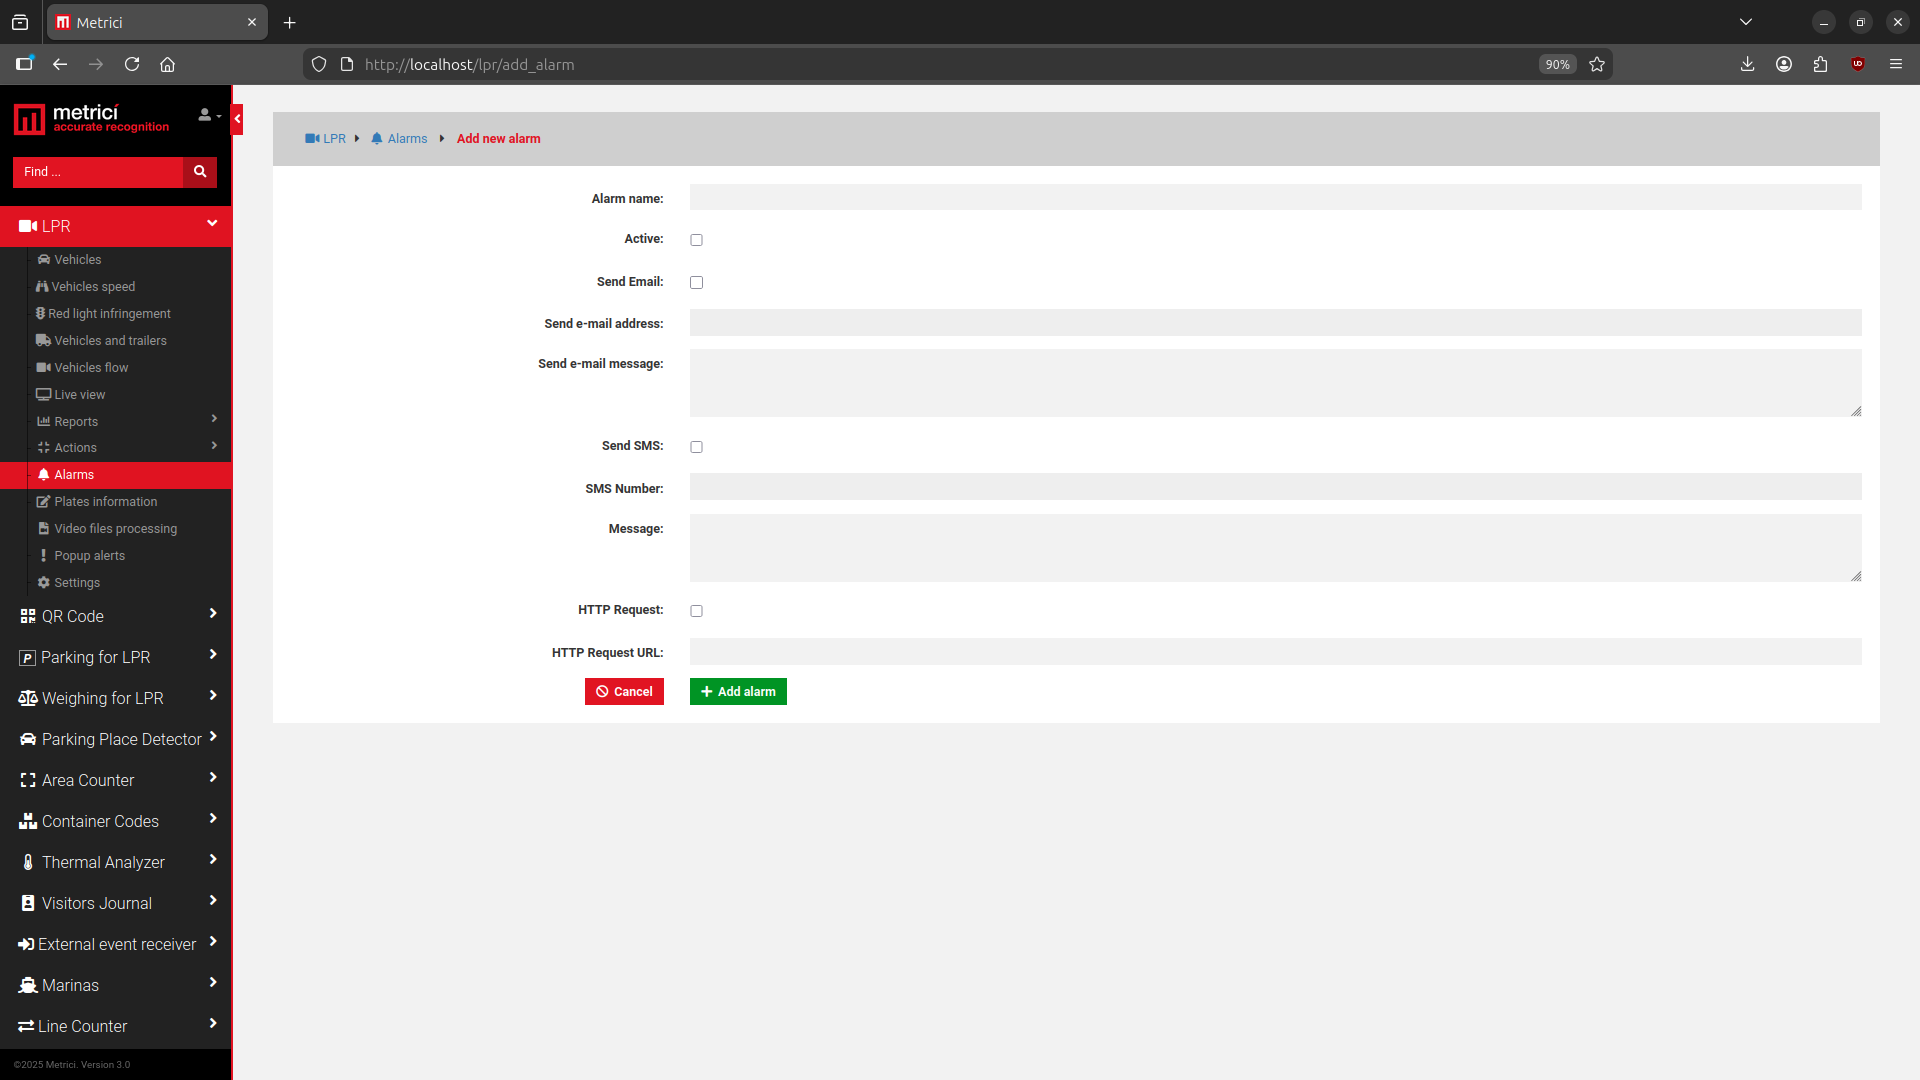
Various types of alarms can be configured within the Metrici interface. To create a new alarm, click the Add Alarm button. An alarm can be sent to an email address or to a phone number when the SMS module integration is enabled. When creating an alarm, please note that this is a two-step process. First, you name the alarm and select the desired notification method (SMS or email). Then, you define the conditions that must be met for the alarm to activate.
Creating an Alarm
Follow the steps below to create a new alarm. Each alarm requires a name, a notification method, and at least one triggering condition — see Fig.22 Add Alarm.
- Navigate to the Alarms section from the main menu.
- Enter a descriptive name for the alarm.
- Toggle the Active switch to enable the alarm.
- Choose a notification method:
Email: Enter a valid email address and compose a custom message to accompany the alarm notification.
SMS: Enter the recipient's phone number for text message alerts.
- Click the Add Alarm button to save.
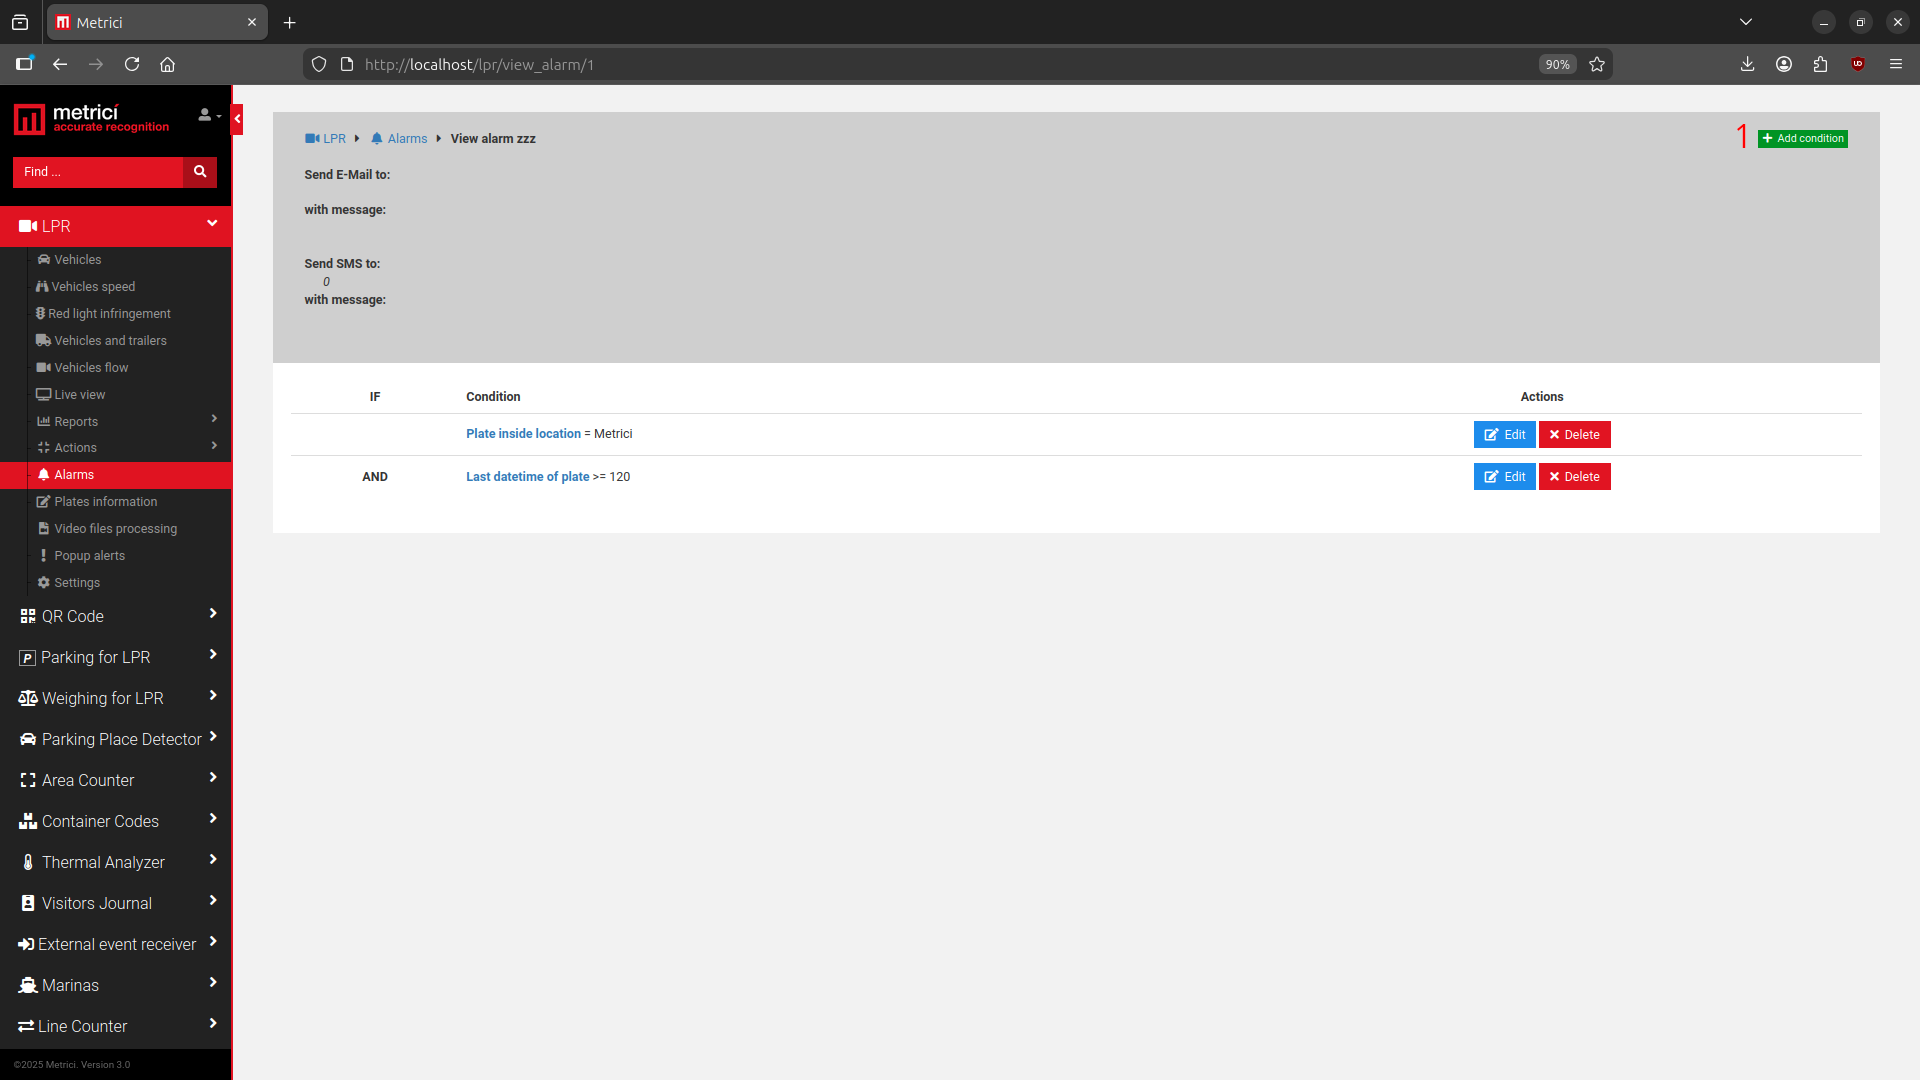
To add conditions to the alarm, click the green Add Condition button in the upper-right corner — see Fig.23 Conditions(1). You can add as many conditions as needed — the alarm will only trigger when all conditions are met simultaneously.
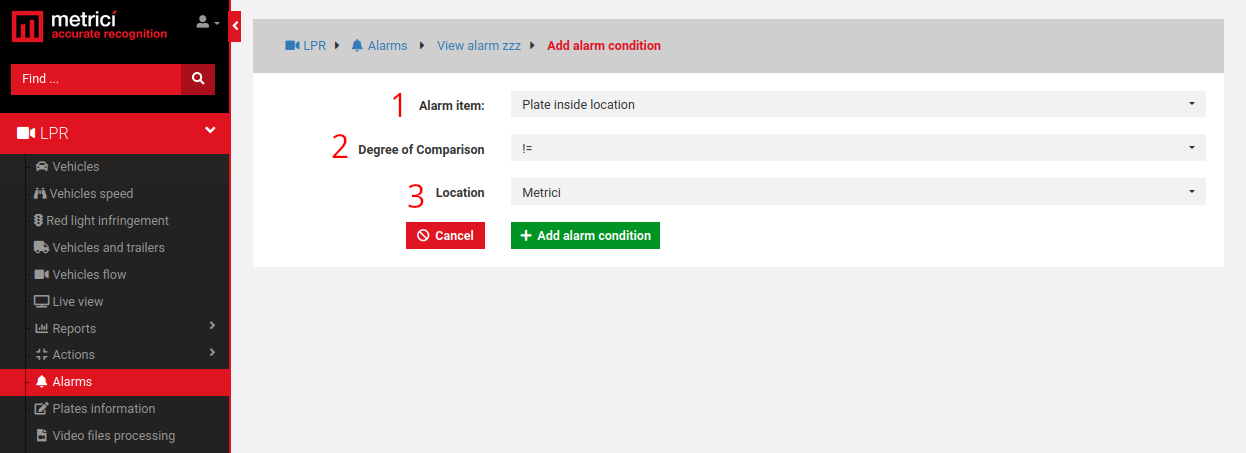
For the first condition you must configure three parameters: an Alarm Item, a comparison operator, and a target location. The Alarm Item defines what the system evaluates. First available types are Plate inside location and Speed — see Fig.24 Add Conditions(1, 2 and 3).
For the next conditions the available types are: Plate Inside Location, Last Direction of Plate, Last Datetime of Plate, Plate in Group, and Speed. Next, select a comparison operator (such as =, !=, <, <=, >, or >=) to define the relationship between the alarm item and your target value. Finally, specify the target value — for example, the name of a location, a plate group, a speed threshold, or a time-based SQL expression.
Plates Information
This section displays a list of all vehicles registered in the database, along with any additional information entered in the info field. Click on a plate number or the Edit button to begin editing its details. Using the top menu bar, you can add new number plates to the list, or export and import lists in CSV format.
Video Processing
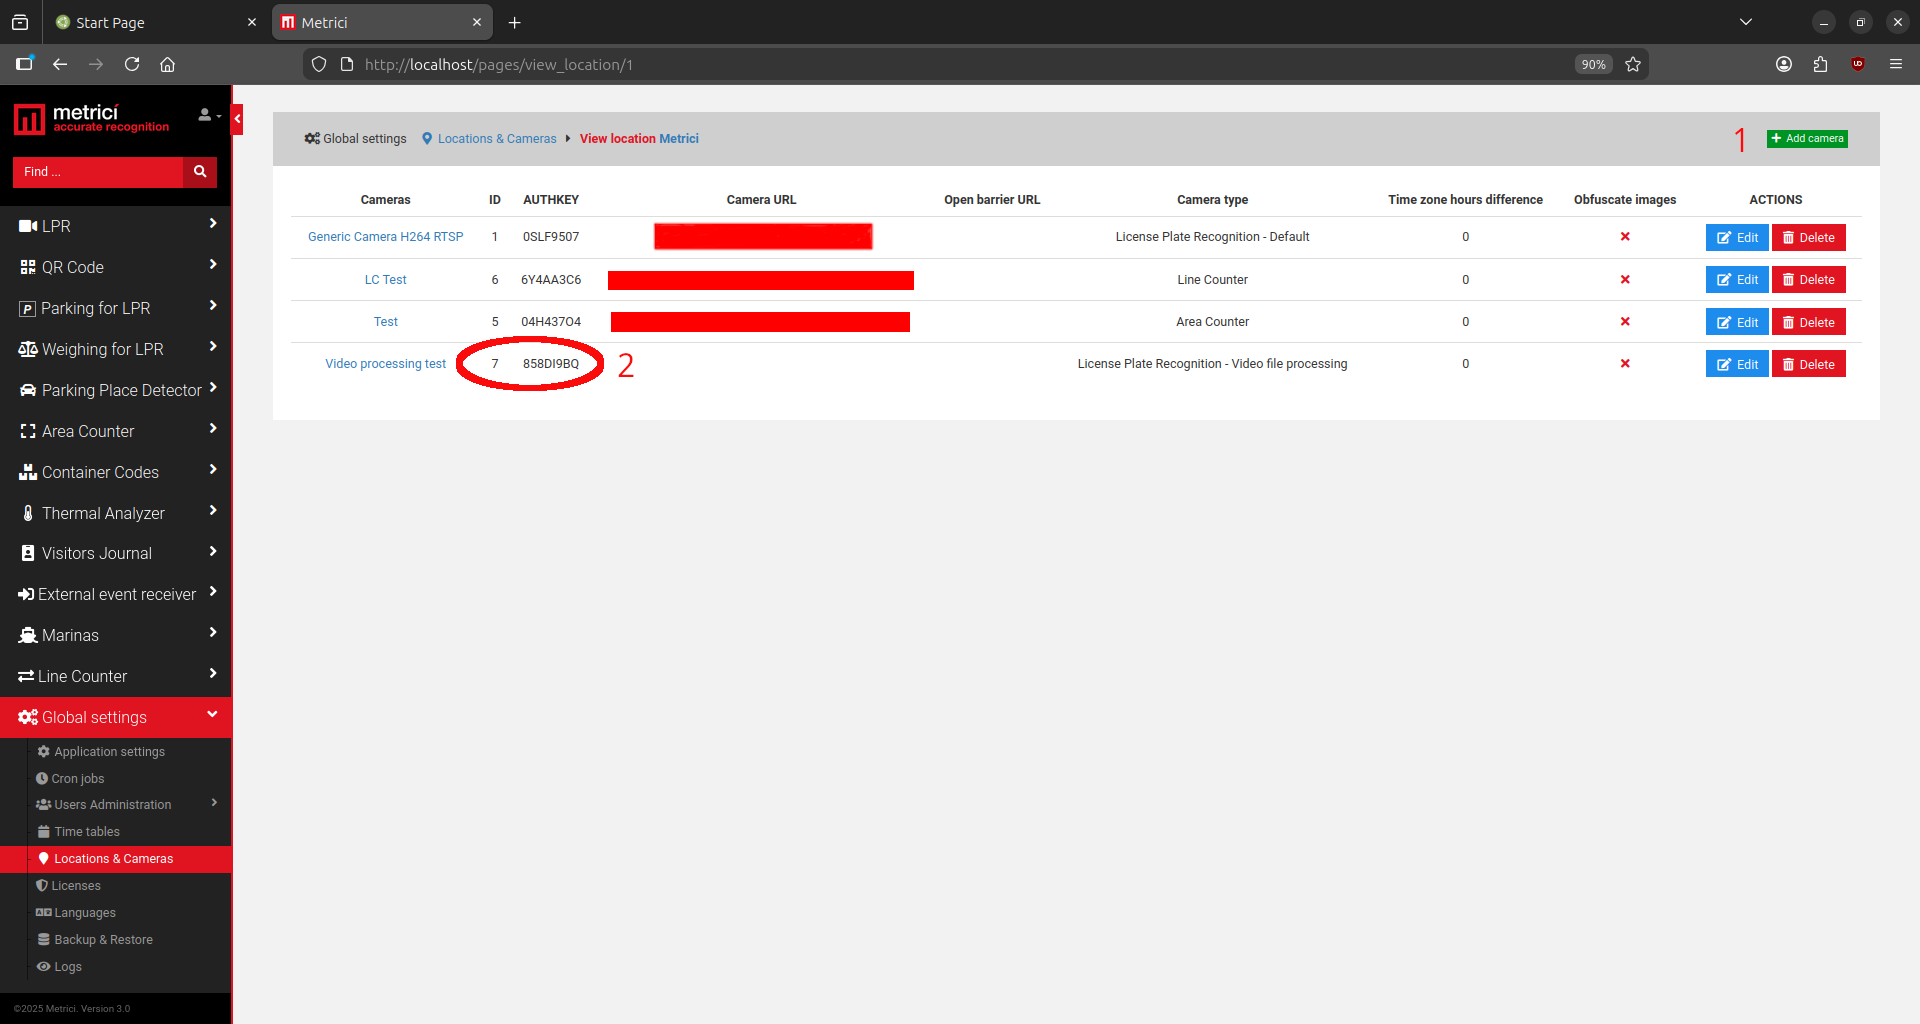
Metrici supports license plate analysis and detection in recorded video files in .mp4 or .avi format. To enable this feature, configuration is required in both the Metrici Interface and the Metrici Control Panel. Begin by navigating to Global Settings → Locations and Camera in the Metrici Interface. Select the desired location by clicking on its name, then click the Add Camera button in the upper-right corner to create a virtual camera entry — see Fig.25 Add Camera (1).
In the configuration window, enter a descriptive name for the camera. From the Camera Type dropdown menu, select License Plate Recognition – Video Files Processing, then save the settings. Once the camera is created, Metrici will assign it a unique Auth Key and Camera ID — see Fig.25 Add Camera (2). Make note of both values, as they must be entered into the engine settings within the Control Panel to complete the setup.
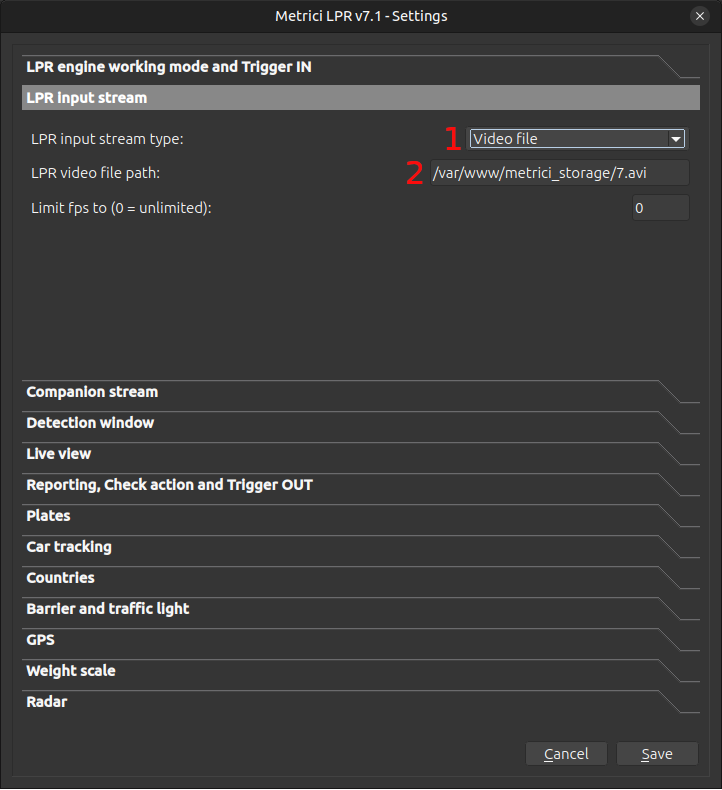
Control Panel Configuration: Click the Add button in the bottom-left corner. Enter a name for the camera and set the Application Type to LPR. In the engine settings, navigate to LPR Input Stream and set the LPR Input Stream Type to Video File — see Fig.26 LPR Input Stream(1).
Next, in the LPR Video File Path field, enter the path to the folder where the engine will search for files to analyze — see Fig.26 LPR Input Stream (2). For example, if the path is /home/metrici/counter/54.avi, then 54 is the Camera ID generated by Metrici in the Interface, and the .avi extension indicates that the engine will process AVI files. To analyze MP4 files instead, simply change the extension to .mp4 — the Camera ID remains the same. For a fresh installation, the LPR Video File Path will always follow one of these formats:
/var/www/metrici_storage/ID.avi/var/www/metrici_storage/ID.mp4
The ID at the end of the path /var/www/metrici_storage/ID.avi must match the ID generated by the web application when a camera is added. This means that the video files need to be renamed using this generated ID before they are processed.
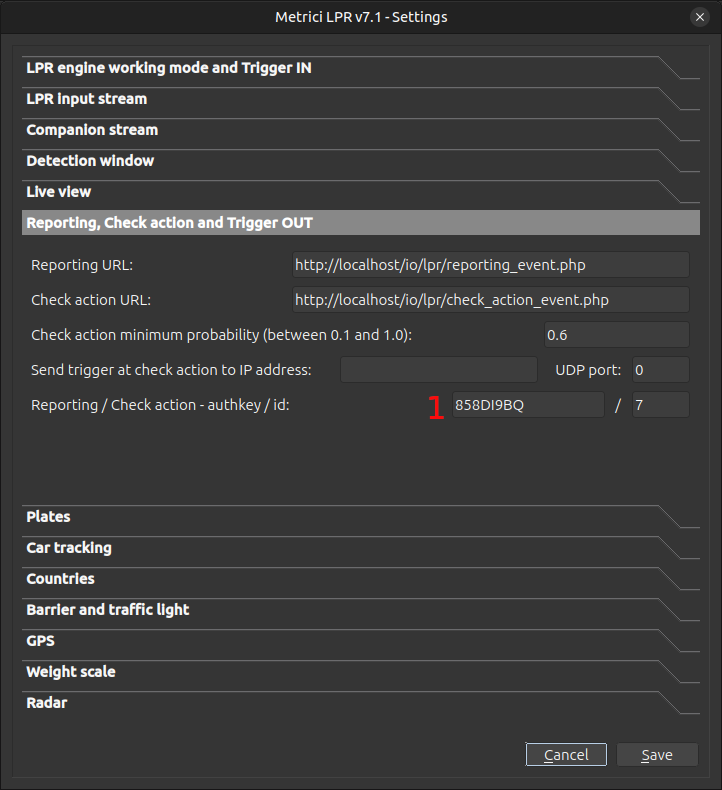
Then navigate to Reporting,Check Action and Trigger OUT and enter the Auth Key and Camera ID that Metrici generated in the Interface — see Fig.27 Reporting (1).
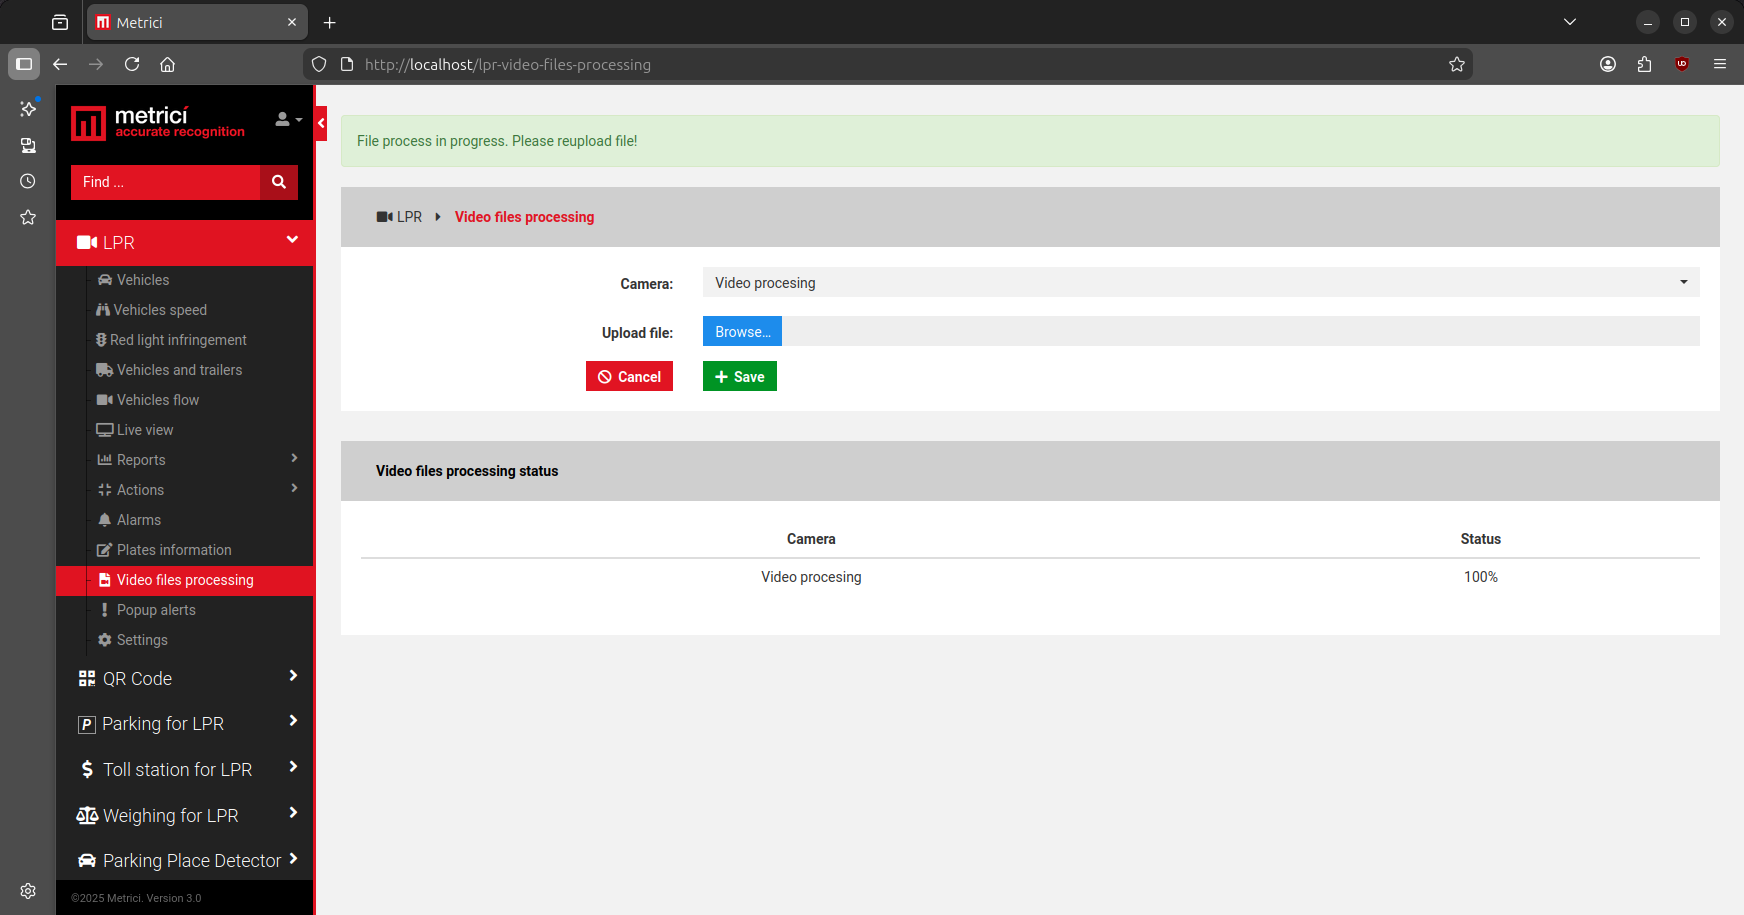
To analyze a recorded video, go to LPR → Video Files Processing in the Metrici Interface — see Fig.27.1 Processing. If multiple cameras have been added to the system, select the one you want to use for the analysis. Click the Browse button to locate and select the file you wish to upload, then click Save and wait for the progress bar to reach 100%. While the analysis is in progress, no other file can be uploaded for the same camera. Regardless of the original file name, Metrici will rename it to ID.avi or ID.mp4. Once the analysis is complete, the file extension is changed to ID.avi.bac (or ID.mp4.bac). When a new file is uploaded for analysis, the previous backup file will be overwritten. The engine will only process files of the type configured in the Control Panel, so make sure to upload the correct format or update the settings accordingly.
Settings
In this section, you can configure several parameters for the LPR module. Click the green button Edit Settings top right corner — see Fig.28 Settings.
Minimum Probability Display defines the confidence threshold at which a detected plate is stored in the database. The default value is 0.6, meaning only plates recognized with at least 60% probability will be recorded.
Show Original Plate enables the display of the license plate photo exactly as it was captured by the system at the moment of detection. This is useful for visual verification alongside the recognized result. In the detection view, the image highlighted with a green circle represents the original camera capture, while the image highlighted in red shows how the neural network interpreted and recognized the license plate.
Delete Plates After (days) sets the retention period for stored detections in the database. A value of 0 means all plates and detection records are kept indefinitely.
Events counter keeps track of the total number of events in the database.
Disk Space displays the total capacity of the storage drive, along with how much space is currently occupied and how much remains available.
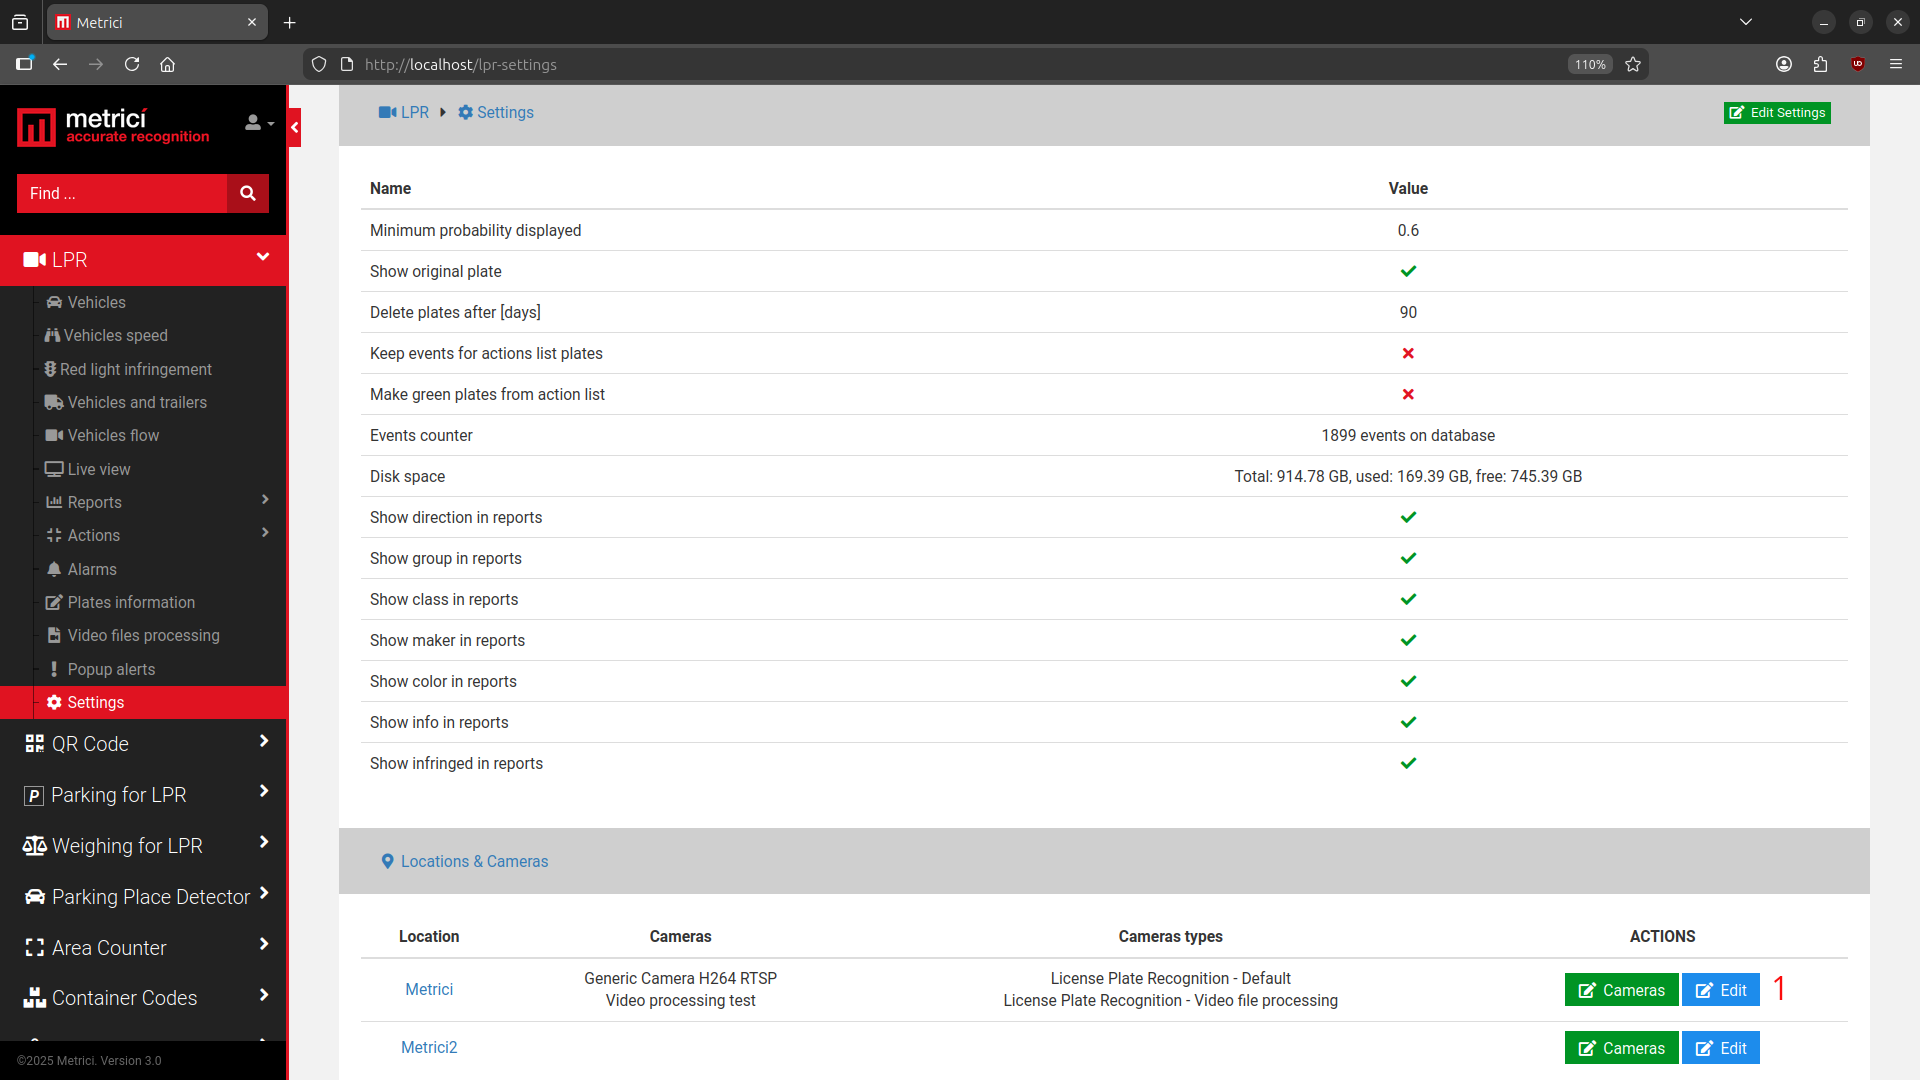
Managing Locations and Cameras: From this menu, you can also edit the locations and cameras configured for LPR under General Settings. When you select a location, a list of all cameras assigned to that location will be displayed — see Fig.29 Locations & Cameras.
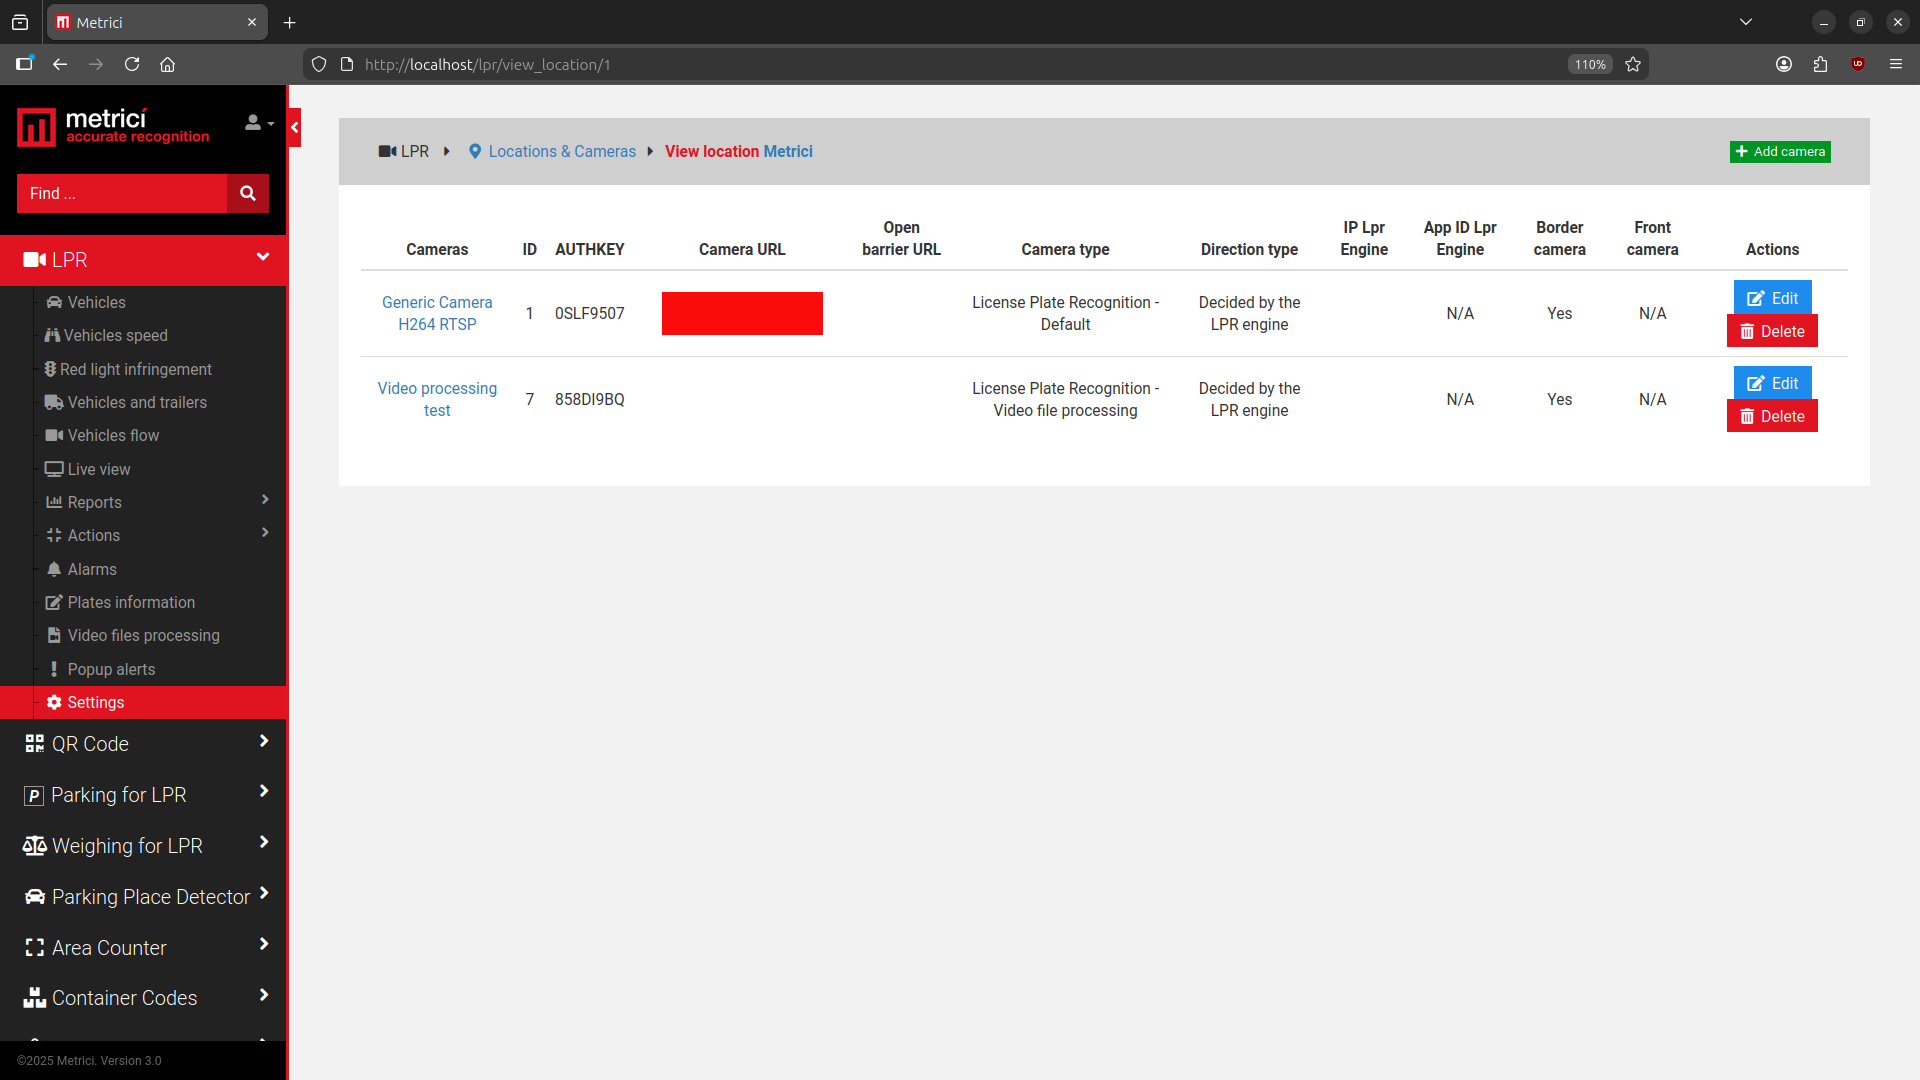
Click on a camera name to access its individual settings and configuration menu — see Fig.30 Edit Camera.
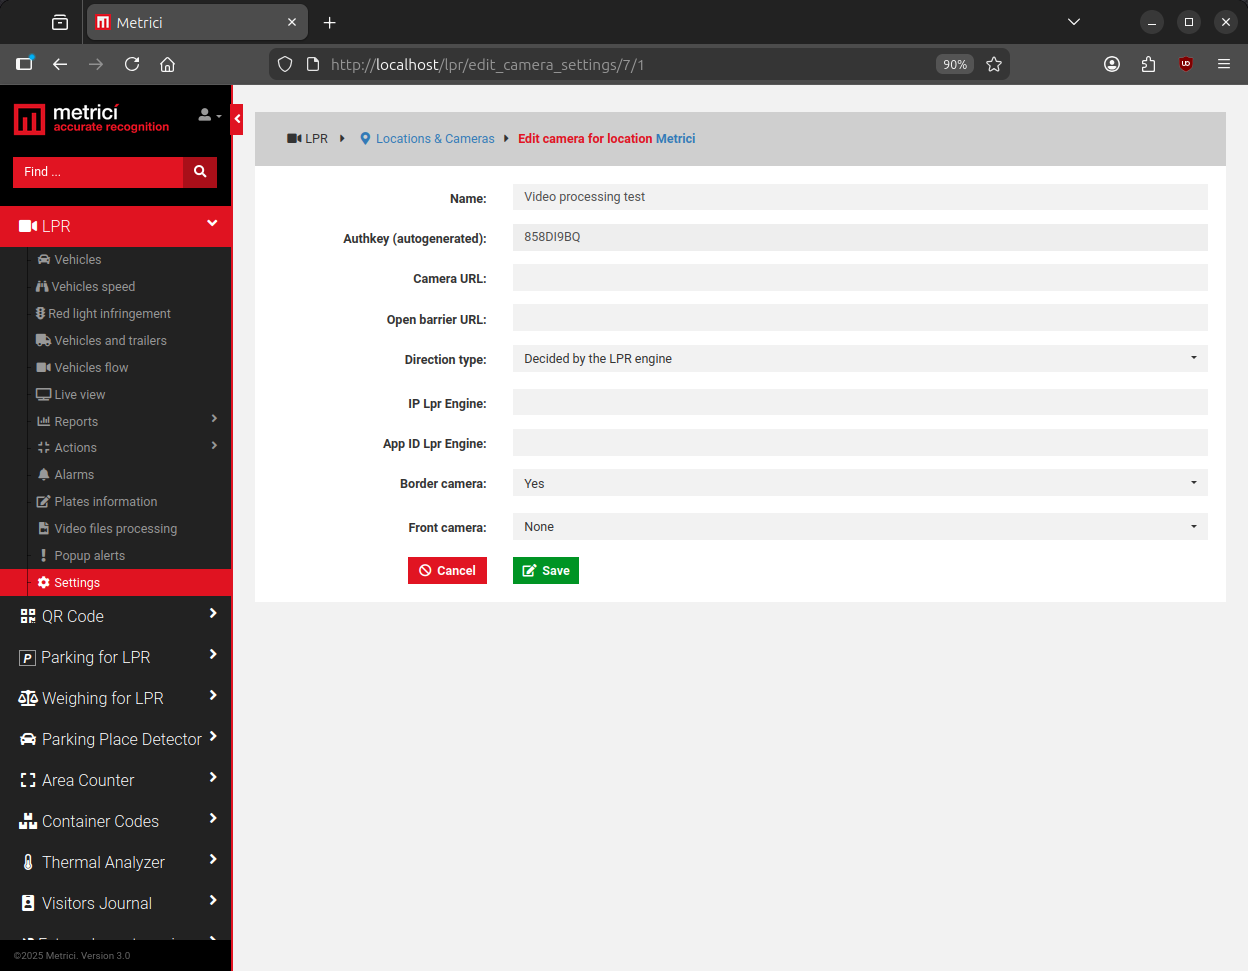
In this section, you can configure the following parameters for each camera:
Camera Name — a descriptive label to identify the camera within the system.
Auth Key — the authentication key used to establish communication between the Metrici Interface and the Control Panel.
Camera URL — the IP address of the camera that delivers the video stream.
Barrier URL — used in LPR applications to open a barrier directly from the Live View with a single click on the camera image. Enter the IP address of the LAN controller connected to the barrier associated with this camera. Each camera can command only one barrier. Note that the communication is not directly with the barrier itself, but with a LAN controller that sends the open command to the barrier.
Direction Type — this setting overrides the direction information provided by the detection engine. The available options are:
- Always Coming — every detection is treated as a vehicle entering the location.
- Always Leaving — every detection is treated as a vehicle exiting the location.
- Decided by LPR Engine — the engine determines direction automatically.
Metrici calculates the direction of movement by analyzing the differences between two successive frames. However, when detection is triggered externally (for example, by an inductive loop), the vehicle may be stationary at the moment of capture. In this case, the engine cannot determine direction on its own. By setting the direction manually to Always Coming or Always Leaving, you ensure that the system accurately calculates vehicle flow in and out of a location — for instance, correctly updating the number of available parking spaces.
Image Capture on Manual Barrier Opening: By default, when a barrier is opened manually from the Interface, the event is recorded in the database but no image is saved.
The following settings allow you to enable image capture for these events:
IP LPR Engine — the address of the server where the Control Panel is running. This can be localhost or a specific IP address (e.g., 192.168.1.1).
APP ID LPR Engine — the application ID assigned to the camera in the Control Panel. This value must be copied from the Control Panel. When a camera is added to the system, it automatically receives an ID, which is displayed in the first column on the left side of the Control Panel interface.
Border Camera — this setting has two options: Yes or No. A border camera is typically installed at the entry and exit points of a parking lot, such as at barriers or gates. Only cameras designated as border cameras are authorized to increase or decrease the count of available parking spaces. When a vehicle enters, the count decreases; when it exits, the count increases. If additional cameras are installed throughout the parking lot — for example, at strategic points to guide drivers to available spaces — these should be set as Border Camera: No, since their role is informational and they should not affect the parking space count.
Red Light Infringement, Speed & Vehicles and Trailers
Vehicles and Trailers
The Vehicles and Trailers menu displays a list of all detected vehicles and their associated trailers (if applicable). This menu is particularly useful in scenarios where both the vehicle and its trailer need to be identified and matched — such as logistics hubs, weighing stations, border checkpoints, or industrial facilities.
Each entry in the list represents a detection event that includes information about the vehicle's front plate and, when a trailer is present, the back plate as well. A filter bar at the top of the page allows you to narrow down results using any combination of the available fields.
Available Filters
| Filter | Description |
|---|---|
| Front Plate | The license plate detected on the front of the vehicle. You can search for a specific plate number or a partial match. |
| Country (Front) | The country of registration associated with the front plate, as determined by syntax analysis during detection. |
| Back Plate | The license plate detected on the back of the vehicle or on the trailer. This is useful for matching a vehicle to its trailer. |
| Country (Back) | The country of registration associated with the back plate or trailer plate. |
| Date | The date on which the detection event occurred. You can filter by a specific date or a date range. |
| Time | The time at which the detection event occurred. Use this in combination with the date filter to narrow down results to a specific time window. |
| Location | The location where the detection took place, as defined in Global Settings → Locations & Cameras. |
| Direction | The direction of movement of the vehicle — coming or leaving — as configured in the Metrici Control Panel for that camera. |
| Class | The vehicle classification type, such as car, SUV/pickup, van, bus, truck, bike, tram, or utility/heavy machinery. This requires the vehicle classification option to be enabled in the Control Panel. |
| Maker | The vehicle manufacturer (brand), as identified by the detection engine — for example, Toyota, BMW, Mercedes, etc. |
| Colour | The colour of the vehicle, as identified by the detection engine. |
| Action | Indicates whether an action has been assigned to that plate number in the database — such as opening a barrier, sending an email, or triggering an alert. |
| Info | An additional information field where custom notes can be attached to a plate number in the database — for example, the owner's name, a company, or a special remark. |
You can combine any of these filters to create precise searches. For example, you can filter all trucks from a specific country that entered a location during a particular time window, or search for a specific front plate and see whether a trailer was attached.
As with other event lists, the results can be exported as a PDF or XLS file for further analysis or record-keeping.
Red Light Infringement & Speed
When RED LIGHT INFRINGEMENT in the left column is chosen, a new filter menu appears on top of the page, where you can filter cars crossing on a red light or not. If you choose Yes, you will see only cars that did not stop on the red light of a traffic light. This option is only available in the LPR Plus module and can be activated when you have a companion camera working with the LPR one.
For this menu to work, you will need to create a detection area around the traffic light in your companion camera stream in Metrici Control Panel. Metrici will permanently monitor what colour the traffic light is and will "inform" the LPR detection engine. When a detection is made and the traffic light is red, the event will be saved in the database as a RED LIGHT INFRINGEMENT. Also, keep in mind that the LPR detection area should be positioned past the traffic light.
The Speed menu works in the same way, but when a Metrici Controller Radar is connected to the LPR engine, any LPR event will have a speed attached to it that can be filtered in the Interface the same way as red light infringement events.
Popup Alerts
Popup Alerts allow you to configure notifications for individual number plates or groups of number plates, each with a custom message. To get started, add a plate or create a group — see Fig.20 Groups (1), then enable the "Show Pop-up" option in the settings menu — see Fig.301 Popup Alerts Settings. You can also customize the alert message to suit your needs.
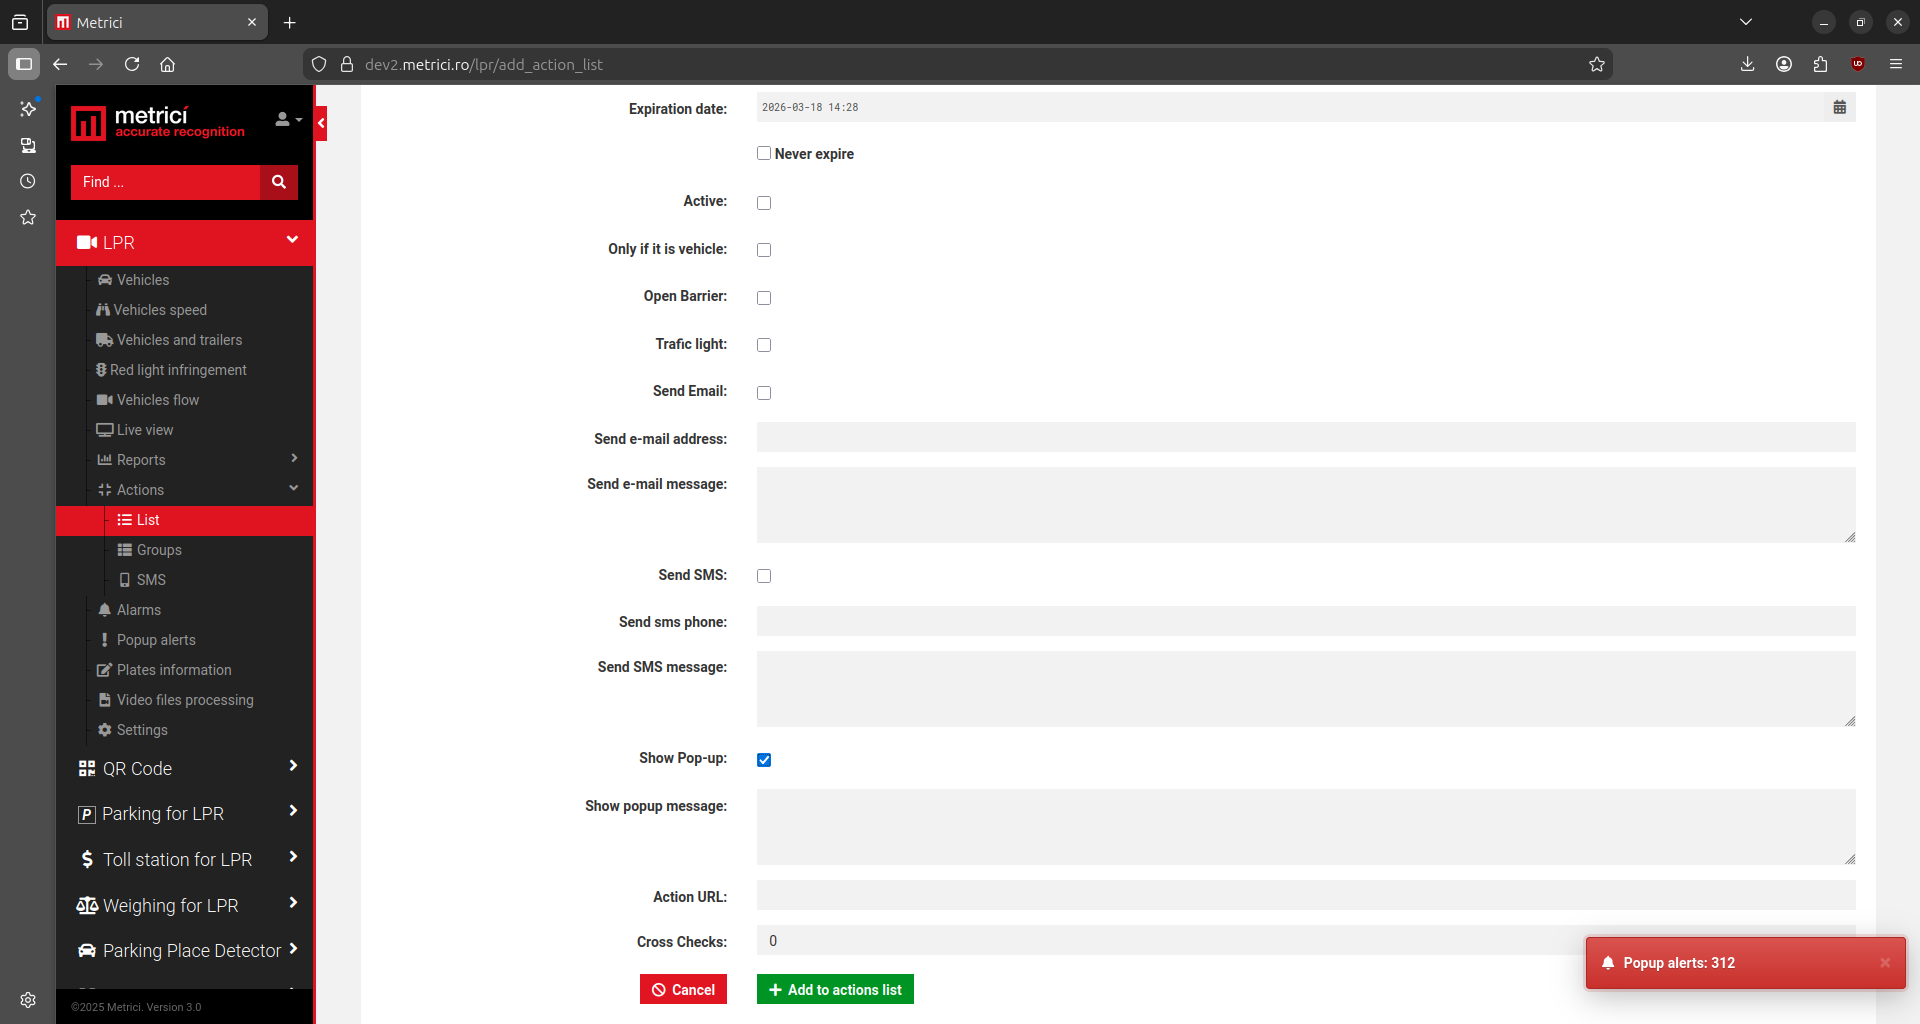
After the popup alert is set, when the alert is triggered, you will see a notification in the bottom-right corner of the screen. You can click on it and you will be redirected to the popup menu — see Fig.302 Popup Alerts Menu (1).
Click the green button to acknowledge the notification and the popup will disappear — see Fig.302 Popup Alerts Menu (2).
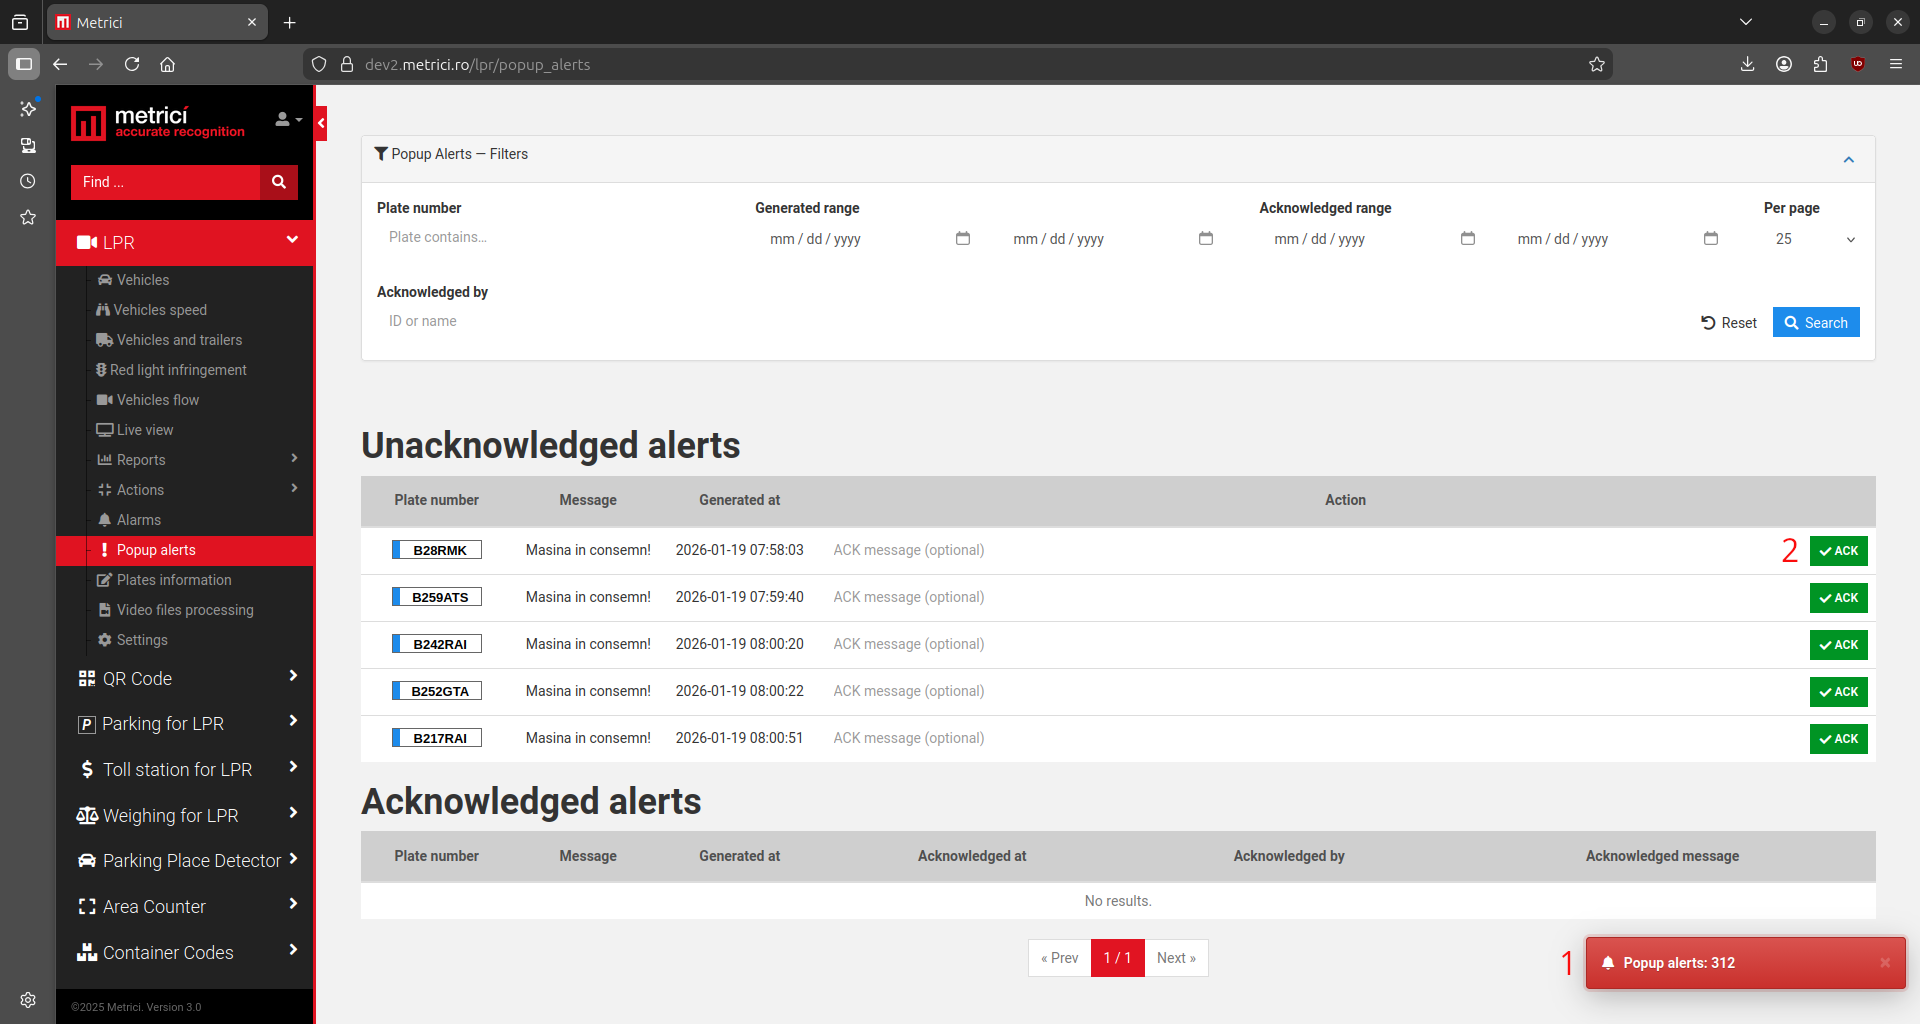
You also have the option to filter alerts by number plate, generation date range, or acknowledgement date range.